Unless you are a wood worker, this is going to REALLY bore you ---so call your hubby over, and go get a pedicure while he reads all this stuff, and that’s ONLY if he is the wood working type of guy!
I told you I’d at least post pics of the wooden table so that IN CASE someone knows someone who knows someone who likes to tinker ---you get the idea?
I couldn’t do this, nor do I know anyone who would do this, but perhaps cabinet maker types would.
Maybe someone's hubby is very into wood working --these would be the perfect thing for an etsy shop or ebay -- and if you do it, maybe in thanks for me putting this out there and helping you, you'll make me one.. :c)
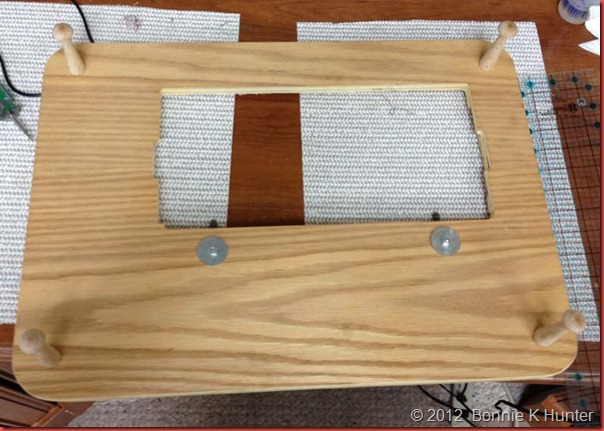
This is the TOP of my wooden extension table. There MAY Be easier ways to make these….I’m not sure… but basically the top is a piece that measures 22” X 15 3/4”. It’s 3/4” oak finished plywood, stained and varnished. If I remember right he did them in other woods too –I just like the sturdiness of oak and thought that scratches, which are bound to happen when working with pins and needles and scissors and seam rippers and other sharp stuff--wouldn't be as visible on lighter oak than say, dark cherry or mahogany.
You will notice that the hole has many layers and grooves etc--- this is what I meant by saying that if you lived close, it might be easier for you to “borrow” mine than to just give you the dimensions and have you work one up. The two hinges you see were taken from an OLD machine case ---and properly spaced so that the machine could fit them, the same way they did in the case itself ---finding these may be an issue, but probably not impossible…especially if the case comes with a really nifty machine in it – it’s kind of NICE that way! :c)
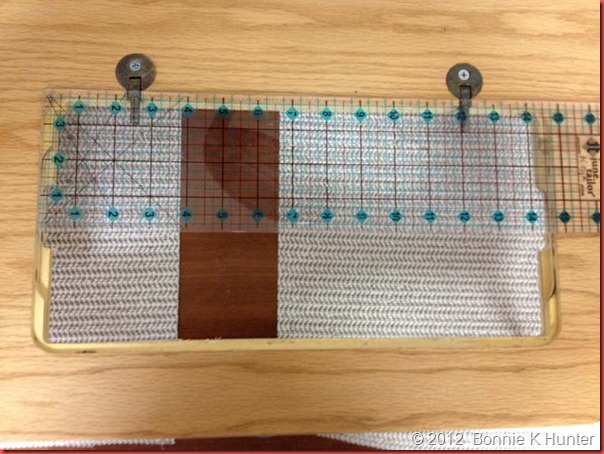
The opening itself measures 14 3/4” wide at it’s widest, not including the little lip inside….
It’s 7” from front to back. the front has a 1/4” lip – the back does not. Could this be made with a lip all the way around and get rid of the “need” for the hinges? Just a thought. As it is – I find the differences in machines to mean that sometimes this table is just a bit “too narrow” for some bases. They are not all the SAME – I guess that is why they are called “clones”. For instance, it fits my singers perfectly, and the blue wizard. It fit’s Marilyn --- but Barbie? her bottom is a bit wider, and doesn’t set down in that lip. Do I dare ask DH to dremel it out a bit farther? NO!!! Then it would be too BIG for the machines that do fit it properly. ((See, this is another touchy thing and why it is best to have some vintage machines to try it out on …))
This is a close up of the grooving going on on the right side ….different machines have different wiring and things that need spaces cut out for….
The left side with it’s grooves and notches ---
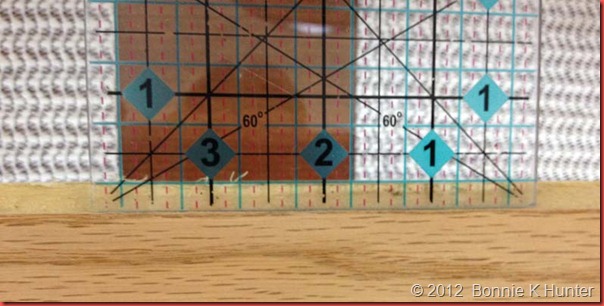
The front lip is only 1/4” deep ----((But I said, it could be more for Barbie..but she’s just going to have to let her bottom hang over – not risking changing the hole size!))
The spacing of the hinges is pretty cruicial….they are recessed circle holes, just deep enough to drop the hinge parts in so they lie flush. They have to be spaced just right so they fit the holes at the back of the machine base. ((Is this scaring you off yet?! Can you still make these, you think? I hope SOMEONE can!)) What I found is it’s 10” from the OUTSIDE of the far left hinge to the outside of the far right one…. ((technical enough for ya?!))
This is the bottom side….4 holes are drilled partway through to allow the 4 3” peg legs to fit. You can see the washer and nuts that hold the screws from the front of the hinges.
As I said, these are 3” wood pegs that should be pretty readily available. I also bought some little foam circles that stick to the bottom of these…it keeps them from shifting on the table top.
Here’s a pic of my Blue Wizard in the table…fits great! I love how this table fits so MANY of my machines….((Even if Barbie has an issue with it!)) I was piecing a small amish stringy for Tonya back in 2008!
I’ve also got a table for 3/4 size machines such as my Spartan and my Singer 99. This one has “different” measurements --- let me know if you need them and I’ll get it out and measure.


Check with somebody who repairs sewing machine for the hinges - my Mr. Singer sold me a pair for $1 when a lent machine with table came back with a couple of pieces missing.
ReplyDeleteyou can buy the hinges on ebay. i have about 3 sets myself.
DeleteMs Bonnie, you sure are accommodating! I will be speaking with my brother-in-law so see if he could do one.
ReplyDeleteI sure do love that pink Morse sitting in the tabletop!!! I have an addiction to the "clones"!
ReplyDeleteI'm not sure why you would need the hinges since you're not going to be folding the machine down into the table like a foldaway model. If those could be left off, that would simplify it quite a bit.
ReplyDeleteso you can tip the machine back to oil it.
DeleteOr probably to change the bobbin
DeleteSo, what exactly are the hinges doing on the back of the machine? Are there holes in the machine for the posts of the hinges to go into?
ReplyDeleteI have never made a sewing table, but I did make my son's bedroom furniture, a bed, desk and dresser... I could probably manage a sewing table. Are you driving to Columbus Ohio next month? If you are and you bring Barbie with you, I could take measurements and see exactly what you need, make it for you and deliver it a month later in Dayton...
Just a thought.
Paul
www.OutnumberedQuilter.com
yes, there are holes on the back of the machine for the hinge posts to go into.
DeleteThis is great! I was telling my husband a few weeks ago that he needed to make me a sewing table to sit on the kitchen table. I tried to explain what I was seeing in my head, and he just looked at me funny! LOL Now I have pictures to show him.
ReplyDeleteThank you!
I hope someone makes these. They are gorgeous. I need one for a Featherweight. And a 99.
ReplyDeletei bought mine on ebay from shepsurfs. i bought three of them.
DeleteBonnie... I sent a copy of these directions to my brother to see if he could make me something like this for my Singer 533... I bought mine in '77 and a 534 that is a very similar model at a yardsale a couple years ago. I can't tell from your pix how the electric cord plugs in...could you send me a pix of yours? Mine has a removable plug in the right side which makes me think I may not be able to have the table extend past the right side of the edge of the machine.
ReplyDeletehm
I bought a couple of those on ebay and they worked out great. When I sold my machines that I had them for, I let the tables go with them. I have risers now made by John Smith and they have drawers and work wonderful. You can find him on FB under John Smith or Embroidery Risers (I think is the name).
ReplyDeleteJan
I made one of those foam board tables to fit all three of my machines from directions I found on You Tube. I now have a 4' by 4' table to lay heavy quilts on, lay out pieces etc when I sew. The table is level with the throat plate. The foam is covered with heavy duty clear vinyl. It may not be as glamorous as an oak sewing table but it sure does work beautifully!
ReplyDeleteBtw, I just started quilting in October 2011 when I retired and so far I've made 4 queen sized bed quilts (used your Hidden Spools for the first one), 4 lapsized throws and one throw sized toddler quilt (with trucks).
I enjoy reading your Facebook and blogs. Thanks!
I have a little Spartan, my first machine. Cost $17.50 and I had to make payments on it in order to buy it. I still have it almost 48 years later.
ReplyDeleteDid you check the knobs on the Morse, I think the knobs above the zig zag visual move the needle position, not sure.
Ramona from Maine sewnsew@live.com
Thanks Bonnie. I just sent this post to hubby. He's got the tools, but, does he have the time. I have the machines that he can measure the base of. We'd already talked about him making something, but, this is better than what we'd talked about.
ReplyDeleteBonnie,
ReplyDeleteThose hinges are not absolutely necessary. I have two of these tables (one from friend's DH, one from neighbor). Neither of them has the hinges; the machine just rests on the little cut out ledge. My neighbor even put in a small drawer! One has pegs, the other has a long, narrow piece of wood for "legs". I was nervous about those pegs being prone to break, so asked neighbor for a more substantial wood piece. Love them and will be asking him if he can make me one for my full-size machine. BTW - I asked about selling them for possibly $50, but he said he couldn't make any money on them for that price. It's a lot of work. Di in TN
Thank you so much for posting the info and photos on this project. I am bookmaked it for later use. Maybe this idea would work for my new Viking Sapphire? She is a true portable but the idea is sound.
ReplyDeleteSmilies
JulieinTN
thanks! very helpful!
ReplyDeleteNice table and I love the hot pink Morse, I don't own any pretty machines like those. I do have featherweights and Singer treadles.
ReplyDeleteSharon W. in Texas
Nice table and I love the hot pink Morse, I don't own any pretty machines like those. I do have featherweights and Singer treadles.
ReplyDeleteSharon W. in Texas
Thanks for posting this Bonnie...I used to be married to a wonderful woodworker - then silly me, suggested he try 'longarming' ~ that was 12 years ago....so much for woodworking but maybe I can sweet talk him into brushing off his saw and tools :)
ReplyDeleteI enjoyed reading about your trip to the school. The children look so cute in their outfits. Also thank for showing pics of your machine bases. I think if I saw a Morse in that color, I couldn't pass it up.
ReplyDeleteIf anyone wants to discuss this with a wood worker, the 'grooves' are ground out with a router to fit the machine at whatever level the parts stick out underneath. (Yeah, I watch a lot of This Old House, and my grandpa was a master carpenter...) You need a thick enough piece of lumber for the top so you can carve out the grooves for the machine to sit on. The hinges may steady a lighter machine if you really sew fast but probably aren't strictly necessary. I'll have to discuss this with a couple of my talented brothers!
ReplyDeleteThanks for the pictures.
I have two of these made by Bonnie's original supplier. The reason I have two is that the first one was not right. So he sent me another at no charge and said he was quitting making them because machines were not universal enough and he was loosing money making the mistakes right.
ReplyDeleteXOXOXOXO Subee
I have something similar that a local gentleman made for me. It has revolutionized my sewing. LOL. I do not know how I ever sewed without it. Here's the link to my post about it:
ReplyDeletehttp://dirtroadscrapper.blogspot.com/2010/11/custom-made-sewing-table.html