>>>>

Thursday, June 30, 2005


Yesterday I got a 98 on my anatomy/physiology exam on the anterior lower extremity compartment! I tell you I was so brain fried when I got home that I wanted something easy and small to throw together. This is the result. I have a bin of solid color 'amishy' strips and pieces all in different sizes...these all started as 'something in the center' and were brought to 6.5" size by courthouse stepping with strips around the centers. I was inspired by a quilt I saw in a book called "Kinder Komforts" by Bettina Havig, a book filled with antique doll and small (some hired man size, long and skinny) amish quilts. This quilt is about 39" square.

My big question or dilemma is now....how do I get all these things that I have pieced and want to hand quilt.....hand quilted? Some things are just not meant for machine quilting, and that includes anything amish to me. In the last few months I have pieced 4 amish type tops! And I am currently hand quilting on my "best things" quilt, but it seems that other things like bindings always take up my hand work time and the quilting doesn't get done as I dream it to.

I don't know what it is, but I can sit for hours at the sewing machine piecing away, but I can't seem to make myself sit for hours on the couch hand-quilting. It is just as important, and just as productive. Why can't I do it? I piece to music, and it is soothing to me, but I can't hand quilt to music, and the TV is too attention grabbing to be really productive quilting while that is on either. I'm thinking books on tape or CD might be the way to go. I need to check out the library.

I suppose I could always just give up physical fitness all together...maybe that hour a day I spend jog/walking with the dog could be better spent on my butt on the couch hand quilting? At least I'd have something to show for the limited free hours I have a day! :c)

Posted by Hello

Monday, June 27, 2005


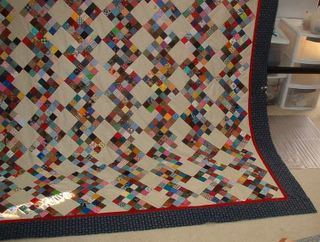
Picture from farther back, and it still doesn't fit completely in the camera view! Posted by Hello

I just realised these are all showing up in reverse order on my blog page! So I hope you don't mind reading down....Here is a shot of the borders I put on the zig-zag 9 patch. I think they give it an old fashioned feel and really frame it off nicely. Posted by Hello

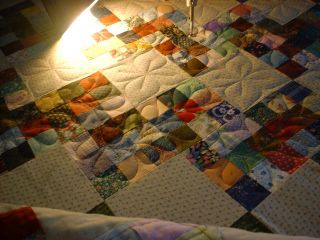
another view...kind of dark, because I have to turn the flash off to get the quilting detail to show. I love feathers!! This quilt is large, 106"X107" and will be great on my king sized bed as a coverlet. Scrappy scrappy and pretty much utilitarian, so I won't mind if the cats leave their fur all over it :c/ Posted by Hello

Quilting! Dave is out of town working in Chicago this week, so I decided to spend some time on one of my own projects. This is a detail shot of the feather and squash-blossom quilting I am doing on my zig-zag 9 patch quilt. This quilt was pieced completely as a leader-ender project. Posted by Hello

Friday, June 17, 2005


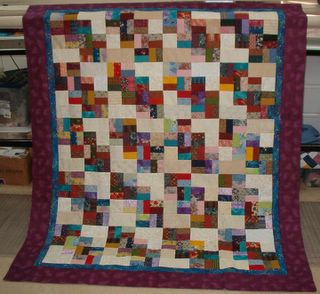
This is the top I was working on today. The alternate blocks didn't
quite do what I had originally thought, but it does give an interesting
look. Kind of looks like braided brick bowties! However, I don't think
anyone can say that three times fast, and I am all out of ideas for names!

I'll try the other variation next by changing the altnernate block.
I think it would look cool with brights and a black background
and I have a couple other ideas floating around too...

Bonnie Posted by Hello

Tuesday, June 14, 2005

More thoughts on "complimentary and interesting"

I love vintage quilts, and one of the things about vintage quilts that I love is when quilters had to be ingenious about the back of their quilts because they didn't HAVE a quilt shop to march to to find a perfectly matching, complimentary back for their quilt. I love things like 'substitution'...when they thought they wanted a green border, but the green they had only went 3/4 the way around the quilt, so they had to finish up by substituting in a second shade of green. Much more interesting!

I think muslin is also completely appropriate for a vintage looking quilt back whether it's an 1800's repro, or a 1930's repro or anything in between or after. Muslin IS the stuff that many quilts were made of, and I love how it quilts up.

I love things that just appear "wrong" at first glance sometimes because it gives me a glimpse into the quilt maker's life and that is more interesting to me. Like the back of many amish quilts...they weren't ALL solids. Lots of them had prints on the BACK, or checks..they were allowed to use these as the BACK of the quilt (in some amish communities, not all) because it wouldn't be seen, and it was an appropriate back. I think it makes the quilts more interesting. A bit unexpected.

When it boils down to it...what is "appropriate" or "interesting" or "compatible" are ALL just OPINIONS that will differ with each quilt or each beholder. What "goes" and what doesn't is strictly a matter of opinion and always will be.

If I had a limited stash, and were new to quilting maybe I'd go back-buying after construction, but if I were dealing in minis of any variety, it doesn't take much for a backing and I'd likely have something that would work already in my stash. I was thinking of bigger quilts from lap size to bed size, and I still wouldn't march out there and hit the quilt shop for a back as an after thought.I love the vintage quilts in which flour/feed sacks were used for backing, many times with the label of the flour mill or feed manufacturer still visible on the back, in plain sight for all to see. This adds interest, and this is appropriate in my eyes. Using up leftover fabrics from the front of the quilt to construct an interesting back is completely complimentary to me.

If I didn't have as large of a stash as I do, if my mind hadn't been changed over the past few years to using what I have. (thinking more like our quilting ancestors and their resources)..If this were the way I shopped, Or maybe if my quilt were strictly for "show and tell" and not going to charity or for someone I loved to use until it fell apart, I can see buying a back after the top was done with these thoughts about being complimentary and interesting in mind. I guess then it wouldn't be about what *I* thought was appropriate for a backing, but I would be focusing on what "others" would think was appropriate for a backing. And again, we are back to dealing with nothing but opinions, that will likely change from person to person.

I'd sure wish I lived closer to Mary Jo's....and Id be heading for the sale fabrics first because "complimentary" or "interesting" does not mean full retail price to me either. :c) I am always on the lookout for sales for good candidates for backing fabrics so I *DO* have some on hand to choose from and I don't think because I buy them with no particular quilt in mind that they are uninteresting or uncomplimentary. I think it's just good quilt-cents.

Sometimes I will purposely put something "wrong" in one of my quilts, because even though I am making a vintage era looking quilt, I want it to be a representation of fabrics that are in my scrap-stash too. Scrap quilts of yesteryear were made with fabrics obtained through daily living, making clothes, making bedding, and they used fabrics from their own era that they lived in to make quilts that showed which fabrics they lived with daily.

My scraps and scrap quilts are from fabrics that I use daily, even tho I'm not clothes making anymore, I'm not using scraps from making aprons, skirts, blouses, dresses.....I do have scraps from all my sewing projects and the quilts I make with the scraps that I have are like a library of fabrics that have been through my hands and my life. I love the vintage "look" but I also like the feel of using what I have on hand, just as if it were as limited a scrap bag as I would be pulling from had I lived in 1870 or 1935.

It's okay with me if someone thinks my backing fabrics are just "wrong" or don't go with the quilt, or if the fabrics in my quilt are NOT all exact 1800's reproductions, as long as it has the right feel to me, and I have found a home for the scraps that I love, because it is my opionion that gives me the most satisfaction in the completed quilt, front and back.

Like always, just opinions :c)
Bonnie

Laughable Quote!

A few weeks ago I ordered a book off amazon. It's "Small quilts with vintage charm" by Jo Morton.

I love the look of the quilts in the book, very antiquey vintage style, right up my alley. I've looked at the pics, but never stopped to "READ" the text in the book.

This statement on backings just made me guffaw out loud!

"Purchase backing fabric AFTER your quilt top is complete so you can select a fabric that complements the front of the quilt. Using fabric that you don't want anymore does a DISSERVICE to the quilt top. Remember the two pieces will be stitched together forever; therefore, they need to be compatible and interesting."

HMMMMMMM!

Of course, that's easy for her to say since she designs lines of fabrics, she isn't paying $9.00 or more a yard for beautiful fabrics for the back of her quilts!

Who says that my scrappy backings are a disservice to the quilt top? I find them completely compatible and more interesting than if I had waited until the top was pieced, went to the quilt shop, bought 8 yards of something not on sale and had it all matchy matchy!

I love to look at antique quilts and see that they used what they had on the back to make it big enough for the quilt top. To me this is VERY interesting and is a good clue into how the people lived in their lives. They didn't have quilt shops to march into to buy 6 yards of backing fabric that matched the front of their quilts.

I love scrappy backs. I do them all the time. I love the feeling I get from using something up, and the giggles that come from just using something that just DOESN'T go....to me that's the kicker..that's where the fun is. And I'm going to keep doing it!

Bonnie

Sunday, June 12, 2005


close up detail of wonky stars in the corner of the border. Posted by Hello

Here are the blocks I've had sitting around for a long time with no
desire to make more. Have you ever felt that way?

It's a half-log cabin...and the thing I didn't like about them is when
you put the blocks together there are MORE seams to match than with
regular log cabins. I gave up on matching them...and then I didn't like
it. So enough is enough!

I put them together, wonky centers and all (oh they cry out to me like
sore thumbs that the 4 squares in the center of the pinwheels are SO
off!) I added a triangle border, and since it was partly wonky anyway, I
added 4 wonky stars to the 4 corners. Posted by Hello

New Morning, new ideas...

Okay, so the person who wrote that email last night probably didn't mean me to take her message as my patterns aren't worth the paper and ink it takes to print them. I don't want anyone frustrated. That wasn't my intent when it came to redoing the website, it was to make things easier! Obviously, some people think the old way is better..so what can I do?

I remembered that some recipe sites and others have a "click here for printer friendly version" option. So this morning I went in and made ANOTHER page for every pattern page I've got and linked that on the original page that had the menu on it. It wasn't hard...just tedious. I don't know if anyone will even really use it. There are other things that probably should be done to make things more printer friendly, like reduce the font size, reduce picture size, etc..but then we are really getting into alot of work This is it for now!

Besides, I'd rather be creating something with fabric than dicking around with this website thing endlessly and still have people finding fault with this or that!!

Bonnie

Why did I bother??

I've spent all weekend updating my website....I wanted a menu on the left hand side of the page because every time I ADD a page, I would have to go to each and every page in my website and link the new page to all the previous, and all the previous to the new page. With alot of pages on a site, this can take a long time and be quite daunting.

So....I slave and slave and get things finally the way I want it. Now I only need to update the menu when I upload a new page and all will show on all the pages without updating them individually. Sounds like a good idea right?

Not to mention that I put my patterns on the internet for people to use for free....we won't even get to that part and what people take for granted where that is concerned....

I posted to my email lists that I had upgraded my website, that their bookmarks would need to be changed, etc.

I just come up to check my email before going to bed and I get THIS email:

"Since you have made the update to your site the entire pattern page will not fit on a piece of paper unless it is printed in landscape mode (otherwise not all of the directions print). Probably 1/3 of the page is now the menu selection on the lefthand side. So what use to be 6 pages is now 11 pages if one wants to print out your directions.
Is there a way to print off your patterns without getting all of the other buttons, etc on the left hand side?
I don't want to sound like a whiner - just would love to access your patterns without wasting paper and ink."

Okay...she may not WANT to sound like a whiner but COME ON....did I mention the patterns are FREE? Is it worth a few extra pages of paper for a FREE pattern? Does she really think my pattern is a complete waste of paper and ink, or did she not mean it to come across that way?

Good Grief. I think I am completely losing my faith in the selfishness of people.

*sigh*
Bonnie

Friday, June 10, 2005

Unnecessary stuff we buy....

I've been on a junk-quilting kick lately. I don't know what it is, but even more than regular scrap quilts, I love to sew string quilts and crazy type blocks from left over trimmings I couldn't bear to part with. You know those triangles you clip off when you join lengths of strips for binding on the diagonal? Yep. I even save those. I heard someone talking about this "mile a minute' quilt...I found the pattern on ebay. Ebay is great for many things, but be sure you have seen the item first hand before buying it!

I got this pattern for $6.99 plus s/h. Being that I have been a pattern designer in a previous life (I used to design for the butterick pattern co...and had my own pattern company for dolls and stuffed animals under the name "needle in a haystack") maybe I am expecting too much when it comes to what you get for $6.99....but let me tell you...this pattern had a cover..folded in half. One sheet inside...poorly written directions, no diagrams or pictures, typed on one sheet front and back...and that was IT! I'm disgusted. I learned no more from buying this pattern than I would have if I had just looked at the picture on the front, and didn't even READ the instructions. :c/

Maybe it's just one of those quilts you don't need a pattern for, and I was kind of expecting this because of my sewing experience, but I thought that there was some new trick or technique that was just going to turn on the lightbulb for me as far as using small pieces goes. Not so. the only time you use your precious small pieces is when you start the center of the block, and that doesn't use them nearly well enough for me....the rest of the time you are sewing sections on top of long pre-cut strips. I think I would rather use my long pre-cut strips in other ways than to do this pattern this way....not using the little pieces that I wanted to use. Too many of the blocks turned up with the same fabrics in them...not enough variety, etc.

I guess I'm in a huffy mood. I'll just stick with Gwen Marsten's more selective, but not as fast ideas. I just can't believe I spent money on this pattern when I could have spent it on FABRIC!!

Bonnie

Maggie made me do it!

Maggie sent her blog to my email, and before I knew it, I signed up too!

So here I am on this beautiful June afternoon, dragging my tail avoiding the quilting machine, thinking of all sorts of things I should be doing, but not making headway on much of anything! I guess this is what comes from getting up at 4am :c/ (not because I wanted to!)

I've had a website for eons now....I don't want to say 8 or 9 years because it doesn't feel that long, but still.....I wanted to share more of ME and my thoughts, and I thought adding this blog might do it. If you want to check out the website it's http://quiltville.com

I am a longarm machine quilter (10 years! egad!) and I'm also in school studying to get my license in neuromuscular and massage therapy....and I LOVE IT! I love learning...I think that having something totally unrelated to quilting has added so much to my love of quilting and my creativity drive..you know, opposition in all things and all that.

I have too many projects to list...and not enough time to quilt them all. I love hand quilting as much as I love machine quilting, I think it's that opposites thing again. However, this morning I had a whoooops moment...I started quilting on my "the best things in life are quilted" quilt....(Will find out how to upload a pic here) and when I sprayed water to remove the marks from the inner red border....things turned PINK! egad. I've got synthropol.....I can get some retain....I know I know, I should have been a pre-washer in a previous life, but I really detest pre washing fabrics! So I'll muddle through and hope that I can remove the bleed later. No more marks will be removed until I can wash the thing. Do they still make dye magnets??

I guess I'll learn more how this thing works and play with it more later. Right now there is a customer's quilt waiting in the machine that needs feathers in the outside border and fans in the center of the quilt....and I need a dose of something to get me motivated!!

Bonnie

Just Me and My PT :c) Posted by Hello

This is my "The Best Things in Life are Quilted!!" Quilt....inspired by my friend Tonya who taught me to do freehand machine pieced letters, and Gwen Marsten and her liberated techniques....it's that little red outer border that is bleeding pink into the white! AUUGH! Posted by Hello

Wednesday, June 01, 2005

Scrap User's System!


Scrap User's System!
(Click here for printer friendly version)


TOO FUNNY!! A friend in California sent this pic!
This is truly a "Sign of the Times" :c)


*Update, Dec 29, 2011*
This original post was written long before blogland existed, and I've moved it over here where things are easier to find on the blog.

Paralyzed By The Stash?

Paralyzed By The Stash?!
(Click Here For Printer Friendly Version)


To buy or not to buy, and if I do, how much?

I've been asked this question A LOT ...."If I'm just stashing, what sizes of cuts are most useable?" And the other reasoning I hear is "It was such a great price, I couldn't let this sale pass me by, but I wasn't sure how much to get......"

After 25+ years of fabric collecting and quilting, I've been pretty much "no buy" for well over 2 years now! (With the exception of the plaid shirts fetish I acquired for the thrift shops!) I have SO much fabric still that I only buy when I ABSOLUTELY need something to finish a project.

Shopping the stash is the best idea. I always go there first, but sometimes you need something else. (I haven't been shirt shopping in about 8 months...I've even banned myself from THAT!) I decided that I didn't care how good the deal was, that the fabric could "live" at the store until I absolutely had to go buy it for an "immediately needed now" crisis. This has worked for me.

It helped just knowing that if I needed backing, binding, borders, sashings, background, and even some 'go-withs' that I could go to the store and get it if I absolutely could NOT find anything in my stash that would work. This is an utmost show of FAITH! *LOL* How many of us buy 12 pairs of tennis shoes, just because they are on sale, at a great price, and we want enough to stock up? We might not like those outdated shoes in 5 to 10 years...do we still want them hanging around our closets?

It was hard turning down those sale prices. The first few months of NO BUYING was excruciating. I felt like I needed a 12 step program! I had to remove myself from email notifications from online stores that were exclaiming things like "NEW SALE BINS!" "FREE SHIPPING" And what about those 40% off coupons? AUUUGH! I live within 2 hours drive from the infamous Mary Jo's in Gastonia NC. It's a fabric Mecca, but I dare not go! And if I do need to go, I know the fabric, or at least some fabric that will work.....will be there (and most likely be on sale) and it can just LIVE THERE until I need it!

In the mean time, I now spend the time that I would spend shopping, actually quilting and working on my projects. I still feel like I've barely made a dent in my stash. That is when I really realized how over whelming this stash really is! It took a long time to get over the jitters I'd get when driving past the quilt shop and not pulling into the parking lot...but it got easier. I don't miss it now.

When I was buying...if there was a fabric I liked but didn't know what I wanted it for, and the price was good, I'd buy a yard easy. 2 yards if I wanted it for a border....5 to 6 yds if I thought I might use it for a back, but really if you don't KNOW what project it is going in, how much do you know to buy? I suppose we could rationalize and think that eventually we might need EVERYTHING for a back and buy 6 to 8 yards of everything because it is a good price and we might need it some day and we don't ever want to run short because we might not find that fabric ever again. *LOL* This is how I got into the situation I'm in!

I didn't ever really become a fat quarter shopper either, because I always thought those were not going to be ENOUGH of any one fabric to do what I needed. That's where the "buy at least a yard" thing came in.

If you want to indulge, look at the projects you have going on and see if there is anything you need to complete them. I don't plan for too many "in the future some day I want to make" projects any more because my mind will change a dozen times (if not more) by then. I only buy for the "here and now" and things I am going to make immediately! That way you get the shopping fix, and the completion fix all in the same dose! And the things you use here and now have scraps that work into the scrap stash bins for later, which is good too. Sometimes running out of something and forcing yourself to make a substitution from your stash, alter your lay out a bit can break you out of the "gotta make it just like the one in the book" syndrome and you'll really be suprized at your own results, and the new interest it gives to the quilt.

If your stash is whittled down to the point where you are lacking in any certain color you can concentrate on that color. Maybe you've used quite a bit of your blues and there isn't as much of a working variety there. One thing I would do is round stuff out in a general way if I needed to. Backgrounds are something that I need to not let diminish too much because then there is nothing to work with to help use up the other fabrics that I've already got.

I guess I have had to let the fear of the world running out of fabric leave me. I felt like I was Chicken Little, but instead of "The sky is falling! The sky is falling!" it was more...."if they stop making this I'll never have enough to make the quilts I want, and once it's gone it's gone, so I must hoard hoard hoard" and it got to the point where my stash had paralyzed me. You know what? Quilting is a multi-billion dollar enterprise....the fabric is NOT all of a sudden going to stop being printed and dry up! I have faith in the fabric manufacturers that they will keep printing fabrics...maybe different fabrics...so yes it's important to have what you need to finish projects you've started...but you can't buy ahead for every project you ever want to make in your life.

How many of us feel like we have stocked our quilting rooms and closets like people stocked their bomb shelters in the 50's?? Just in case we have to live in there for the next 40 years, we better have enough fabric to quilt for that long..*giggle*

So, this probably doesn't answer your questions on how much to buy of what! But no matter what you buy, it's either going to be not enough, too much, or it won't match what you need it to! (I'd still go for 1 to 2 yard cuts if the price was really good and it was something I was needing for borders...3 yards if I was going to need it for sashing and binding...)And repeat after me: "It can LIVE at the store until I really need it to finish a project I already know about!"

Bonnie

P.S. The opinions stated are soley those of the author, and do not reflect the opinions of all quilters!

Folding that Fabric!

I recieved an email from Ewalda asking: "Do you have anywhere on your web site how you folded your fabric? It's awesome!"

What I do....is take the fabric...and fold it selvege to selvege..the way it comes off the bolt at the store. Bring the folded edge to the two raw edges so it is in half again, and do it once more so the length of fabric is only about 6" wide.

Measure the depth of your shelf and subtract an inch or two. This is the measurement that you are going to use to fold your fabric into "mini bolts". With my cabinets, I fold my fabric over at the 15" measurement. I just lay a yardstick on the table, find where 15" is, measuring that from the left end of the folded fabric piece towards the center of the length. Begin to fold over and over and over at that measurement until the fabric is in one small bundle.

It doesn't matter how many yards are in the piece. The fabric "mini bolts" will end up being the same depth and width on your shelf, even if longer pieces of yardage are thicker. You can still see by looking at the stacked fabric, just exactly what you have on your shelf. All raw edges go towards the back of the shelf so all you are looking at is neatly folded fabric! It is really easy to pull ONE stack out, get the fabric you want out of the stack, and slide the stack back in place. Try it!

I do this for pieces 1/2 yard and up. Anything smaller gets folded in with the FQ's in my drawers.

On Point Quilts!


Putting it "On-Point"!!

(Click here for printer-friendly version)


Figuring the math for diagonal quilt settings!


Here is the math formula for finding out the sizes of triangles you will need for a quilt that is
set "block to block" WITHOUT sashings:

Corner Triangles
Take the finished block size and divide by 1.414
Note: Round up to the nearest dimension on the ruler.
Add 7/8" to that number

Cut two squares the size determined above.
Cut each square in half diagonally for the four corner triangles.

Example #1:
Finished block size = 12"
12 / 1.414 = 8.486 (Round to 8.5 = 8-1/2")
8-1/2" + 7/8" = 9-3/8" squares to cut for Corner Triangles

Example#2:

Finished block size = 6"
6 / 1.414 = 4.243 (Round to 4.25 = 4-1/4")
4-1/4" + 7/8" = 5-1/8" squares to cut for Corner Triangles

Side Triangles
Take the finished block size and multiply by 1.414
Note: Round up to the nearest dimension on the ruler.
Add 1-1/4" to that number for the correct size to cut squares for side triangles.

Cut this square in half diagonally twice with an X to produce four Side Triangles.
Cut one square for every four side trinagles needed for the quilt setting.

Example#3:
Finished block size = 12"
12 x 1.414 = 16.96 (Round to 17 = 17")
17" + 1-1/4" = 18-1/4" squares to cut for Side Triangles
Example#4:
Finished block size = 6"
6 x 1.414 = 8.48 (Round to 8.5 = 8-1/2")
8-1/2" + 1-1/4" = 9-3/4" squares to cut for Side Triangles
Common Sizes for Setting Triangles
Finished Block Size
Side Triangles
Corner Triangles
3"
5-1/2"
3"
3-1/2" 6-1/4" 3-5/8"
4"
7"
3-3/4"
4-1/2" 7- 5/8" 4-1/8"
5"
8-3/8"
4-1/2"
5-1/2" 9-1/8" 4-7/8"
6"
9-3/4"
5-1/8"
6-1/2" 10-1/2" 5-1/2"
7"
11-1/4"
5-5/8"
7-1/2" 12" 6-1/4"
8"
12-5/8"
6-5/8"
8-1/2" 13-3/8" 6-7/8"
9"
14"
7-1/4"
9-1/2" 14-3/4" 7-5/8"
10"
15-1/2"
8"
10-1/2" 16-1/8" 8-3/8"
11" 16-7/8" 8-3/4"
11-1/2" 17-1/2" 9-1/8"
12"
18-1/4"
9-3/8"
12-1/2" 19" 9-3/4"
13" 19-3/4" 10-1/8"
13-1/2" 20-3/8" 10-1/2"
14"
21-1/8"
10-7/8"
14-1/2" 21-3/4" 11-1/8"
15"
22-1/2"
11-3/8"
15-1/2" 23-1/4" 11-7/8"
16"
16-1/2"
17"
23-7/8"
24 1/2"
25 3/4"
12-1/4"
12-1/2"
13"
*Note* I like to round my numbers up a bit when cutting the squares for side triangles. For instance, if your closest fraction is 1/8", I personally would round it up to the 1/4". If the closest fraction is 3/8", then I would round it up to the 1/2". The blocks will float inside the top a bit when pieced with bigger triangles, but I trim it down after the top is together.

Lay out the triangles and corners with your blocks. Begin sewing the quilt into rows starting at one corner. Your first row will have one corner block, two large setting "wing" triangles, and the corner triangle. Your second row will have three blocks, two wing triangles...etc. Each row will get larger as you get to the center of the quilt. I like two assemble the quilt rows together as I go until there are two halves of the top.....and then sew the two halves together in one long seam.


After the top is together, use your ruler and rotory cutter to trim the edge of the quilt 1/4" away from the corners of the blocks at the quilt top edge. This gets rid of all the dog ears from sewing the rows together too.


What if my quilt has SASHINGS?! What sizes do I cut?


The side and corner triangles need to be cut using the same calculations above, only we now add the sashing measurement to the block measurement as one unit. The sashing is considered to be part of the block when calculating the side and corner triangles. Say you have an 8" finished block size, but you are setting the quilt with 2" finished sashing. You would figure that you need setting triangles for a 10" finished block size (8" block + 2" sashing) to set your quilt.


Yardage for Mitered Borders Chart!

Standard Bed Sizes!

How Many Squares in a Fat Quarter?

Did you ever wonder how many squares of various sizes you can get from a Fat Quarter? ((18" X 22")) Use the handy chart below as a guide!

How many squares from
one fat quarter??
(18"X22")

2"
99
2.5" 56
3" 42
3.5" 30
4" 20
4.5" 16
5" 12
5.5" 12
6" 9
6.5" 6

How Many Squares in a Yard?!

Cutting Quarter Square Triangles!

Quarter Square Triangles!


Lots of blocks use quarter-square triangles because we need the straight of the grain on the LONG edge of the triangle. Half-square triangles have the bias edge on the long side, but these are a bit different.

What is the formula to keep in mind for when you need to figure out what size of squares to cut with an X to get the 4 quarter square triangles? Take your finished size of the unit.

If the finished size is 4". Add 1-1/4" to that measurement.

In this case that size is 5 1/4"!! Cut the squares, and then cut the squares again from corner to corner in both directions with an X. This puts the straight of grain on the longest edge of the triangle. In the future, just remember that you add the 1-1/4" to the FINISHED SIZE of the unit!


Leaders & Enders! The Why's and How's!

Leaders and Enders!
(Click Here for Printer-Friendly Version)

Adventures in Chain Piecing :c)


Adventures With Leaders & Enders is was released in Feb 2010! It's chock full of fun scrap quilts that you can stitch in between the lines of sewing other projects!
Click HERE to order!

If you wish to SEND a check instead of an electronic payment, you will find a printable order form HERE!

Below is a preview of what leaders & enders are and how I work with them, and you can see a few of the book projects in stages.
The book contains 12 large project quilts, and lots of information on working with scraps that you won't want to miss!

I love continuous chain piecing. I think it is one of the methods that really saves a ton of time and a ton of thread ends.....

I learned a long time ago to use a folded scrap to sew on and off of at the beginning/ending of a line of chain piecing...you would get to the end of your chaining, and sew onto this scrap, leaving it under the needle of the machine, and snip the threads between it and your piecing behind the presser foot. This always leaves SOMETHING under the foot so you dont start the next line of piecing with long threads that get tangled and get sucked down the needle hole pulling your fabric pieces with it, or worse, have to trim all those, trying to get them in the trash, but finding them ending up more on the floor, and clogging the wheels of your wheelie chair at your sewing machine as you roll over them or around the vacuum beater bar!

When you get to the end of the next chain of piecing, you put another fabric scrap though the machine and trim behind it...then you would go up to the top of the piecing you just trimmed off, removing the fabric scrap (sometimes called a 'thread bunny' by those who use this method) and have it ready for ending the next line of piecing.) I typically had two thread bunnies going at any given time, one would be under the foot as the 'leader' to start the piecing with, the next one would be the 'ender' as I ended. The 'ender' becomes the new 'leader' as you start the next line of piecing.

I would continue to use the same scraps to sew on and off of until they were clogged with thread, then that would STILL end up in the trash...and I would start with new ones until they were too full of thread to use anymore.

Then a lightbulb went off. I took a bin of scrap 2" squares that had been accumulating from trimming scraps down, and started using those as leaders/enders instead of a wadded up thread covered scrap. I would sew a light square to a dark square, trim off behind it.....and eventually have a stack of these little "two squares" that I would also use as leader/enders to sew into 4 patches....

The first pic shows trimming the other chain piecing I was working on BEHIND the two leader/ender squares that I just fed through the machine..I am using little spring thread snips that I keep at my machine for reaching behind and snipping. It's easier than trying to get back there with big 8" sewing scissors. The second pic shows two pairs of 'leader/enders' being sewn into a 4 patch at the ending of a line of chain piecing:


The 4 patches finished at 3", and I paired them up with 3" finished 1/2 square triangles making
this block unit:


I made THIS quilt with them:


Finished and bound!

Click here to see Wendy's Layout of the same block!

I was so enthralled with how this quilt grew while I was working on OTHER projects at the same time that I quickly had to come up with another! So I started sewing 9 patches the same way, using red and neutral squares as leaders/enders. I ended up with THIS quilt:


Click here for a close up of quilting detail!

My third leader/ender project went quickly too..I made a scrappy double irish chain with the leader/enders... It's shown here as one block, and as the blocks are being laid out. The blocks are made with 4 four patches from light/dark scraps (the 4 corners of the block), and 4 connectors
that are made with a dark scrap sewn to a 2" square of the background that is the same fabric as the alternate blocks (the background fabric square is at the center of the 4 sides) and one plain center square for the center of the block. I do the alternate blocks as leaders/enders too...the
2"X 5"rectangles for the sides of the block have 2"scrap squares sewn onto the ends of them before they are sewn to the large 5"X 8"alternate rectangle..all while sewing other projects, and using these just to start and end a line of piecing.


Here are a few of the blocks as they were coming together:


And the full quilt! There are 66 checkerboard blocks and 66 alternate blocks
for a total of 132 blocks set 11X12!


Finished and bound!
Click here for a close up of quilting detail.

My fourth leader/ender project was a zig-zag 9 patch. I made the 9 patches from leader/enders with more scrap 2" squares. These 9 patches are completely random, each 9 patch has 9 different fabrics in it. This really wasn't a chain piecing project...I suppose it could be if I wanted to sew 3
panels of 3 strips each, sub cut
them, rearrange, sew back together...but that isn't the point. This project, a pair of 2" squares at a time, then a third added, then 3 rows of 3 sewn together as leader/enders while I work on other things.....grew all on it's OWN!

When I have 10 completed 9 patches, I pin them together with a safety pin. Easier for me to count that way..just count the pins...


Time to start putting this leader/ender project TOGETHER!

Here is the center together before borders!

With borders!


Finished and bound!
Click here for close up of quilting detail!

I quickly had to come up with what to do NOW in the leader/ender department since the 9 patches were all done....I still have an overflowing bin of 2" scrap squares sitting by the machine. I remembered an antique strippy quilt I had seen....and the light bulb was firing off again. This is
what I have going, just since counting the 9 patches, seeing I had enough, and switching gears into the next leader ender project.

These strippy panels may go with alternating plain panels that I can do some fancy quilting in, or maybe I will use them as the 'bars' between some other piecing, like stars on point....something will come to me! What I am doing is piccing dark/light/dark/light/dark (5 squares) into a chain, and then piecing two solid red triangles onto the end of each row. This will put the pieced bar on the diagonal....all steps can be done as leader/enders, even adding the next finished 5 square bar with two triangles unto the strippy unit that will grow quickly on it's own as I work on other things! I need 7 panels to finish the quilt, and look....I'm nearly done with the 7th one! Time to think about what leader/ender project I want to do next :c)
Close up pic of leader/ender strippy panels


This is the finished quilt! The binding is on, but still has to be turned to the back and handstitched down!

Close up of quilting while on machine and on fence!

So, now that you know what leaders/enders are....can you see yourself doing something with them?The pieces don't have to be 2" squares..they can be ANY size...they can be rectangles for a rail fence, they can be 1/2 square triangles...just ANYTHING that you can use to start and end a line of piecing.

And they dont even HAVE to be scrappy. They can be planned. Think of the next project you WANT to do even though you are already piecing on something else. Are there units in that 'next' quilt that you can cut pieces for, and use those for leaders/enders as you work on your current project? You can have that 'next quilt' nearly half pieced by the time you finish your current top! And that is the exciting part. You just have to think ahead and have something cut and sitting at the side of your machine for you to use and you will be amazed how fast units stack up :c)

Any other questions on why I do this? :c)