
The Incredible Scrappy Bargello!
(Get ready to make a BIG dent in the scrap stash!)

Click HERE for Printer-Friendly PDF.
Though known by many names, quilts made with a simple one size square are timeless: One Patch, Trip Around The World, Sunshine and Shadow, Boston Commons, Postage Stamp, even 9 patch, 4 patch, 16 patch etc. The fascination for quilters remains the same.
The colors may change, the light/dark values may change, but a quilt made with one simple square will always stand as a testimony to the true essence of quilting....to make something with so much beauty from such odd leftovers - all from one little square!
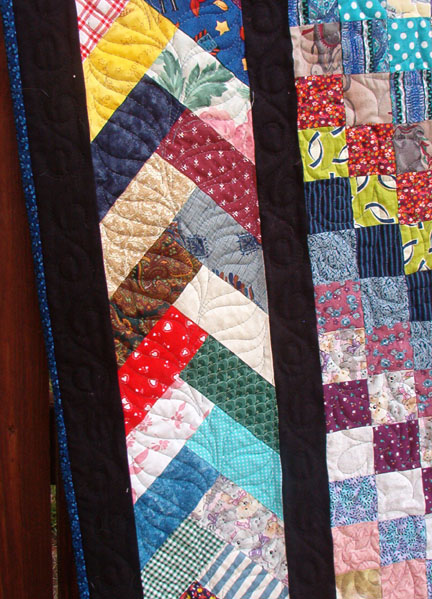
Quilted and bound! Close up of really weird fabrics and border quilting detail!
I am ALWAYS looking for quick, fun patterns that use up lots of odds and ends. I think I will go through life trying to use up all these abundant odds and ends, never making a dent in the big pieces I have collected! There must be something true in the saying that scraps never totally go away, they have a tendency to multiply while you sleep!
This quilt is a good one for using up EVERYTHING...even really ugly stuff. And since fabrics are placed randomly...it is almost magic how everything just looks GOOD together, no matter how yuck you think that old print is, or that weird colored solid, etc.
Lap Sized Quilt:

The quilt center will measure 48X64 without borders.
Quilted and bound! Close up of really weird fabrics and border quilting detail!
I am ALWAYS looking for quick, fun patterns that use up lots of odds and ends. I think I will go through life trying to use up all these abundant odds and ends, never making a dent in the big pieces I have collected! There must be something true in the saying that scraps never totally go away, they have a tendency to multiply while you sleep!
This quilt is a good one for using up EVERYTHING...even really ugly stuff. And since fabrics are placed randomly...it is almost magic how everything just looks GOOD together, no matter how yuck you think that old print is, or that weird colored solid, etc.
Lap Sized Quilt:
The quilt center will measure 48X64 without borders.
For this quilt you will need 128 2-1/2"X16" strips. You can get several strips out of a Fat Quarter...or you can dig through your scraps and cut what you have got into useable sized pieces. This is what I did, because I was using up *odd ball* stuff.


For the first panel....stitch 32 strips together randomly as shown into one long length. Try as best as you can to keep the edges even on at least ONE edge of the panel. There may be some fabric "scooting" but that's okay. I find it helpful to at least always match the CENTER of each strip to keep the panel straight.

Now comes the fun part...take the bottom of the panel, and sew it to the top of the panel with right sides together, so you are forming a *Tube*. If you have ever sewn a strip pieced trip around the world quilt, this will sound familiar to you. If not, TRUST ME!!
Carefully CAREFULLY fold your tube so it is straight and flat....align the edges as best as you can, and trim off the edge so it is straight. Cut the panel-tube into SIX 2-1/2" Sections.
***NOTE*** If you find your tube is too unwieldy for you to fold straight, don't sew the last seam that turns the panel into a tube. Leave that one undone for now. Grasp the panel between the 16th and 17th strips, holding it by the seam and letting the ends fall. Shake it out...this will help align your panel.
Fold it carefully and cut into SIX 2-1/2" sections as above. Set one of the strips aside to use as your first "uphill" or "downhill" strip, and then take the other 5 strips and sew the last square to the first square with right sides together so you are forming loops as if you HAD cut them all from a tube. I find this helpful the longer my panels are. It helps keep my squares straighter.


Now comes the fun part!!! Take one of the strips of squares that you just cut....and choose a square you would like to be the top left hand corner of your panel.
Carefully undo the seam between that square and the one above it opening the strip into one long length. This first panel is an UPHILL panel meaning you will move the second square down up into the top position with the next strip. and unpick the seam so the OLD top square becomes the next bottom square, etc. (Is this confusing? Does this pic help??)
Repeat this procedure for all 6 strips in the panel and stitch them together, carefully matching seams...press well.
For the DOWNHILL panels you will do the reverse, moving the top square in the first strip down in the next strip, so it is in the position of the second square, and what WAS the bottom square on the first strip, now becomes the top square on the second strip.
The lap quilt has 4 Panels - 2 uphill, 2 downhill.
Complete all 4 panels and stitch together. Press and add borders. Quilt and bind as desired!
And don't forget a label for posterity!
I added 4" borders to the lap quilt above.
If you are really ambitious and want to make the large quilt you will need over 360 2 1/2" X 16" strips! Make your panels 46 strips long for a 92" length. My large quilt has 6 panels with 6 rows (3 uphill 3 downhill) and two side panels with 4 rows....for a total of 88" wide.

September 2005: The week that Hurricane Katrina hit. I am making quilts for refugees like crazy. I just feel the need to do something MORE than just click a button on the computer to send money. I have a bin of 3" scrap strips, and with a bit of math and figuring have revamped the Scrappy Bargello to work with these larger strips.

This quilt finishes at 72'' X 82''. This is perfect since the Red Cross is asking for twin size.
September 2005: The week that Hurricane Katrina hit. I am making quilts for refugees like crazy. I just feel the need to do something MORE than just click a button on the computer to send money. I have a bin of 3" scrap strips, and with a bit of math and figuring have revamped the Scrappy Bargello to work with these larger strips.
This quilt finishes at 72'' X 82''. This is perfect since the Red Cross is asking for twin size.
For this quilt I used 112 strips cut 3" X 20". Each panel is made from 28 strips. The panels measure 15" X 70". 4 panels make a quilt center that is 60'' X 70''. I added a 2" cut inner black border, and a 5" cut outer purple border to finish the top.
The construction is exactly the same as for the quilt made with the 2.5 strips above!
January 2008: Super Bowl Bargello! My yahoogroups list had a bargello-sew-a-thon on Superbowl Sunday! I was able to complete this top in one day.

Here it is, hot off the presses! The first quilt quilted in my new home in Winston Salem NC! I used plaids, stripes, and prints all from recycled 100% cotton clothing!
What a fun project. The binding is on, and I am in the process of hand sewing it down. Here is a close up of the quilting!

I made 6 panels 40 strips long. (A total of 240 strips) It gave me a quilt center that measures 72"X80" before borders.


Here are a couple smaller ones! Baby Bargello was made for my friend Jill and her newborn son Justin! To make the baby quilt size, Make your panels from 20 strips...each with 5 stairsteps instead of 6. The quilt will be 40''X40'' before borders.
While in Lancaster PA I picked up a bunch of Amish Solids. I wanted to use them ALL in a small wall quilt, and I played around with the scrappy bargello to come up with this quilt!
While in Lancaster PA I picked up a bunch of Amish Solids. I wanted to use them ALL in a small wall quilt, and I played around with the scrappy bargello to come up with this quilt!
I used 1 1/2" strips with 30 strips in each panel. 5 stair steps to each panel! I want to hand quilt this one but for now it is just hanging on my design wall because I like looking at it so much!


Gracias me encantan,,,para mi y para regalar,,saludos desde Argentina...
ReplyDeleteThese are awesome quilts I love all the little squares. Can I do these with squares rather than strips. I cut out squares of different sizes to make in to quilts.
ReplyDeleteFinally managed to put my pineapple block quilt together, great sewing it with 2 1/2" strips, makes great squares. But now stuck on how to quilt it under my home sewing machine, have no idea! Help!!!
ReplyDeletetwemyss@orcon.net.nz
I love the scrappy bargello! I made my first in a baby quilt size and was pleased at the way all the scraps came together with what is a "new" method of piecing for me. Awesome fun. I'm cutting strips to make two or three more of them! Great scrap buster!
ReplyDeleteThank you for the tutorial!
Cindy
I save all 2 1/2 scraps all year. Then I take them and machine on winter stay away from home. Sewed over 350 strips together this year. Have made this at least 6 times, all sizes. Really fun to work on
ReplyDeleteI use goof off to remove sticky labels, you can find it at the hardware store.
ReplyDelete