
Different looks, different block sizes and settings!
(Click here for printer-friendly version)


A Special thanks to Marsha R for sharing her pictures of her "Scrap Boxes" quilt!
These are her pictures you see below. We both belong to the Stashbusters email list on yahoogroups.com
and have both made similar quilts in the past couple weeks. Hers is a big one, one of mine is a tiny one! We are collaborating together on these directions for you! (Thanks Marsha!)
and have both made similar quilts in the past couple weeks. Hers is a big one, one of mine is a tiny one! We are collaborating together on these directions for you! (Thanks Marsha!)
I am addicted to string quilts just as much as other scrap quilts. I love their whimsical appearance, riot of color and the freedom from having to match match match! Do you have a bin of over flowing small strips and strings? This page will show you a couple of different methods for turning your humble strips and strings into a beautiful quilt!
Let's Begin!

This is my bin of strings! :c) What a mess! But so much potential!
Into this bin I toss odd shaped pieces from squaring up backings, tapered ends from trimming up yardage when rotary cutting, anything that I don't feel like cutting down into uniform strips, and anything less than 1.5". This is the END of my fabric food chain! The last stop on the road to being "useable". But strings, as humble as they are...can be beautiful and so fun and rewarding to work with!
If you don't have a collection of strips and strings you've been saving, you can cut random strips of varying widths from 1" to about 2" wide from your scraps for this project. It is great too if not all the strips are straight...angle them a bit. It adds alot of interest to the quilt!
In addition to your strips and strings, you will need fabric foundation squares for this project:

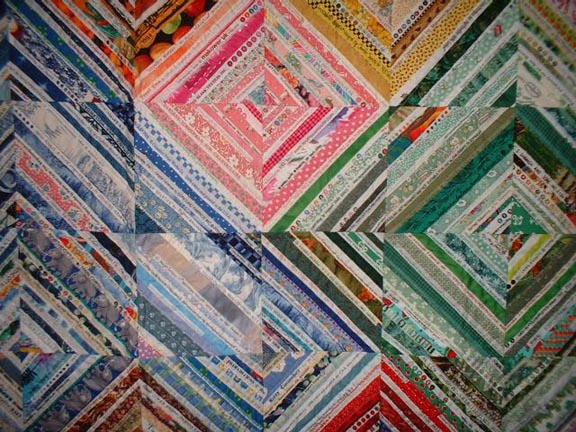
You can use ANY size square that you would like. Marsha used 11" squares for her base. The white that you see forming the diamond 'sashing' in this quilt is actually a center strip down the diagonal of the square that is left 'uncovered'! You can use any color of foundation square you would like. You might choose a black if you are working with all brights, or red if you are working with all blue strings. Think of your fabric foundation squares as being your 'accent color'. It gives your eyes a place to rest in between all the busy scrappy strips!


Using your ruler and a pencil, lay the one inch line corner to corner on the diagonal of the square. Draw a light line. This is a 'placement' line, not a sewing line, so it will be covered up in the next step. Flip the block around and do the same thing. You can use your previous line by putting the 2" mark on it, and drawing the second line 1" from the center on the other side of the block.


Take your first strip of fabric, and align the right edge of the strip up against the first pencil mark. Sew 1/4" from the edge of the strip as shown.


Flip and press your strip out towards the block corner. Place another strip on top of the first with right sides together and stitch, flip, press! Continue adding strips until you finish one side of the square, and then repeat for the remaining side. It helps to put a piece a couple of inches wide at the very corner or you will "lose" it in the seam allowance later!


Looks a little jagged, doesn't it? That's okay! Next we trim!


Press the whole block well and trim it to 10.5" square! One block quarter complete!


Two block quarters make a block half, two halves make one big 20" block!
Marsha's quilt uses 48 block quarters sewn into 12 big blocks set 3X4 for a quilt center that measures 60"X80". With borders, her quilt measures approx 80"X102".
My Quilts!

I made this lap sized string quilt for a children's charity! My quarter blocks finish at 8", and I used paper foundations, covering the whole foundation square, without leaving the accent strip uncovered as Marsha did above! A slightly different look! You can use fabric foundations for this one too, but I prefer to remove the papers after trimming to eliminate the bulk of leaving fabric in. To make my quilt the size it needed to be, I have a row of 1/2 blocks at the bottom of the quilt center.
This is my friend, Kabnet Wax Paper!

See how beat up the box is?! I get this at Sam's Club or Costco. This is the kind of deli paper that you would find lining the food baskets at your local deli, the size is about 10X10 and is great for foundation piecing. It tears off very easily when it is time to remove the paper. Other paper I like to use....OLD PHONE BOOKS! The pages aren't as large, but the paper also comes off easily when it is time to remove it. For this project I do like to use paper foundations because my strings are not all straight cut strips of fabric. Some have torn edges, some have slightly curvy edges...and having a foundation means I am going to have a square of "manufactured fabric" from my strings that will lie flat.


lay your first string/strip down the center of the block on the diagonal. Take your second strip, and place it on top of the first strip with rights sides together.When piecing through paper, you want to use a larger needle (like a denim needle, size 14 or 16) and set your stitch length smaller. This makes the paper very easy to remove after trimming the block. Stitch this strip with an approximate 1/4" seam. Because some of my strips have uneven or torn edges, I am more concerned with "enough" of the fabric being caught in the seam, and the seam being straight, than I am with the exactness of that 1/4".


Press the second strip open away from the first, and continue adding strips to either side of that center strip in the same way, filling up the block. I like to go beyond the edges of the paper so that I definately have enough when squaring up the block. You don't want to run short and not have enough to catch in the seams when you join the blocks together.


Trim blocks up to 8.5" square. Remove papers at this point. Stitch blocks together in rows, and stitch rows together to form quilt center.
My lap quilt above used 20 8" finished blocks for a quilt center that measures 32" X 45". With borders it measured approximately 45" X57", a good child's size!
Midterm-Mayhem!

Mid-term Mayhem!
I came home from taking mid terms with a desire to sew something, but not having energy for anything big. I didn't want to have to think too hard on anything! I decided little string blocks would be just the thing!
I had been trimming and cutting scraps down into useable sizes and strips, and there was this little pile of leftovers that weren't long enough to be strings, weren't big enough to be strips or squares, and I couldn't chuck them out. Still, I'm talking SMALLER than 6" long and some really narrow stuff here. So....I cut some 4" foundation papers from the deli papers I use for string piecing, and I started piecing these little string blocks with them. They are so cute and finish at only 3.5".
I remembered a pic of an antique quilt that I had seen that had used a comon fabric down the center of the block so, I cut 1" strips of the pink accent fabric, and just laid it across the diagonal as my first strip. I sewed random width strips on either side of the pink one to fill up the corners of the blocks. The strips aren't centered exactly as in Marsha's quilt above. I wasn't in the mood to have to think that hard with midterms nagging at me. So here is another option for you if you want to try an accent strip and like the wonky look.
I machine quilted it, placing a plume in every square, following the direction of the pink X's formed by placing that pink strip down the center of each block. I used a variagated rayon thread called "horizon". Perfect name I thought, since the end of school is on the horizon!

Close up of feather plumes in blocks, and 'peacock feathers' in the outer border.
Want to REALLY save everything to turn into a fabulous string quilt? Check out this stringy delight by
Donita Baritz!

Many friends in many places all over the world contributed fabric selvedges for this quilt. There about 1000 selvedges. Close up pic. Thanks to Jeri H for providing pictures of this fabulous quilt!
How about some "Antique Eye-Candy!"
I love antique/vintage string quilts and this is where I get my inspiration! Most of the time these quilts were worn out and used up with living, but there are still some great ones out there. Here are some pics to inspire you. Can you imagine having to resort to nothing but a scrap bag of the smallest pieces to quilt with? Many of these quilts had such humble beginnings when whole yardage was scarce.

This fun old quilt has the string blocks set in a zig zag setting! Another fun one I want to try!
What if we added sashings??!

These blocks are made as the ones above, but are separated by wide sashings and large cornerstones that make it seem as if you are viewing the quilt through window panes!

This one uses a narrower light colored sashing, and no cornerstones around 4-block units.
See how fun it is when strips angle and are tapered instead of all straight?

Ooooooh green! That will keep you awake at night!
These blocks are placed so the center strip makes an 'X' where the 4 quarter blocks are joined...but notice that some of the blocks on one edge are 1/2 blocks...and some of them don't make the X at all!

More of "THAT" green, and this time a cheddary orange-gold!
This piecer must have had very small pieces to work with! Her blocks are made of 16 small string squares!
One that I made in Amish Solids:

I remembered a pic of an antique quilt that I had seen that had used a comon fabric down the center of the block so, I cut 1" strips of the pink accent fabric, and just laid it across the diagonal as my first strip. I sewed random width strips on either side of the pink one to fill up the corners of the blocks. The strips aren't centered exactly as in Marsha's quilt above. I wasn't in the mood to have to think that hard with midterms nagging at me. So here is another option for you if you want to try an accent strip and like the wonky look.
Little blocks in progress:

The corners of the blocks are actually the triangles I trimmed off from joining lengths of 2.5" binding strips on the diagonal! Just can't bear to toss anything "useable" away!
The corners of the blocks are actually the triangles I trimmed off from joining lengths of 2.5" binding strips on the diagonal! Just can't bear to toss anything "useable" away!
I machine quilted it, placing a plume in every square, following the direction of the pink X's formed by placing that pink strip down the center of each block. I used a variagated rayon thread called "horizon". Perfect name I thought, since the end of school is on the horizon!
Close up of feather plumes in blocks, and 'peacock feathers' in the outer border.
Want to REALLY save everything to turn into a fabulous string quilt? Check out this stringy delight by
Donita Baritz!
Many friends in many places all over the world contributed fabric selvedges for this quilt. There about 1000 selvedges. Close up pic. Thanks to Jeri H for providing pictures of this fabulous quilt!
How about some "Antique Eye-Candy!"
I love antique/vintage string quilts and this is where I get my inspiration! Most of the time these quilts were worn out and used up with living, but there are still some great ones out there. Here are some pics to inspire you. Can you imagine having to resort to nothing but a scrap bag of the smallest pieces to quilt with? Many of these quilts had such humble beginnings when whole yardage was scarce.
This fun old quilt has the string blocks set in a zig zag setting! Another fun one I want to try!
What if we added sashings??!
These blocks are made as the ones above, but are separated by wide sashings and large cornerstones that make it seem as if you are viewing the quilt through window panes!
This one uses a narrower light colored sashing, and no cornerstones around 4-block units.
See how fun it is when strips angle and are tapered instead of all straight?
Ooooooh green! That will keep you awake at night!
These blocks are placed so the center strip makes an 'X' where the 4 quarter blocks are joined...but notice that some of the blocks on one edge are 1/2 blocks...and some of them don't make the X at all!
More of "THAT" green, and this time a cheddary orange-gold!
This piecer must have had very small pieces to work with! Her blocks are made of 16 small string squares!
One that I made in Amish Solids:
So there ya have it! I hope this inspires you to try some string quilting of your own!


I am in the process of making a scrap quilt. When I get the top finished,could it be tacked (tied) or hand quilted. If so, please tell me how to go about it. Thanking you in advance
ReplyDeleteDoris Coker, Yukon, OK
Email address: Slapndoris@cox.net
I'm wondering the same thing. Since I used lightweight fabric for the foundation backing, it is already pretty firmly put together. I'm thinking to tie it might work.
DeleteThanks for the tutorial and the antique quilt inspirations! I like the zig zag one too,
ReplyDeleteThanks so much, Bonnie - with your website, I have finally found what I've been looking for for years - info, wonderful ideas and perfect help/instructions about scrap quilts! You've made someone very happy!!
ReplyDeleteNow I know what to do with all my left over scraps.
ReplyDeleteI have been quilting only about two years and my third scrap string quilt is in progress. While working on them, I consider them charity quilts but when finished, they are so beautiful, it is hard to give them away. On my first one, I used high quality muslin background and did quilt as you go. I love it. My second was done on 10 inch paper background squares from MSQC. I love it and I am in the process of free motion quilting it. I am using the paper again for the third one. I make a lot of the squares when I need thread therapy but don't feel like thinking too much. Thanks Bonnie for all your tireless effort.
ReplyDeleteCarol Livengood