
The blocks are 6" finished, all the 1/2 square triangles finish at a tiny glittering 1.5".

Not for the faint of heart, this quilt contains 2,124 half-square triangle units!
Not including the solid borders, this quilt contains 5,884 pieces!

Did the desire to make this quilt ever strike you? Did the 'inset' squares scare you off? With this two block method, you can avoid inset seams and construct this quilt more easily than you thought possible.
The main unit for this quilt is a 1/2 square triangle square that finishes at 1.5" when it is sewn into the block. There are many ways that you can construct your 1.5" finished 1/2 square triangle square...from template cutting, to rotary cutting, to the use of foundation papers like "Thangles" or the use of special rulers like The Wondercut Ruler or the Easy Angle ruler by Ez International. Both of these rulers create 1/2 square triangles by cutting from strips without having to use the "add 7/8" to the finished size" usual rotary cutting instructions.
I use both rulers equally for different projects.
This quilt also used "bonus" 1/2 square triangle squares that I collected over time from doing the "place a square on top of another square or rectangle, and sew across the diagonal" dog-eared seams method, as described on my Star Struck Quilt page.
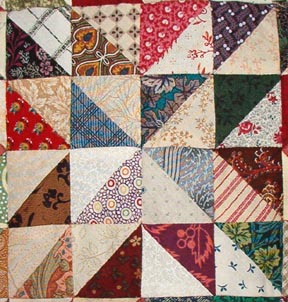
If you are "regular" rotary cutting, these blocks are made completely from 2 3/8" cut triangles. My quilt is made from scraps divided simply into light/dark of every color. These diagrams are in 3 colors only to help you envision the block construction. Click on the links for each block to view the same blocks from my quilt.


Ocean waves block 1A : make 35 Ocean waves block 1B: make 36

What was really intriguing about this pattern is that it is a 'positive/negative' design graphically. Above you will see block 1A and 1B. Do you see how they are made from 4 quarter blocks...each with the darks all facing the same direction in each quarter, and those quarters pinwheel around the center? Do you also see that block 1A and block 1B are opposite from each other? It is important to see how the lights/darks fall in each block, and that each row "pinwheels" around in the proper direction. If one row contains block 1A, the next row will contain block 1B.
My quilt is queen size. It is 11 blocks X 13 blocks. Half of the blocks are blocks 1A and 1B. The other half are Block 2 (shown below)
Along with the full blocks as shown above, the outside of the quilt center is made from half blocks that complete the pattern. The half blocks for block 1 are like this:

half block 1A: make 14 half block 1B: make 12

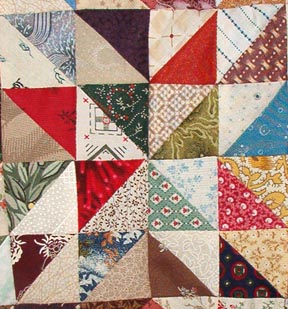
ocean waves block 2
Make 72
For this block you will need to piece 'wing' triangles onto your pieced 1/2 square triangle squares to make the corners that surround the center square. These wing triangles are also cut from 2 3/8" squares, cut once from corner to corner diagonally. If you use the Easy Angle ruler for cutting your wing triangles, they are easily cut from 2" scrap strips, so you don't have to do the 3/8" measurement thing. I really like this ruler for cutting the wing triangles. It has the seam allowance added already, and one of the corners is already nipped as you cut, so there are less dog ears to deal with. Give it a try!
The center square is rotary cut at 4 3/4". Cut 72 of these center squares.
You will also notice with this block that there is a positive/negative thing going on with the corners. 2 of the corners have 3 darks around a light, and the other two corners have 3 lights around a dark. This block can be rotated to go which way you need it to in the rows to keep the positive/negative thing going.
You will need to also make 1/2 blocks of block 2. Again the positive/negative thing will change depending on which row you are working on. On one row, the dark wings will be sewn to the right corner, and the light wings sewn to the left corner. In the next row, it may be opposite, so watch your design wall carefully as you lay these out. Here are your half blocks for block 2:


ocean waves half-block 2a: make 10 ocean waves half block 2b: make 12
With these 1/2 blocks the large triangle needs to have the straight of grain to the outside long edge of the block. For the large triangles, cut 6 squares 7.25" square. Cut the squares twice from corner to corner with an X to get 4 large triangles from each square. You need 22 triangles for the quilt, this will give you 24 so you have 2 extra 'just in case'.
Corner quarter blocks:


Make 2 quarter blocks with DARK wings around a light triangle and
2 quarter blocks with light wings around a dark triangle.
For the large triangles for the corners, the straight grain needs to be on the outside edges of the triangles. Cut 2 squares 3 7/8" square. Cut from corner to corner diagonally once to give you 4 large corner triangles.
Now the fun part comes....laying out the blocks and assembling them into the quilt top. I worked my quilt in rows, making enough of blocks 1 and 2 for each row, and starting and ending each row with the half block that it needed for that row. I then sewed the blocks into the row, and then added that row to the previous row. I always checked when sewing the next row, that the pinwheels in the center of the pinwheel blocks were turning the way I wanted them to. Lay them out as you go, and be sure they are. If you find you made the block spinning the wrong way, set it aside for the next row that spins that way...I can't tell you the number of times that I did that!
Do you see how the block 1 A's fit with the block 2 corners turned the way they are? This is correct.
This is NOT:
You would need to rotate the center block so that the light wings are in the upper left corner for this row and work with the block 1 Bs.

This pic shows my top in progress...at the far left of the pic is the half row that is the TOP of the quilt. after the top row 1/2 row, there are 6 rows of blocks attached. See if you can find out where the block 1's and 2's are.
Can you see the difference in how block 1a spins from 1b? Find the center of each pinwheel block....it will help you.

Here it is getting bigger yet! This time I have the row of half blocks at the far right of the picture...see the large triangles on the edge?


Close up of blocks and borders:

I finished off the quilt by floating it with a 1.5" (2" cut) inner border, and then a border of more triangles sewn into pinwheels. A 6" cut outer border frames the whole thing and gives the eyes a place to rest.

Quilting in progress! I am using a Hobbs wool batting inside this quilt. I love how it shows the quilting detail so well!

Better view of the quilting in the borders. Bet you can't guess that I love feathers! :c)
Wanna see the 'flip side'?? I cut into my stash of black and grey fabrics that I'd had hanging around since who knows when! I pieced the back from 10.5" squares and LOVE the look, and it sure cleared out those fabrics, leaving me room to buy more :c)

How LONG do you think I've had these fabrics hanging around?


Dear Bonnie, In the past you have posted pictures of people that have finished quilts from your patterns. I have been curious to SEE if anyone has done your Ocean Waves? I used your pattern & finished mine last August. It remains unquilted right now, but it's up next to get done! I can't wait for you to see it.
ReplyDeleteSam
Love you quilting of this one.
ReplyDeleteNot for the faint of heart, but I am going to do this one.
ReplyDeleteThanks Bonnie
Judi
I love this! I'm in the process of making one similar to this, but my blocks are 12". I don't have much of a pattern and am not sure how many 1/2 blocks I need to finish it.
ReplyDeleteI like your idea of 10" blocks on the back. I think I'll use that on one of my upcoming quilts.
Your quilting is beautiful!
QUILT IS ON MY BUCKET LIST!!!
ReplyDeleteThanks for simplifying it for me.