

“I am a brand new quilter!” She said!
“This is my first ever workshop!” She said!
“I hope this isn’t hard, because it looks hard, and I’m very nervous!” She said!
“Trust me!” I said in reply.
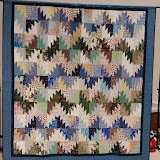
This is the easiest quilt EVER and a great way to bust those large hunks and chunks – those unloved layer cakes and languishing fat quarters!
And if students come with their squares already cut, we get down to the nitty-gritty of matching pairs of squares with right sides together, slicing them into giant half square triangles, trimming and squaring and away we go!
And here’s even a better hint for you:
This quilt is assembled in rows. And until you know which row and which orientation your block is going to end up in….DO NOT PRESS ANY BLOCKS until rows are assembled! Leave them ALL UNPRESSED!

Then once in rows, you can press the seams in row 1 all the way to the right, the seams in row 2 all the way to the left, the seems in row 3 all the way to the right, etc. See this photo?
The seams will nest with each other all the way across and down the quilt! Hooray for easy!

Baby quilt top! DONE!
How’s that for our brand new quilter in her first ever workshop? She is scared NO MORE! Of course, we were all cheering madly!
Another VERY VERY cool thing learned in class from a student:

Meet Liz!
Liz is a POWER sewer, and she came prepared to make this quilt either queen or king size ---busting those scraps in a rainbow of colors.

Liz’s blocks partway through class on her portable design floor!

By the end of class she had this and more!
I asked her about her wonderful thing…she said she used a mailing tube, or upholstery tube,home dec fabric, and fusible fleece to make this. Basically make it any size you want, but I believe this is 2 yards long.
Iron the fleece to the back side of the heavier home dec fabric. Liz used a zig zag stitch to attach binding all the way around it. Then simply hot glue one end of the design floor around the card board tube.
At the end of the day she simply left her blocks in place, rolled the whole thing up and took it home! When she gets home she can simply unroll it and her blocks will still be in place.
You can also hang it on a wall by putting hooks in the ends of the tube. Isn’t this awesome? Thanks Liz!
There are a ton of photos of our wonderful sewing day.
You will find the pattern for Scrappy Mountain Majesties under the Free Patterns tab at the top of the blog.

Click the image below if you are unable to view the slide show on your mobile device. You’ll be taken to the photo album for viewing!
 |
| Scrappy Mountain Majesties, Tulsa OK 2015 |
I’m heading home this afternoon!
But there are a couple of hours left to relax before I’m being picked up – guess who will be sewing more H blocks in her room?
Yep. That would be me!
See you soon, North Carolina!
I’m looking forward to Quilt-Cam tomorrow -- Monday evening – so write it down, plan for it – we haven’t had it for a while and I only have a few days before heading out to Maine – so we better DO IT!
Monday, March 23 at 9pm EST! I’ll see you there.


Love the quilts being made in this class, but I think I need a design board like the one shown here. Great idea.
ReplyDeleteThank you Liz and Bonnie!
ReplyDeleteNow I know what to do with that roll of 1980's drapery fabric that I have not been able to part with - even though I know I will never use it LOL! What a wonderful idea and it will fit perfectly in my tiny sewing room!
Yay! Quilt Cam tomorrow! DH going on a trip in the morning. I will have Quilt Cam to keep me company! Thanks Bonnie..
ReplyDeleteBrilliant idea! I have a long length of a furnishing weight camouflage fabric I have been wondering what to do with, now I know. I have been cutting squares to make Scrappy Mountain Majesties some day but have promised myself I will finish my UFO's before starting it!
ReplyDeleteEverything is beautiful and cool. I love the idea of the design floor. I want to make one. She could make these and sell them at shows! Thanks for all you and do and all you show. I just want to come and spend a week with you at your mountain home and fill my brain with all of your knowledge.
ReplyDeleteI made a Block Roll similar to her Design Floor roll. It kept my Blocks flat from my 1st Sampler quilt. Safe Travels HOME to Quiltville! I'll be watching tomorrow, it will be before Dancing With the Stars and The Voice starts. I finally watched "Somewhere in Time" while stitching on Worlwide Quilting Day.
ReplyDeleteWe made those rolls as a project at retreat a few years ago - a pool noodle works well - just make a pocket at the top, slide it in and roll up. Ours had ribbon ties, as well!
ReplyDeleteFantastic design roll idea! Fun as always!
ReplyDeleteAlways something new and wonderful to learn. That design floor roll sounds like just the thing - thanks for sharing.
ReplyDeleteOH Bonnie Hunter.
ReplyDeleteI can't wait, I am so excited. LIVE QUILTCAM HOORAY...............
I am in England, So I will be setting my alarm for 4 a/m.
This will be my first live quiltcam.
I only found you on 28th February as I had trimmings from 30 metres of batiks that I had put through my fabric cutter and it seemed a shame to bin all that fabric. So I typed in things to make with strips and fabric strings. Well 180 1/4 blocks of spider web quilt and 75 whole 3 1/2 inch string blocks later I am addicted to string quilting.
Can't wait for quiltcam. I will be emailing you a pic of my work. Lots of love. Ann Barrett. Norfolk, England.
Thanks for showing the portable design floor mat. I have a quilting day with friends in May. I am going to make this before I go. This is terrific. Looks like you had a great trip once again.
ReplyDeleteOh Bonnie, please add the pressing tip to the Scrappy Mountain Majesties directions in the free pattern list. I made one for my brother-in-law in December (undergoing treatment for leukemia) and that pressing hint would have been so helpful. He loves the quilt, by the way, and shows it off to everyone he sees.
ReplyDeleteI am a new quilt also, and she did a great job! So, I will try this, going to the quilt shop today. Thanks
ReplyDeleteAlso thanks for the travel design board. It will travel in my home mostly, have a small sewing area.
My parents gave me a green New Home just like this one for my 16th birthday. It was heaven to have my own sewing machine.
ReplyDeleteThanks for the fond memory.