

Lola! This is NOT where I need you to be right now!
The truth of the matter is – sometimes I make choices that make more work for myself. But once I am both feet in and have made some “not going back” decisions – all that I can do is continue to move forward.
Even if it is just baby steps. Even if it means back tracking and re-stitching where things have come undone.

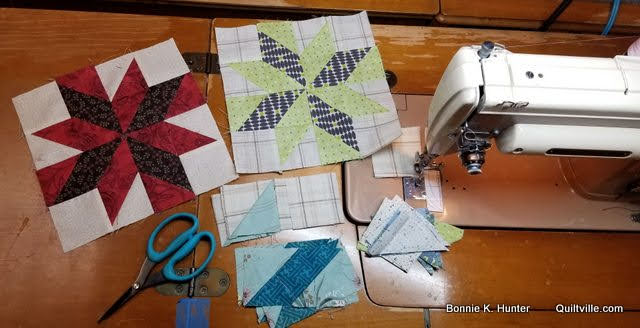
Pardon the lightness here!
There was a lot of light coming in from the QPO windows. add the overhead LED lights to the mix and perhaps a camera lens that could be a bit cleaner and my photo looks washed out.
My issue? Those danged SUPER SKINNY sashings (they finish at 1/2’’) popping open while working with the quilt.
I have pieced my sashings – there are neutral rectangles on the end of each green strip, and the easiest way to piece those was to do it in panels with neutral on each end of the green and sub cut -
But those sub cuts leave those little seams vulnerable, and even though I sewed with a smaller stitch, there are just not that many stitches across a super narrow strip to hold those together through the webbing process.
As the quilt top grew, it got fairly heavy with row joined to row by chaining threads…and the truth is, those chaining threads are the ONLY saving grace in this thing. Those seams don’t pop because of the chaining threads – but the other places where cross-cutting happened? SIGH.
So while the whole top is “Webbed”, I am cutting across the chaining threads leaving one sashing row and one block row in a section, fixing the sashing seams (with back tacking!) before sewing the sashing row to the block row – and once I have gotten that far – attaching the block/sashing section to the “mother ship.”
It took me most of yesterday afternoon just to get THIS far.
It’s a job.
Now what would my recommendation be for someone who pieces this next time? Stick with the small stitches, of course, but perhaps web in smaller sections, back-tacking everywhere you can. Which is a strange thing for me to recommend because I am usually not a back-tacker unless I am putting on borders.
The other way could be to individually construct the sashings without making panels and subcutting. That way everything could be back-tacked during the construction period.
I don’t think that would have taken any longer than how I’m having to do it now – resew sections that have come apart, or are separating due to there being “not that many stitches” holding pieces together.
Skinny 1/2’’ sashings? Beware!
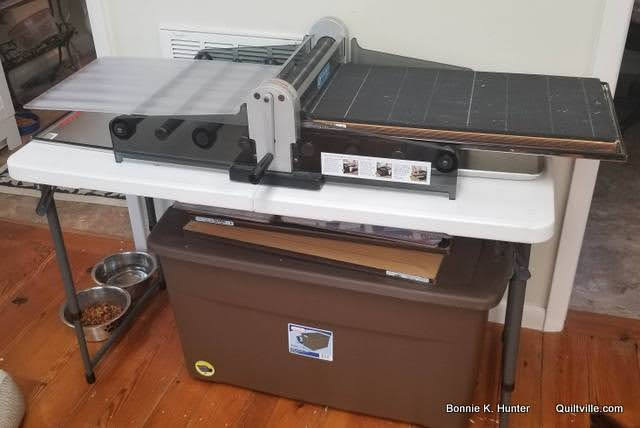
The Accuquilt Studio has a new home at the QPO.
(See?? Hazy photo? Sigh.)
And no, nothing is up close to that air return vent – It’s a wall that really can’t have anything against it, but there is enough air space with the folding table and the batting bin not too close to the wall to make this work. Otherwise that wall is wasted space.
I am looking for a great way to store Studio dies – hit me up and let me know how you store yours, you Accuquilt Studio users! Right now they are just stacked on top of the batting scrap bin.
I’m trying to find time to just cut out blocks in sets of 4 for sewing when I have a few minutes here and there – but really – I want that Blossom Time quilt done so my main focus has shifted for now.

And this completion brings us to 38 blocks on the design wall!
Less than 20 left to go! One an evening maybe? Sometimes two. It will get there.
I’m going to need some more string blocks soon!
Life has of course become fairly routine for all of us I think. When the most exciting things in a week are getting a new HVAC unit, or having the propane truck show up to top off the tanks and consider that a good day – well, yes – it’s a different life than it was, isn’t it?
Yesterday a delivery from Target showed up with basic things I needed that I didn’t want to run to town for. Did you know that Target has free delivery on orders over $35.00? And their shipping is FAST!
Today the to-do list includes meeting up with the gutter guy to get gutters installed around Quiltville Inn. BOY HOWDY! It’s an exciting life! LOL!
How is your Friday shaping up so far?

Quiltville Quote of the Day -
Millennium pyramids quilt made during the Y2K craze with 2000 fabrics exchanged with online friends when the internet was new and fun. Smart phones did not exist, with the only social media being email lists and chat rooms. Good times! Simpler times.
Free pattern from the free patterns tab at the top of the blog.
It’s FRIDAY! Have a good one, folks!


I love how the tulip quilt is coming together!
ReplyDeleteGood Morning. Two comments this morning. One, I store my dies in file folder racks and two, how about shelves above the wall vent?? Is that doable? Have an awesome weekend.
ReplyDeleteGreat idea! My file cabinet has legal-size folders! In the lowest drawer would be best for balance of the cabinet.
DeleteI was thinking the same thing about shelves over the cutter station. I have my smaller dies upright in a bookshelf, but the strip dies are too long for the shelves, so I have them upright on top of the fabric storage wardrobes. Since they are 6 feet high, I don't smack my head against them.
DeleteCB from BC, That is a good idea also but I meant the racks that hold the folders like on top of a desk or shelf. They are made of wire, or heavier metal. Whatever you do make sure those pricey items are well protected!! :)
DeleteGutters are good! Enjoy your day.
ReplyDeleteSo here's my solution to seams coming undone. I do backstitch at the beginning of a row. I also keep sewing until the fabric has cleared the pressure foot. I then cut that thread, but not close to the seam. If you look at the thread you will realize that it twists and sort of makes it so the seam does not unravel. I have also sewn with a 1.8" stitch length for years. Yes it's trick to use the ripper when you have done that but that also helps keep seams together better.
ReplyDeleteBut those 1/2" sashings look so great! Do you think adding a 1/4 " would make much difference - to looks and managebility? And, ah oh. What are Zoey and Ivy up to. Turn your back for just a second. hahaha Yay. Made it through another week.
ReplyDeleteHappy Friday Bonnie. I went to Lowe’s and got The metal racks that hold pans and pots. They work great to hold my studio does on a shelf. I can send you a picture if you like.
ReplyDelete"The Great Pause" is my name for this pandemic time... just sounds better, & more deliberate & positive. No AQ Studio dies but tons of Accuquilt ones...make labels for spines (including finished block size(s) they'll contribute to) & store like books on a bookshelf by type - HST,QST,square,rectangle, animal, flower... alphabetize these & start w/ smallest size HST, QST, square...when shelving. Colored stickers clue me in as to what size finished block they'll be a part of, & some have more than 1 colored sticker, ie- 6" & 12". Totally confused? Hope this helps.
ReplyDeleteOur AC froze up yesterday. The service guy is coming back this morning because it had to thaw out before he could determine if it was frozen only or a part was broken. Hot 82 degrees and I pieced Log Cabins until I couldn't anymore. Wanted to label two quilts but no way they were going on my lap last night. We will see what today brings.
ReplyDeleteWe had 102* weather yesterday in Austin and just as high today and tomorrow.....Summer in Texas! lol
DeleteI learned to sew in seventh grade and the teacher was adamant that all seams be backtacked. Seventy-two years later, I still backtack all seams. I can only imagine the frustration of having to re-sew so many seams. The quilt is beautiful and will be well worth all your time and effort once done.
ReplyDeleteBeing of a certain age - older than you😊—I think this period allows us to enjoy and appreciate the events of every day life which is a good thing. Instead of that always so busy, most had gotten caught up in the past.
ReplyDeleteMy exciting day - we’re harvesting honey this week. Yesterday my husband accidentally dumped all of the frames of honeycomb out of a super. What a mess! Still managed to salvage the honey, so all was good.
ReplyDeleteI love the wall mounted Accuquilt die storage, and they offer two for studio dies. Another way to use the wasted wall, and another advantage of being tall.
ReplyDeleteMy Friday is a celebration of an eight week redo of my house being completed! New living room (floor, outside wall, ceiling and walls), without taking apart the whole house, new roof, new siding and new gutters and down spouts! Now I will be able to spend more time in my she shed-studio since I won't have to be on hand for the contractor! Yeah!!!!
ReplyDeleteCatherine in SW Indiana
A little dab of glue?
ReplyDeleteThose small sashing strips are a pain - but it looks AMAZING!!!
ReplyDeleteI so look forward to your daily posts, Bonnie. Life is rather humdrum right now, but it gives us time to reflect on what really matters and what is extraneous fluff. Keep going on Blossom Time. I'll be buying that book for that pattern!
ReplyDeleteHave you seen a pull down closet caddy? You can have things on a high shelf, in a bin that swings down to be reachable. Pretty cool!
ReplyDeleteSaw one of those when we were kitchen hunting - all the cupboards here at our new house are too high (and I'm not short), so I cannot reach the top two shelves and the fellow in the shop was shorter than me, reached up and pulled it down! Amazing!!! Such a clever idea.
DeleteHi Bonnie, have you told us how to trim behind your epp blocks? thank you.
ReplyDeleteStorage for your dies. Accuquilt has racks that you can store your dies vertically. You could mount them on the wall above the cutter.
ReplyDeleteI bought some used kitchen cabinets for my studio cutter. The cutter sits on top of the countertop. My strip dies are vertical in the cabinets where I removed the shelves. I store my old phone books for foundations in a stack behind the dies so I’m not wasting the depth of the cabinet. My small dies are on a set of bookshelves. Oh, the strip dies only fit in kitchen cabinets if there isn’t a drawer, so if you like that option pay attention to the height of the opening.
ReplyDeleteThis may be more time consuming than you want, but I stay stitch along the edge of the joined corner stones and sashes. Not the whole length of the sash, just where they meet for about an inch or so. Your quilt is looking lovely so far!
ReplyDeleteQuilt name: Lola's Garden
ReplyDeleteBonnie you're a hoot! Exciting times indeed, my big thrill? The lawn mower guys are coming today! 😉
ReplyDeleteEnjoying summer thrills, ever your fan, Sharon
Another method taught to me by my mother--double seam. Sew the neutral/green panel seam, then go back and sew it again. You will have double threads going across--adds a new problem of bulk, but if you are ok with that, it can be a big help down the road.
ReplyDeleteThere is always the Sharon Schamber method wit Elmer's glue diluted with water. Have used it when needed. Takes a little time but everything turns out great. Love the look of what those skinny sashes when all together. More work for you but in the end......
ReplyDeleteBlossom is not in the
ReplyDeleteThe block pattern for Blossom Time is found in the May/June 2019 issue of Quiltmaker Magazine in my Addicted to Scraps Column. Digital copies are available.
I believe it is in the Mar/Apr according to your Addicted to Scraps section.
Just thought you would like to know.
Could you talk a little on your accuquilt as to what dies are most beneficial for Bonnie Hunter quilts. They have some strange sizes I don't think I would ever use. Thank you so much.
ReplyDeleteLove the tulip quilt. Will there be a digital pattern? I live in Canada so no shipping of books.
ReplyDeleteI have several big long heavy studio dies. I bought a sturdy real wood 3 shelf bookcase at Goodwill. I stood it on its side and added casters to the bottom (former side) and affixed a larger top to the other former side now table top. The large dies stand on end like books between the dividers (former shelves). I use the top as my cutting station. Works great. Small dies are stored like books on another bookcase and mid size dies are stored label side up in rolling toy boxes. Studio dies are heavy and being able to wheel them to the studio cutter is handy and let's me keep them neat and organized.
ReplyDeleteThis is the best idea I've heard yet! Thank you for sharing!
DeleteThis morning I commented to my husband that I wasn't sure what it said about my life that I am very excited about a new dust mop!!!! It's the little things after all:)! Love the tulip quilt and the skinny sashings are the bomb! Just love the look.
ReplyDeleteI have tried many methods to store my dies. Best so far is a old large bookcase. Took out shelves to accommodate the large lengthy dies and stood those dies on end. One shelf above those house a few small dies on end. The rest are on the shelves next door to the big guys again on end. Adjusted the shelves according to die height and all labels showing . Books on die cutting are grouped with the dies and my cutter also has its home in the bookcase. Mats are stored on the shelves with respecting die sizes. Everything with die cutting in one place makes it rather nice.
ReplyDeleteIn spite of the trouble with skinny sashing, I really like the look of the quilt and am waiting for the pattern!
ReplyDeleteSad these skinny sashing are giving you problems and so many tips to try and help the situation.
ReplyDeleteIt’s looking so pretty and even with all the problems it’s a gorgeous project.
Love how Lola is helping lol
Stay safe
Love and quilty hugs
I love the tulip pattern - the secondary pattern is a super compliment to it. I like the thin sashing as it makes it look so dainty. :D
ReplyDeletelookinh at your blocks, I can't help but think how great these would look in a QAYG quilt using small sashings because they finish up at 1/2" also.
ReplyDeleteHi,
ReplyDeleteMy friend Bonnie uses Large binder clips To hold die cut patterns together and store her die cuts in a box I think her husband made.😉 I think I saw some others stored in a bookcase.
Have a great weekend.
Hi Bonnie! I store my Accuquilt Go dies using an expandable pot lid holder from Ikea. This way they are stored upright and since this thing opens accordion style you can make it as long or short as your space allows. I bought 4 of them a couple of months ago online. The only down side was it took Ikea a whole month to send them to me. They were in stock, it just took them that long to pick the order. IKEA VARIERA Pot lid organizer, stainless steel - $7.99 each. They are heavy and well made. But still only $5 to ship
ReplyDeleteRegarding Lola.............remember when the children were small and negative attention was better than no attention?! Enough said.
ReplyDeleteBonnie, would sewing the seams on the large shashing strips twice before sub cutting work?
ReplyDeleteI use a pot and pan Lid rack I got at a place in Houston called the Container Store.
ReplyDeleteI used tiny sashings on a round robin quilt borders to make it look like stained glass. They are a pain but they do look great.