Happy FIRST Friday of 2023, everyone!
And there is no time to bring the reveal to our Chilhowie Mystery like today.
It's time!
We've made "Most" of the units. There is some more cutting of fill in pieces to do - and it is time to pull it all together.
Are you excited?
Chilhowie Mystery - A Mystery No More!
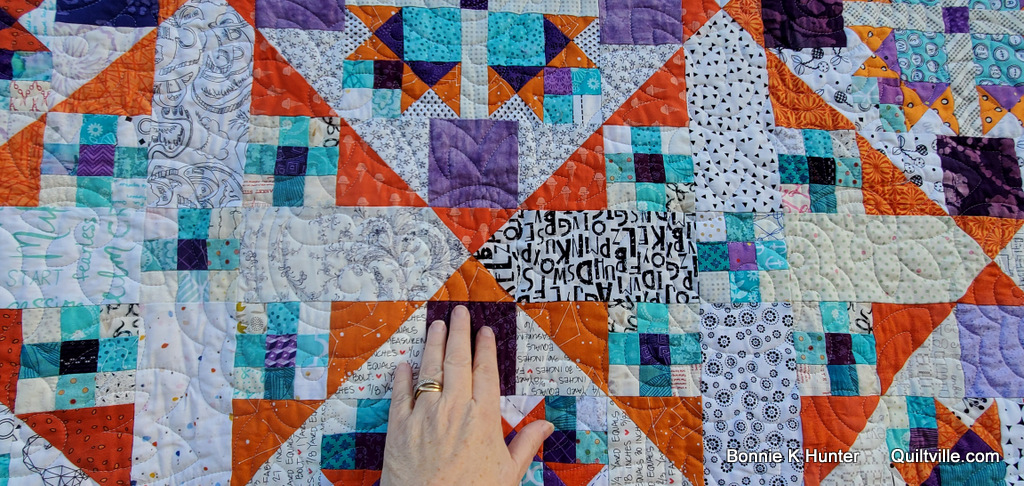
If you take a good look you'll see that those Part 2 units are used as the border.
There is no chickening out, as you've already made the units!
All of the big blocks are also done - we just need to cut some sashings, some quarter square triangles, make some flying geese and cut some spacer units for the inner border and we'll be ready to set this whole thing together.
It makes me so happy to know that these tops will come together quickly, and folks aren't left with baggies upon baggies of small units still left to assemble. We've done most of the grunt work all along the way!
Click HERE for Printer-Friendly PDF.
Full Quilt Layout -
So you can see where we are going.
Step One: Sashings.
For each neutral sashing cut:
1 rectangle 3 1/2'' X 6 1/2'' AND one matching quarter-square triangle the same size as the quarter-square triangles you cut in orange for Part Four.
I cut my quarter square triangles from 2'' strips using the 3'' finished green line on the Essential Triangle Tool.
Cut 48 sashing rectangles each with a matching quarter-square triangle. Use as many fabrics as you want, just make sure your quarter square triangles match the rectangles they are paired with.
If you are using traditional rotary cutting for your quarter-square triangles, start with a 4 1/4'' square, cutting it on both diagonals with an X which will yield you 4 matching triangles. (So maybe you make your sashings in sets of 4 matching? 12 sets of 4 matching will give you the 48 needed.)
Let the layout begin!
Design wall, bed, or floor - it's how we get things where they need to go.
Arrange your 16 blocks in 4 rows of 4.
Place sashing rectangles between the blocks, 2 per sashing, leaving the spaces between the large purple squares blank.
Take the matching orange quarter-square triangles and use them to complete the "circle" of triangles around each block.
The inside blocks will use all of the triangles, while the blocks at the edge of the quilt will have one left over. The corner blocks will have 2 left over. These will become flying geese in the inner border that will finish the circles at the edge of the quilt.
Bring the neutral quarter-square triangles into position matching them to the rectangle they will connect to. These units will be sewn as hourglass blocks where one circle touches the next.
Place your remaining nine 9-patch units as cornerstones between the blocks.
Stitch the hourglass units, pressing them as desired. Square units as needed to 3 1/2'' and add them back to the quilt to complete the quilt center layout. They will finish at 3'' in the quilt.
Join units into rows, pressing seams toward the sashings and away from cornerstones.
Join rows to complete quilt center.
Center together!
Oh, I love it!
Next - completing the orange at the outside edge of the quilt with the remaining orange quarter-square triangles.
The neutrals on these are scrappy.
If you are using traditional rotary cutting, cut 16 neutral 2 3/8'' squares. Slice squares once from corner to corner on the diagonal to yield 32 half-square wing triangles. These will combine with the remaining orange quarter square triangle units from above to make the 16 flying geese units that will finish the orange at the edge of the quilt. The assembly is the same as the Essential Triangle Tool method.
If using the Essential Triangle Tool: Pair two different 2'' strips with right sides together. As these are scrappy I only made 4 cuts from 4 different pairings to get the scrappy look that I want.
Strips are right sides together as we are cutting triangles in mirror image - left hand and right hand wing triangles to pair with the orange flying geese triangles.
Trim and square off one end of the
strip set.
Place the 2nd red line for 1 1/2''
finished half-square triangles at the top of the strip set as shown. Remember
to keep the line you are measuring by on the fabric, not beyond the fabric on
the mat or your triangles will be one line-width too small. Make the first cut.
Pivot the ruler to make the next
cut, again keeping that line on TOP of the fabric. Cut. Repeat to cut as many as desired from this pairing. Cut 16 pairs total from a variety of pairings.
Sewing: Open one pair of triangles as shown with the blunt tips at the top.
Place the right-hand wing triangle against the orange triangle with right sides together. Stitch. Press seam out toward the wing triangle. Trim dog ears.
Align left-hand wing triangle against the orange triangle with right sides together. Stitch. Press toward the wing triangle. Make 16.
Trim units as needed to 2'' X 3 1/2''. Units will measure 1 1/2'' X 3'' in the quilt.
They are going to go here!
Cutting fill-in rectangles and corner squares:
From neutral fabrics cut:
44 aqua rectangles 2'' X 3 1/2''.
32 neutral rectangles 2'' X 3 1/2''
Stitch the 32 neutral rectangles to 32 aqua rectangles, pressing seams toward the neutral. The remaining aqua rectangles will fill in the spaces at the end of the sashings in the quilt center.
Inner border unit.
Make 16.
Unit will measure 2'' X 15 1/2''.
Stitch the aqua end of a rectangle pair to either side of an orange flying geese unit. Press seams toward the aqua rectangles. Place units around the quilt, matching the orange flying geese unit to the orange that it belongs to.
Use the remaining aqua rectangles to fill in the border against the neutral sashings in the quilt center.
Join units to complete each border length, pressing seams toward the aqua rectangles.
From aqua scraps, cut 4 cornerstones 2'' square.
Add the cornerstones to either end of both the top and bottom borders, pressing seams toward the neutral rectangles at the end of the borders.
Laid out and ready to attach!
Adding side borders first!
Press side border seams toward the borders just added. Add the top and bottom inner borders to the quilt, also pressing seams toward the borders.
Quilt center together!
One more border to go.
Separate units into two groups: Purple on the left, and purple on the right. Join 24 purple on the left units side by side as shown to create one border length. Press seams open to reduce bulk when adding to quilt or press to match to nest with how you pressed the inner border. Make 2 for top/bottom borders.
Repeat with the purple on the right units to make 2 side border lengths.
Purple on the right units are sewn to the quilt sides first. Pin to match where seams align between the outer and inner borders and add to quilt. Press toward the inner border.
Four Patch Cornerstones
From scraps cut 8 purple and 8 neutral 2'' squares.
Join units into pairs, pressing seams toward the purple squares. Stitch pairs into four-patch units, pressing as desired. Units will measure 3 1/2'' and finish at 3'' in the quilt.
Four-patch cornerstones in place. Add the cornerstones to the top and bottom borders (purple on the left) pressing seams toward the four-patches.
Notice on the large quilt diagram that four patches DO NOT ROTATE in the border. All four of them face the same way. Look closely at one corner above. Where 2 purple part 2 units meet in a corner, the purple square of the four-patch meets them against the orange.
Add top and bottom border to the quilt. Press.
At the far right, with the four-patch NOT rotating, the neutral square of the four-patch is in the corner where the two neutral rectangles meet.
When the quilt top is complete, take a "victory lap" of stay-stitching around the outside edge of the quilt top by setting your machine to a slightly longer stitch length and sewing just shy of 1/4'' around the outside edge.
I find this easiest to do with the quilt top face-down so I can easily keep seams from flipping the wrong way.
This is essential in keeping the many seams from popping open during the quilting and binding phase. It also helps to minimize stretch.
Quilted and bound!
I visited my friend Terri in November to learn her IntelliQuilter system while getting Chilhowie quilted.
We quilted Chilhowie with a pearl grey thread in an edge-to-edge design called New Delhi 2 from QuiltsComplete.com
I love love love it!
From the back -
Yes a ONE FABRIC backing!
I bound Chilhowie in purple using
2’’ wide strips for a 1/4'' double-fold finish.
I love how the hourglass unit in the center of the sashings make this look like a complicated 2 block quilt set on point.
And of course Lola gives her approval too!
This has been such a fun year presenting this mystery for you. I've met so many new folks who have joined in - and I hope you'll stay throughout the year!
Please keep sharing your progress photos using hashtags #quiltvillemystery and #chilhowiequilt. I love seeing your creativity!
Our next Leader & Ender challenge begins in July - that's always fun. We are currently working on Triple Treat found under the Free Patterns Tab.
Okay - that's it - go assemble those Chilhowie quilts!
Quiltville Quote of the Day -
"A creative life is an amplified life. It's a bigger life, a happier life, an expanded life, and a hell of a lot more interesting life." - Elizabeth Gilbert
Now that this reveal is complete - I'm feeling a bit at loose ends.
I think I'll also go quilt on something.
Isn't it marvelous what playing with fabrics can do?
Have a wonderful weekend, everyone!
©2022 Bonnie K Hunter. All Rights Reserved.
This
mystery is given for personal use only. No part may be reproduced or
transmitted in any form by any means, electronic or mechanical including
photocopying for sharing, scanning or by any information storage and retrieval
system without permission in writing from the author.
Please no
uploading and saving of this file with intent to share, email or distribute,
either digitally or in hard copy. NOT FOR RESALE.
Please
send your friends to my blog to print their clues. Thank you!


.jpg)


I still on trying to finish my Triple Treat quilt before I start on the MQ. I am just not a person that can have an UFO around and start a new project. I love the end effect of the MQ, Bonnie. Once again, you definitely are treating us to a beautiful quilt. Thank you
ReplyDeletethank you Bonnie! Its a gorgeous quilt!
ReplyDeleteSo what is the size of the finished quilt? This has been another EXTREMELY fun mystery quilt! Thank you again Bonnie for all the hard work you put into these!
ReplyDeletePlease refer back to the introduction. Thank you!
DeleteLooks fabulous! Can't wait to finish the quilt!
ReplyDeleteAnd I thought the blocks looked good without sashing. Always a special twist at the end! Thank you, Bonnie Hunter!
ReplyDeleteI love it!
ReplyDeleteThanks Sew Much. I love the scrappy neutral sashing and the tricky Border. Yep they are all done, no reason to not use them. I have all day to play. If I get up now. I woke up just to check the blog. It's still dark in the PNW.
ReplyDeleteOh my goodness it is gorgeous! You have such a brilliant mind to create this incredible design and I can't wait to get to my sewing room after work today! Thank you so much for another fun mystery!
ReplyDeleteOh, I LOVE IT!! Such a happy quilt. Thank you so much for all you do in making sure we have our fun at the end of the year!!
ReplyDeleteWhat a beauty!! This is gorgeous! Thank you so much!
ReplyDeleteLola is a puddin' and a great model for your quilts! Love the reveal Bonnie! Have fun finding something else to quilt!
ReplyDeleteThanks for another beautiful pattern Bonnie. I've been too busy to get started yet, but I know I'll definitely be making this one, probably more than once! LOL
ReplyDeleteDelightful, Bonnie! I'm so excited to finish! Esp. THANK YOU for thinking to have us assemble the border pieces in advance so we can't chicken out! 🤣 I've chickened out once in the past with a pieced border and regretted it later! Brilliant, as always. Your mysteries really help me thru the holidays and I am so so grateful. Happy New Year!
ReplyDeleteWhat Fun!! And such a delightful quilt. Thanks Bonnie, you are so appreciated!
ReplyDeleteWow! I love it. I need to get busy and get past part 4. You are wonderful to put all of your time into making this fun game each year.
ReplyDeleteAbsolutely wonderful! I am still plugging away on it but I am inspired to keep on keeping on. Mine probably won't be bed size but I will keep going and see where I land. What fun!
ReplyDeleteWow! Somehow I didn't reveal yet. I've only been reading a long because I'm getting my house ready to sell. But I'm definitely looking forward to sewing this one after I get settled again.
ReplyDeleteShe's a beauty !!!!!
ReplyDeleteAwesome soo beautiful
ReplyDelete