Happy Friday, Quiltvillians!
Today is the day you've been waiting for - and so have I.
This is something that has been playing in my head for nearly a year - well at least since last Fall when one of my Quiltville Inn retreaters had an "Oopsie!" moment and we turned that lemon into lemonade!
Do you remember my Ditch Lilies quilt? It was such a fun one to make.
Click HERE for printer-friendly PDF.
And you might remember this unit:
These were quick and easy -
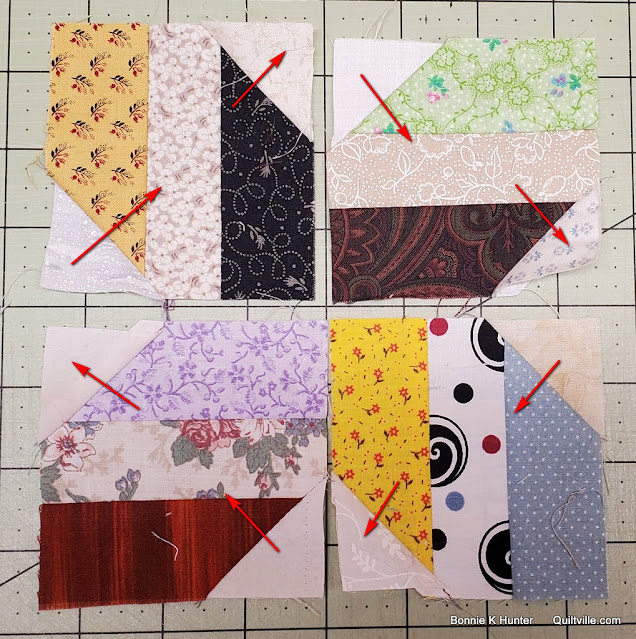
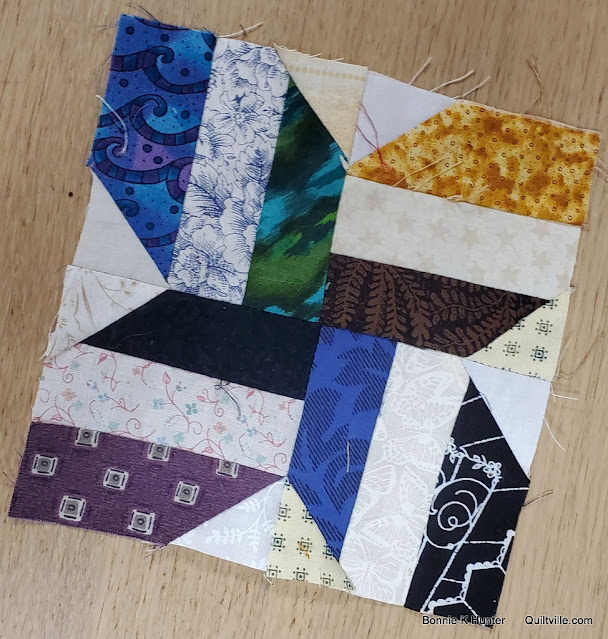
But what happens when you put the stitch 'n flip corner on the WRONG corner? OOPSIE! and if you do it 4 times wrong - no worries! We get new opportunities:
We pinwheeled those babies and look what we got!
Oh, this has possibilities!
From here my mind was in overdrive. While this is much like my own Star Struck quilt from the Free Patterns tab it's just a bit different using 3 strips instead of 2 in the strip set.
I'm going to give you two options for the unit size - you choose which best suits your scraps.
I used 1 1/2'' strips of colors and neutrals along with 1 1/2'' squares for the corners. This gives me a 3'' finish block quarter. My Oopsie Daisie blocks finish at 6''.
If you want to make a 9'' Oopsie Daisie block, start with 2'' strips and 2'' corner squares. Your block quarters will be trimmed at 5'' and finish at 4 1/2'' in the 9'' block. The corner squares are cut at 2''.
You will need to remember the size you are trimming as my instructions below are for the 3 1/2'' block quarter size.
Stitch colored strips to both sides of a center neutral strip. Press seams toward the colored strips.
Ready to add corners in Leader & Ender fashion!
Sub-cut strip sets into 3 1/2'' increments. Some of my strip sets left me enough to get a 1 1/2'' cut out of the end! I'm saving those in a baggie for possible 9-patches later.
I have these sitting on my cutting table so I can prep the corners to add in batches - I'll do a bunch before I sit down to sew, and when I run out, I'll prep some more and keep that Leader & Ender project going.
Block Assembly!

Nesting seams! Follow the arrows!
I start by position the upper left unit as shown with the "press out" corner in the upper right of the unit.
Rotate the next 3 units so that a "press in" triangle nests with the "press out" triangles all the way around.

See how they work from the back side?
It is important to make ALL blocks in the same way so that they will nest when placed together in the quilt. Don't change up your in or out corners!

This challenge is going to use up a lot of those older fabrics I have hiding in my 1 1/2'' strip drawer. Do you have some of those too? Use them up - the more the merrier!
My first batch - plus the original *Oopsie Daisie!*
I prepped 24 block quarters, matching them with the neutral corners and set them by my machine for use as Leaders & Enders in between sewing the lines of other things.
The hardest thing to remember? The pressing. One corner out - one corner in. Keep it going consistently!
Where things stand today.
As I start to work behind the scenes on this year's upcoming Quiltville Winter Mystery - I know I'll be making more Oopsie Daisie blocks as Leaders & Enders. It's going to go fast.
Of course, if I wanted to slow it down I could cut my strips into individual 1 1/2'' x 3 1/2'' rectangles and assemble THOSE as the base unit Leader & Ender style too - but life is moving too quickly for me to go that route.
I know that when I feel like simply sewing, but don't know what exactly I want to work on, I can easily sew strip sets and sub cut them to be ready for more corner adding.
Once you have a bunch of block quarter units made, and you feel there is enough variety, you can start building the Oopsie Daisy blocks as Leaders & Enders too.
I've been working on other things (And have been gone for a month as well) so I didn't worry about building blocks - just block quarters. Now I'm ready to start turning these units into blocks.
How many blocks do you need? It depends on your own vision!
My blocks are 6'' finished made from 1 1/2'' strips. I made this grayscale mock up just to check how I'd like to go:
Blocks set 11 X 13 gives me a quilt center that measures 66'' x 78''.
I may go bigger. Or I may add borders. That's the beauty of Leader & Ender projects. They just kind of grow on the side and gently nudge you as to what you want to do next. Listen to what your project tells you.
Maybe your quilt will want borders. Maybe it won't.
Just listen. And go with it!
Quiltville Quote of the Day -
We will only have this day once. Attitude makes all the difference!
I made this 4 patch on point quilt in the early 1990s. It's seen many a year of good use.
I still love the quilts I made way back when - imperfections and all!
Have a great Friday, everyone!

How cute is that? Love it.
ReplyDeleteLove! This pattern is perfect.
ReplyDeleteYou spoil us
Thank you 🙏
Going to wind bobbins and sew today on my new machine!
Take it easy
Blessings 💞
I like to grab the Moda scrap bags when I find them on sale and now I have another pattern to cut them up into. Thank you, Bonnie!
ReplyDeletelove this! am starting today! robin speck
ReplyDeleteThank you for yet another great leader-ender project!
ReplyDeleteI’ve recently come over from the dark side & started using your system for organizing scraps. Every time I’m cutting 1 1/2” strips and squares I hear my self saying “ I’m never gonna use these, but ok, I’ll cut them”. Turns out this is the perfect project for me! I can’t wait to get started.
ReplyDeleteThank you for sharing your talents.
Happy quilting!
Barb
Well that was too easy! I already have a stack of blocks made that were intended for icecream sandwich quilt which is white between two colors and placed alternately across the quilt. All I have to do is snowball the corners.
ReplyDeleteOh Bonnie, I love your knack for names of these AWESOME patterns you offer us! I am already pulling my strips!
ReplyDeleteYour example with the arrows is using the same fabrics that are in my scrap bins...serendipity! All my leader/ender quilts have been given to high school graduates in my church...when I see how fast it works up, it becomes my main project as graduation is getting closer. I have kept all the mystery quilts, but the L/E are gone immediately. Thanks for all the fabulous ideas and inspiring pictures of your world travels. Dorothy
ReplyDeleteOh my goodness!! I have a bucket just bulging at the seams of the 1 & 1/2" strips!! I'm still working on Triple Treat, so when that one is done I will put those strips to work! Thank you for always continuing to inspire and show us new and different ways to use those pieces that otherwise just lay around and collect dust!! :) I was going to tell you that I am working on 2 different projects. One is an "O" block, and while I was putting that together, I am working on the scrappy 4 patch X! I have several blocks already!! Hugs and have an Amazing weekend!! :)
ReplyDeleteI love your quote of the day! I have a metal sign that reads "Attitude is Everything. Pick a good one!". My fav teenager never liked it as much as I do!!
ReplyDeleteI have some of your prints at my house. Elaine
ReplyDeleteI built 70+ Rick Rack Nines blocks as my L&E this past winter. I'm now putting that top together, so the arrival of OOPSIE DAISIE perfectly fills my need for a new L&E. Time to dive into those strips! Thanks, Bonnie!!
ReplyDeleteThanks Bonnie!
ReplyDeleteThis reminds me of the Weed Wacker quilt I started at the first Quiltville retreat. It started looking like a circus tent so I never finished it. Fabric choice not the pattern. Maybe with this pattern I could salvage it. You sure come up with great ideas.
ReplyDeleteThis looks like fun. I’ll probably print the pic of which way to press the flips and tape onto my machine so I remember! Consistency is important! Thanks for sharing your opsies!
ReplyDeleteI must have a sixth sense. I just spent two weeks cutting scraps into usable sizes. Six shoe boxes and one paper ream box full of scraps. Now I know what I'll being doing with some of them. Maybe I'll start a quilt in each size. Thank you Bonnie for all you do for us.
ReplyDeleteOnce again a great pattern. You are smazing, Bonnie, coming up with all the beautiful patterns. You are very creative. I receive many compliments on every quilt created with your patterns. Thank you for all you do for us.
ReplyDeleteJust a big THANK YOU Bonnie. This will be fun!
ReplyDeleteOh, this is going to be a fun Leader/Ender project. Thanks so much!
ReplyDeleteThank you Bonnie. I have about hundred 3 1/2 each rail fence blocks sitting in a container waiting for me to get to them. Just need to add the flip and sew corners to help get this project finished. Thanks
ReplyDeleteI am so happy you are using 1 1/2" strips! I have so many of those and kept thinking I needed to do something with them...thank you! Now I can use them up!!
ReplyDeleteI am so excited for the new leader and elder project.
ReplyDeleteThank you Bonnie, another fabulous project!
ReplyDeleteIt sounds fun!
ReplyDeleteIs anyone thinking of doing with solids?
ReplyDeleteLeader and Ender is my favorite season :) Thanks, Bonnie, for keeping my stash moving.
ReplyDeleteLCP, all solids would be very nice. I hope you do. I wouldn’t have enough solids. Laura H.
ReplyDeleteThank you, Bonnie, for your generosity in sharing free patterns. I listened to the audio for "Oopsie Daisy". I did a double take and then giggled at hearing a mixture of the strip dimensions being given in feet rather than inches! I'll be using this leader/ender very soon! Ah, technology!
ReplyDelete