

Life is so much better with a new ironing board cover!
I’d been needing to do this for the longest time – and the time was never right. And there wasn’t the right fabric or supplies on hand – or so I thought.
Now, I’m not one to diss a hard working ironing board that shows signs of much pressing and productivity. Don’t get me wrong. I firmly believe that an “always clean” ironing board is evidence that someone isn’t sewing hard enough! LOL! But there comes a time in every board’s life to retire the old and update with new.

It all started here!
A huge and heavy pillow ticking curtain that used to hang at the sliding glass windows in my basement sewing area at the cabin. We replaced it with a rolling shade this past winter – no cords, just easy up easy down. But this curtain? Not only does it contain yards of the heavy duck fabric, but it is also lined with a very nice weight of 100% cotton in white. I can’t just toss this – could you?
When The Hubster asked me to replace his tennis ball bag that had worn thin and was starting to tear, my mind went quickly to the binds folded on a shelf in the utility room, waiting for “some day, some project.”
Bag made – I found I had a left over piece just big enough to turn into an ironing board cover – and it only took an hour.
First things first – and I forgot to get a photo of this part – Lay the fabric wrong side up on the floor. Center the ironing board upside down against the fabric. Draw a 3 1/2’’ margin all the way around the outside edge of the ironing board. Be generous with it. You need enough margin for a double drawstring casing.
With the iron on HIGH setting, press over 1/4’’ or so. I’m not a steam presser when it comes to quilt block construction, but I did spritz and press here to get a good crease on the edge of the fabric.
While we try to avoid tucks in patchwork, you will NEED to press in some tucks as you work yourself around the curves and corners, especially at the “nose” of the ironing board.
Once you’ve done the 1/4’’ all-the-way-around routine, do it AGAIN, this time folding over about 3/4’’ all the way around, pressing and pinning as you go.

Top stitching close to the inside edge of the casing.
Because this is a stripe, I think it’s fairly easy to see where I pinned some tucks around the nose of the cover. Keep it as smooth as you can, remembering that a large safety pin needs enough room to pull the cord or elastic through.

The back end corners – pleat as needed!
I started my top stitching at the back end, leaving myself about 1-1/2’’ open to pass the draw-string through.
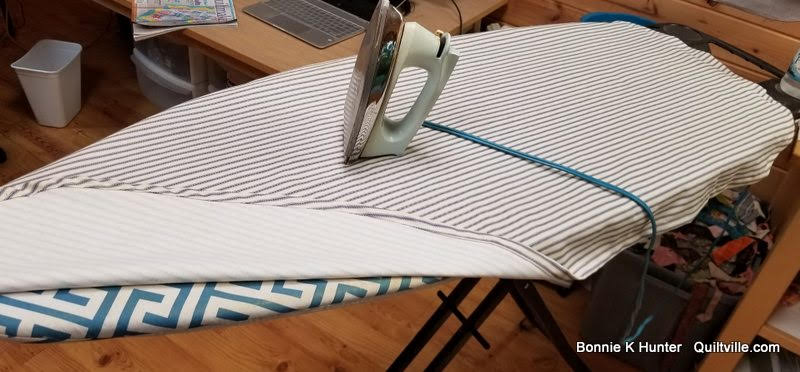
Ready for the cord!
And then I realized I didn’t have a draw-string cord! We had forgotten to get it along with everything else from yesterday’s Lowe’s run.
What to do??
Back to the curtain – all of those serged seams that I had torn off to make the fabric more usable? BRAIN STORM!

Seams from a 7 ft tall curtain!
Serging makes them extra strong!
I overlapped two ends about 2’’ and straight stitched back and forth and back and forth to join them into one length. I trimmed excess ends – I couldn’t just put in a knot because it might not slide through the casing easily enough.
If you have string – believe me. USE IT. Or narrow elastic, whatever it takes – just make sure it is WAY LONGER than the circumference of your ironing board and strong enough to withstand the push and pull of the safety pin and the adjusting of the gathered fabric as you work it around the cover.

In one side – and out the other!
My only problem was that the sharp point of the pin kept working itself out of the safety catch and poking me – I’d have to back track and feel through the fabric to get it back into the clasp. But we did it. With serged cording to spare!

Not so shabby if I do say so myself!
And it fits better than what was on there previously. I also left the OLD ironing board cover in place underneath – it had an attached pad, and I didn’t have a separate one, nor extra layers of batting to make my own. I just left it in place and added this new one over the top, securing it snuggly with the drawstring.
This whole process? It took an hour this morning.

And there is still all of this left from that curtain!
One other thing I like to do when pressing small parts at the ironing board -
Lay down an old terry cloth towel. Press on top of the towel. It will help keep your ironing board scorch-free and the towel will absorb any best-press, spray starch or other chemicals, not to mention stray threads and dog ears. When the towel gets yucky looking – just toss it in the wash and lay a new one down.
This is generally a great place and time to use those bath towels that have seen better days but are too good to be tossed to the garage to be delegated as car wash towels.

This happened yesterday!
The sink is also in place, but the sink plumbing not functional yet – we needed a different elbow than the old plumbing provided – so off we went.

Yeah. Here Again. LOL!
Really? We couldn't get this stuff when I picked up the toilet and mirror Friday? Nope.
Last minute decision (or absolute necessity) to replace the vent registers rather than to put the old, rusted, bent, ugly ones back in place. And while we're here… some fatigue mats and the new PVC elbow for the sink drain (This is what really started the list.) A filter bag for the shop vac after all of that dry wall dust clean up. And this is where I fell short with NO IRONING BOARD CORDING!
All’s well that ends well -

Movie night at The Blue Ridge Movie Lounge!
A great way to end a very busy day – Rocket Man!
Tears, laughter, toe-tapping and singing along. This was the soundtrack to my childhood.
Awesome, poignant, and a compassionate dose of reality. Well done!
And this puts me back at the Quiltville Post Office where I am writing this post as the internet is better. Not by much, but better!
Today we continue with getting the sink functional, finishing up the painting, baseboard and lighting in the Postmaster’s Office (My computer room) and start on the back storage/entry/back stock room.
And I think the Postal Gal at the Mouth of Wilson Post Office was a bit agog when I walked in with about 80 orders in 4 stuffed to the gills mail tubs before 11am closing yesterday. I asked for more tubs to replace them – she said she didn’t have any. What am I going to do? She said she will “put in a request for more.”
I’ll have Jeff bring some more up from home when he comes to mow the lawn here at Quiltville Inn tomorrow. And it is my hope that over time the need for MORE will be understood as the out-going mail increase to this sleepy little town starts showing up on regional spread sheets!
It’s REALLY a good thing that I wasn’t doing my String Frenzy book release from here – they wouldn’t have known what hit them!

Sale continues though Monday, June 3rd – Midnight Eastern!
Your purchase may also include digital patterns as free shipping is based on your merchandise total.
Remember to use code Free39 at purchase to redeem. No refund. MUST USE CODE! Click to visit the Quiltville Store.

Quiltville Quote of the Day
Spider web quilt found in North Carolina.
Anything worth doing is best done with passion, determination and the thrill of seeing results come to fruition!
I’m off to pick up a paint brush.
Enjoy this first Sunday of June 2019, everyone!


Bonnie! Thank you for the tutorial...but those tulip blocks are just darling!!! DARLING!!!!
ReplyDeleteThe quote this morning brought tears to my eyes. A new daily reminder for me as I'm battling the feelings of melancholy still - not as much as I was, and for no apparent reason. Thinking somewhere in my subconscious I'm being told to pay more attention to the present, all my many blessings, and let any "junk" go (and I don't care where it goes. Your posts are a great daily dose of just what I need. Thank you.
ReplyDeleteWow.....looked at my ironing board cover....critically, this morning...ok, time for new but will reuse the parachute cord from this old one. Had a problem with it at first because knot would not stay knotted! needed one of those black cord lock thingys. .....always have had the casing opening at the broad end of the board but am rethinking that as that seems to be the most used end now that it is only used for quilting....you have this really old lady thinking this morning, Thank You, Bonnie !
ReplyDeletefiddle dee dee....curtains to the rescue once again....lol
ReplyDeleteThat's where my thoughts went, too, Grace. LOL!
DeleteI just love your tulip blocks!!
ReplyDeleteThanks for the tutorial. Love the cover. And it directional too!
ReplyDeleteBonnie, I can just imagine what that post clerk thought when you came in the door with the load!! My post office which is small would be passing out!! Love the ironing board cover and all your inventive ways of conquering!!
ReplyDeleteYour Mouth of Wilson post office will be getting a boost, but the Wallburg one is going to miss you.
ReplyDeleteMy thoughts too
DeleteI use old flannel pillow cases on my ironing board to protect the cover. I just lay one over the ironing board cover and the flannel helps it stay in place.
ReplyDeleteI have several and just run them thru the washer and dryer when they are all full of starch. I like your idea of old towels too.
Please make sure you warn the post office before your next book comes out so they can, hopefully, be prepared. Tracy J in Michigan
ReplyDeleteDon't forget the
ReplyDeleteCording!
I have so enjoyed reading your journey over the past year and look foreward to seeing your quilt class offerings when you get to that point. I'm saving my nickles (we no longer have have pennies in Canada) to hopefully attend one of your classes.
ReplyDeleteIf you look at a store bought ironing board cover you will see that they sew a big zigzag stitch over a small twine all in one step, you just pull the string when you have the cover on the ironing board an tie it. Just make sure the stitch is big enough to go over the string.
ReplyDeleteGreat idea, Joan. I have a thread that is stronger than my usual cotton sewing thread. So I think I'll use the stronger thread to zig zag over the string. I save the selvages of fabric to tie up plants in my garden. I think the selvage edges would work in place of the string.
DeleteLOL - A gradual introduction into what it about to hit the Post Office ladies. Maybe they should have a chat with your Wallburg Postal ladies.
ReplyDeleteIt is so enjoyable seeing all your dreams come to fruition. Thanks for sharing photos and all the ups and downs. As I still work on my Good Fortune top, I am so thankful that you were born into this world. Quilty hugs to you!
ReplyDeletethankyou for the ironing board cover it could not have come at a better time as mine is in desperate need to be replaced! I do not usually comment though I read your blog everyday and follow in social media so enjoy how you write feels ,like you are talking directly to me.
ReplyDeleteGreat tutorial, that little post office will get busy real fast when your at home lol. Love those tulip blocks I’ve been sorting through my scraps to see if I can make some.
ReplyDeleteThank you for the inspiration
Love and quilty hugs
Anne xx
I like the tulip blocks, also, and hope to find the pattern somewhere.
ReplyDeleteThe pattern is in her column in Quiltmaker #186
DeleteStill think those are the best tulip blocks I have seen yet online!
ReplyDeleteI bought an old wood iron board for $20 and it has been the best board I have ever used! It is firm and never bounces. Also the pad stays for longer....and it's kinda nastolgic to iron a quilt on it 😊
Have you considered using a wool pressing pad or using a wool padding under your ironing board cover?
ReplyDeleteThat's what I'm thinking of doing. Bonnie gave me inspiration yesterday about the ironing board cover, as the commercial ones they make today don't last worth the money. Immediately found heavy cotton utility ticking online, and ordered a couple of yards of 57" wide yardage. Now, the batting thoughts. And BONNIE! THANK YOU for the tutorial! That will make it much easier for me!
DeleteI like DJ's idea of using her old flannel pillow cases to iron quilt blocks. I believe a trip to Joan's is in store for me to pick up a piece of pretty flannel
ReplyDeleteI tear the selvage edges off my fabric for use in the garden tying up plants. Now I have a new use. I'll use the selvage edges I have torn off for tying the ironing board cover. Thank you so much for the "how to make an ironing board cover".
Great tutorial! Thank you so much. Love the quote at the end too, have saved it to my computer.
ReplyDeleteI made my own cover from cotton ticking fabric (before I read this). But, when ironing fabric and clothing, it sticks to the cotton ironing board cover. I'm ready to buy the regular ironing board fabric and make a different one.
ReplyDeleteThank you for the Ironing Board Tutorial, your timing couldn't have been better. I have discovered that the old fashion diaper pins ((Yes you an still buy them!) work best for pulling cords and such through casings. They have that little extra safety catch on them so that they don't open quite as easily as regular safety pins.
ReplyDelete