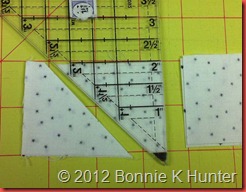
>>>>
Showing posts sorted by relevance for query Bow Tie Cheddar. Sort by date Show all posts

Wednesday, July 13, 2011

Cheddar Bow-Ties!! 2011 Leader/Ender Challenge!


Every year there is at least ONE quilt that we ALL fall in love with.

This year it was a bowtie using a cheddar solid as a background. Do I have to remind you of how much I love solid cheddar? When I look at antique quilts, those with solid cheddar in them are the ones that jump out at me and straight into my heart.

We decided that this year we would use this quilt as a Leader/Ender project --- not to be completed by this time next year necessarily,but to at least show how far we could get in a year if we used these pieces strictly as leaders and enders in between the seams of other lines of chain piecing on current projects.

sisters2011 060

This was my first glimpse of this lovely quilt hanging over one of the racks in the antique quilt booth. Did you spy it in the slide show the other day on my post of the antique quilts?

sisters2011 061

Here it is spread out a bit better….I love that there are no borders, it is just bound with a terrific old indigo blue!

Would you like to join us in the 2011 Bow Tie Challenge? There are no rules, no deadlines, no finished size, no muss no fuss. Basically, all you have to do is cut the pieces ahead of time, keep them by your machine, and when you are in the need of a leader/ender, you’ll use the bow tie pieces and watch them grow in number until this time next year!

Click HERE for printer friendly version!

To get started:

sisters2011 175

Directions make 3" finished bow tie blocks!

From cheddar background cut: (2) 2” squares.

From bow tie fabric cut: (2) 2” squares and (2) 1-1/4” squares!

((I know 1-1/4” is a strange size,and not one that I keep on hand, so I am cutting all my “sets” for the bow ties from my drawer of 2” strips. I can get the pieces for one bow tie block out of a 2" X 7” strip with 1/2” left over for squaring/trimming!))

sisters2011 177

Lay the (2) 1-1/4” squares on top of the (2) 2” cheddar background squares as shown….You are going to sew those on the diagonal as for snowball corners!

sisters2011 179

You don’t have to trim the excess, but I do. These bow ties are going to finish at 3” square, and you don’t want a lot of bulk where these seams are going to come together. I just aim for an approximate 1/4” with my scissors and snip!

sisters2011 180

The sew the connector units to the bow tie squares in four patch fashion! Press the seams toward the unpieced bow tie squares. Sew the two halves together, and you have ONE bow tie completed!

It takes FIVE seams to complete each bow tie block. So every time you need a leader/ender --- just know that you ARE building something and these ties will add up in no time!

While Lori was working on her Triple Irish Chain quilt this weekend…she was able to complete THESE in no time at all:

sisters2011 183

Isn’t this going to be fun! I can hardly wait to get home and into my 2” scrap bin to start kitting some of these up. I want to use up a lot of recycled plaids and stripes too.

Out comes the 5 yard piece of solid cheddar I’ve been hoarding!

Lori wants to continue to do hers with cheddar prints, and I’m a solid cheddar girl, so we’ll see how different these look as they take shape!

Randy, getting in on some camera action too! Oh we have had just the BEST time this year!! And this crazy woman is already making 2" finished ((YES FINISHED at 2"!!)) bow ties as HER leader/ender project. Be watching her blog for updates!

Are you game? Let’s do it!

Monday, January 09, 2012

Cheddar Bow-Tie Link-Up! ((And Prize Give-Away!))


It’s time to share our posts of how we’ve come on our Leader/Ender Cheddar Bow-ties!

This Bow-Tie Bonanza went VIRAL amongst us after Lori, Randy & I spotted a terrific antique bow tie quilt while at the Sisters, Oregon quilt show last July!  I could hardly wait to get back to Randy’s house to start playing with the possibilities for this block, taking it even a step SMALLER than normal…how would these work with 2” leader/ender squares?

And can we do it as a challenge just to see how many we could amass throughout the year?

Remember how funny it was when I got a Letter from the folks at Mary Jo’s in Gastonia thanking me for their inability to keep the tangerine Prairie Cloth on their shelves?  You guys had it flying out of there!

I’ve watched over blogland since July----and some just couldn’t stand it – they had to make it a primary full time project right away, and soon full queen size ((And maybe bigger)) quilts were showing up, each as beautiful as the next --- and here I was feeling sorry for myself because I’ve been putzing along!

I HAVE been doing them, just as leaders & enders.  Just as I said I would.  The ones you see at the top of the blog are just the ones I was able to do during retreat.  You know, when you are chain piecing 500 gazillion trillion half square triangles, or little 4 patches….it doesn’t seem to do much to put one bow tie piece at the end of the chain before going to iron..but look..I now have TWELVE more than I did before I went to retreat!  They do add up!
campdogwood 045
This is Laura's little basket --- and we had fun trading tie parts to match with our own cheddars, hers a print, mine a solid so we have each other’s fabrics in our own quilts! FUN!

campdogwood 044
Here are some of hers spread out on the table top….one tie at a time, we can tackle this quilt!
No, you don’t  even have to use cheddar as the background.  Your bowties can even be LARGER, some are doing 4” blocks using 2.5” squares instead of our 3” ones using the  2” squares.  The important thing is that you are building units for a sweet and fun quilt in between the lines of your chain piecing!

cheddarbowties 001

These are MY ties!  And I wasn’t sure how many were in here, so I took some time to count them, and pin them in groups of 10, making them easier to re-count again later. 

Just to make this fun….And shoot, if this turns out too easy, I’m going to be up a creek…but for the first person who can guess EXACTLY how many bow ties I have….I have THIS prize for you!

cheddarbowties 002
Courtesy of the wonderful folks at Moda, a Summer Breeze charm pack in shades of blue, yellow and green --- let’s get our spring feeling on! 
MDSB
This little picture gives you an idea of what other prints are in the pack…..so guess away!  Leave your comment in the comments section below telling me how many YOU think are in my basket!  You don’t have to have a blog to enter the drawing, but please leave your email address in your comment so I can contact you if you win.  If you guess as "anonymous", and there is no way to contact you, we'll have to choose some one else.

If you see that someone ELSE has guessed the number you were going to guess, choose something else -- there can only be one person per number!

Be patient with me – I’m traveling this week, and my access to email may come in spits and spurts.  The FIRST PERSON to guess the correct number gets the charm pack--

Those with blogs ---

Please link your Cheddar Bow Tie Link-Up Below!

Remember that we need the url of your specific POST, not just the address for your whole blog.

To get the correct address in the linky-–right click on the title/subject line of the post you wrote about your quilt progress. Chose “copy link address” and paste this url in the form when you link.

You can also CLICK the title line of the post you want to link...and copy the url from the address bar at the top of your browser that way.

For instance, my blog address is  quiltville.blogspot.com but that isn't enough. I can't link to the WHOLE blog, I need the address of the post.

**NOTE**  You do NOT need to include the http:// when you insert your address into the linky!

If you link to just your whole blog, I’ll have to remove your link and have you try again because I can’t fix it FOR you.


We'll leave this open until MIDNIGHT eastern time Friday night to give you time to write your posts!
If you link up, feel free to let your facebook/twitter  friends know so they can come look too!  I’d love to see this page flooded with bow-ties!

Happy Monday!

Friday, July 29, 2011

Summer Days in the Basement!

You know I spent the last few days conflicted…wanting to join with friends on a quilty trip to TN, passing on that due to an extremely close deadline list…wanting to sew on THIS, but needing to sew on THAT…and all around me, other things calling my name.

It seems when there are too many things on the “To Do” list, that the only way I can handle it without flying around like a headless chicken is to write everything down, pick ONE THING, put blinders on ---- and go for it. A little bit of progress on lots of things just does not give me the same feeling of satisfaction as much as BIG progress on ONE thing does.

Too many things, and I start to feel like the old rocker knob on top of my pressure cooker ----feeling like I’m going to blow at any moment!

So. It’s a GOOD thing I stayed home. It’s a good thing my feet hurt enough to slow me down a bit. It’s a good thing to knock these things off my list one at a time and SEE the progress! I’m a method girl….assembly line girl…pick one thing and go for it, and that’s what I’ve been doing!

I went out to dinner with Lisa the other night…this was inside my fortune cookie!

stash 010

See? The Universe is trying to tell me something!

One thing that helps me stay focused when sewing is to listen to books on my MP3 player that I download from my library. Right now I’m listening to the Jack Reacher series. Awesome. Ex-Army Military Cop and a bunch of who dunnit scenarios as he travels around. I’m hooked on these, and I don’t know what I’ll do when I have listened to them all. The author is Lee Child. If you like action and intrigue, you’ll like these!

And I can sew and sew and sew and listen, and not have to look up to a TV, or get distracted by what MIGHT be going on in email or facebook ;c)

And I’m using my cheddar bowties as incentive to keep going on other projects! My pile is growing!

stash 007

These are turning out SO cute! And while I was cutting for these, a light bulb went off…we are talking 2” squares and 1 1/4” squares….what do I have in the stash that could really be used up for these? Oh Boy…

Out came the string bin….and the bin with hunks and chunks that hadn’t been cut into bricks or squares yet…pieces that were too short to be strips. Pieces that had been given to me by quilters with the challenge of “If any one will use this --- BONNIE will!”

stash 005

Do you SEE this mess!? And I know..there were a lot of other things demanding my attention, but if I could tackle this ONE THING I’d feel so much better! ((Yes, at this point I was technically avoiding the "to do" list...but I wanted to be in control of this ONE THING!))

I started pulling a few pieces that would work for the bow ties…just a few…and ironing them…

stash 006

See that one brown/cheddar calico?? It’s a 1970’s piece and I love it!! It’s going to be so cute…These pieces weren’t large, not long enough to be strips, and they ended up in WITH a bunch of strings because I didn’t know what to do with them…

I dug through and pretty soon had a whole basket of things just for bow-ties!

stash 012

I’ll pull from this basket as I need to, it’s sitting right under my ironing board…but I’ve got lots of fun vintage stuff in here as well as recycled pieces from shirts, and repros and old calicoes and just stuff that will be so cute as bow-ties. I keep reminding myself this is not a project with a size limit or a deadline. It’s leader/ender friendly and that is how they are growing. But it’s nice to see them coming together in between the lines of power sewing. I can use the bow-tie pieces as “markers” even in between long lines of chain piecing, sewing a bow tie piece every 10 or 25 units just to help me count how far I’ve gone.

But that wasn’t the end of it…..after I pulled the fabrics I could use for the bow-ties..I was still left with THIS STRING MESS!

stash 008

Do you SEE this mountain!?? I have no clue how it even stayed contained inside that bin! LOL!

I’ve been working on several different string projects lately, and it’s a good thing..because I want to sew this stuff up! But I needed a way to organize it better. Can you organize strings? Oh yes you can, and I did!

I sorted into color families! The quilts I’ve been working on have specific color plans, and it was a PAIN to dig through the strings having to find the color I needed. Is this a bit obsessive/compulsive? Maybe so. Is this going to lead to insanity? MAYBE SO!

stash 016

This is the contents of that messy bin…From left to right I’ve got “recycled shirt strings” then Pinks, Reds, Neutral, Brown, Yellow, Orange, Purple, Green & Black. Now the strings will be easily accessible for projects I’ve got in the works. And oh, the variety is SO FUN! When you are playing with strictly color, ANYTHING GOES as long as it is within that color family, so the weirder and more ugly the fabric is, the more fun it is to stick it in there.

And you also find out really quickly what you have MORE OF than anything else:

stash 015

Blues- Navy to Aqua/Turquoise! I see a LOT of blue string quilts in my future…which is okay by me! This whole Ikea bag is FULL of blues. I love Ikea bags. Note to self – I need some more!

Oh. And I threw stuff AWAY. Yes I did….anything questionable, or that felt terrible to the touch…it just WENT. Good riddance, no guilt. That big bin with the green flip top? It now sits EMPTY! I'll find a purpose for it, but it's nice not having the string disaster in there anymore.

But I won’t be stringing today…..today…..I’m tackling about 800 more half square triangles!

stash 014

Gotta use up more of those blues and yellows! Yes, each stack has 100 pre-cut pairs ready to be sewn together this morning! Like I said..I’m an assembly line girl, and I better get down to it!

Friday, August 02, 2013

Hershey Catch Up! Show & Share Day 3!

I’m sending this ahead….because I am four hours behind my normal time zone and will be busy until way late tonight due to an evening lecture in Soldotna!

Last weekend I was teaching in Hershey, Pennsylvania – and this weekend here I am in Alaska.  Quilters from coast to coast and then some!

Jean brought a hexie top she had inherited….teeny tiny pieces ----that is my thimble right there on top of one rosette!

At some point it had gotten wet in a basement, and she was forced to wash it before mildew and mold did its damage ---She was asking us what she could do to best finish it.

Hershey_PA2013 263

Pieces and parts in a box – complete with pieces of “THAT GREEN” to set them.

Hershey_PA2013 259

Main section --- one row only partially attached.

Hershey_PA2013 261

How lovely!

Hershey_PA2013 260

Every scrap most likely has a story behind it – don’t you wish you knew?

The consensus was that you just get in there and DO IT!  We agreed she should make a template from the extra hexies – and do a few trial rosettes on her own in her own scrap fabrics to get the technique down, and when she was ready ---dig in and finish this top.  It’s a treasure for sure!

Hershey_PA2013 264

We also had a Tumelo Trail in  autumn tones.  Beautiful!
Tumelo Trail is one of my favorites from Scraps & Shirttails II

Hershey_PA2013 257

Sweet Maverick Stars! 

I love how the light backgrounds and dark backgrounds alternate – fun!
Maverick Stars is found under the free patterns tab at the top of the blog.

Hershey_PA2013 176

Lovely Antique Bow-tie!

Hershey_PA2013 177

Close up!  Love the pops of cheddar and yellow --This top is circa 1900!

Hershey_PA2013 178

Goodness, aren’t these great?  The blocks were about 2” each.

This antique top was owned and cherished by our quilter who then made this in a previous leader/ender challenge:

Hershey_PA2013 174

Gorgeous!

Hershey_PA2013 175

Closer up still!

Our Cheddar Bow-tie Leader/Ender Challenge is found under the free patterns tab ---Just scroll down to Cheddar Bow-ties!

I can’t wait to see what the ladies have to share here in Alaska!  I am setting this to post as I head off to set up for this morning’s class here ---

First weekend of August 2013 – what will YOU do with it?

Click Here to like our Quiltville Friends Page on Facebook for more fun!

Monday, January 02, 2012

New Years Housekeeping Stuff!

So here we are, in 2012 already.  I know I keep saying this, but I can’t believe it!

Today I’m teaching a String Spider Web class over at Fabric Fanatics in Plano, Tx --- and if you love batiks, let me tell you, it is ALL batiks, ALL the time, and that is all they have!!  It’s a candy store for batik fanatics, and I’ve seen some gorgeous quilts coming together this trip!

I’ll have pictures to show probably tomorrow…..we’ve been going going going and doing family stuff with Dave’s brother and his family every night.  Dave headed home last evening, and I went out to dinner with the shop crew…so there hasn’t been a spare moment to edit down pics.  I’ve gone to bed happily exhausted every night!

There are some things I need your input on. I’m hoping you will leave a comment so I can put some things together.

FIRST!  I was contacted by a few of you who want to do a link-up with our leader/ender cheddar bow tie challenges so we can see how everyone’s are coming along.  Are you up for that?  Would we have enough participation to make it interesting for everyone to see?  I’ll give you time to write a post about your progress, or you can even link it to an older blog post.  I’d just like to do a big cheddar bow tie blow out link –up ----so if YOU can post on those, leave me a YAY in the comments.  I’d like to give ONE MORE Mystery Monday Link Up next monday for those doing Orca Bay to show their progress….and then we can do it the week after that.  Deal?


SECOND --- Remember a couple of weeks ago I did a Yard Sale Saturday post?  That was fun! My blocks were snatched up quickly, and YES I do have more stuff to list. I’ve been contacted by a few of you who would like to participate as well.  Just that the holidays were not the right time to do it ((No duh!!))

How this works is ----you write a post about something quilty that you want to sell….and you link back to me on the linky…and it will be like a neighborhood yard sale!

There will be some ground rules…These items need to be QUILT RELATED. Patterns, Books, Fabric, Notions, Partial UFOs…whatever you want. This is for gently used –white elephant type items, not new-sell-at-retail-stuff or new crafts you have made to sell.. Understood? Think YARD SALE. When your item has sold, mark it sold on your blog page so people know.

You must link your post back to my YARD SALE SATURDAY POST, not just my  whole blog --- The url to use will be provided to you.

You write the post on your blog, you come back here and link it up. It is up to you to decide how you are going to interact with your buyers. I’m going to use paypal, and the selling price does not include the shipping. The shipping price will be figured depending on where the person lives, and the shipping price will be added to the purchase price.

Does this sound like something you’d like to do to clean some stuff out?  There is no limit to the number of things you want to list on your blog….you do your own listings and take care of the details, we just all link together in the linky as a “one stop shopping” spot for people to peruse our wares – yes??
 
If this is something you are interested in, I’m thinking we pick something like the 1st Saturday of the month, and do it once a month.  What do you think?
 
Please leave me your comments below and feel free to email me with any further questions, etc ---  I think it could be FUN!
 
If there are enough YAYS to it, we can do our first Yard Sale Saturday THIS Saturday --- how does that sound?  Choose one thing to list, choose 10 or 20 – give it a shot.  If it doesn’t go it doesn’t go, but I think this could have some real possibilities if we work at it!
 
And with that….is there anything else you think you’d like to see on here?  I’m open to suggestions. Any tutorials or explanations or –just something you’ve wondered about?  I could use your ideas to keep this an interesting place for quilters to gather!

Thursday, March 01, 2012

Princess Crown! Free Pattern!

Click Here for Printer-Friendly Version!

I have had this on the drawing board for a long time ---waiting a certain number of months until the copyright reverts back to me so that I can post it here for you!

If you’ve followed along on my journeys over the past year, you’ll remember that it was suggested to me by DH that “We make a baby quilt” ((Emphasis on the word WE – uhhuh!)) for our friends Michael and Harriet and for Baby Michelle that was soon on the way. It quickly became a global project with African fabrics being gifted to me from all over the world.

I wrote more about it HERE and more HERE.

These blocks were so fast and so fun, that an extra block from this quilt went to Quiltmaker for my Addicted to Scraps Column. You can see the layout they did with it HERE.

I’ve had a lot of requests for the pattern as I did it, and I explained that I needed to wait a certain amount of time before posting it --- and here we are!

This quilt requires 25 Princess Crown blocks measuring 6” finished. The blocks are completely made from my 2” strip bins, with the addition of a 3.5” square for the center. I used my easy angle ruler along with the companion angle ruler and the 2” strips to make the flying geese unit in this block, but you can use any method that gives you flying geese units that finish at 1.5” X 3” in the block.

princesscrown 007

For each block cut:

1- 3.5” center square

4- 2” corner squares

8 half square “Wing” triangles cut from background fabric using 2” strips and the 2” marking on the easy angle ruler.

4 quarter square triangles cut from the color of your choice using 2” strips and the 2” marking down the center of the companion angle ruler.

Cutting Large “Goose” Triangles:

princesscrown 006

I prefer to cut through 2 to 4 layers of fabric, no more, no less! 2 layers seem to adhere to each other and keeps things from shifting LESS than if you were cutting through just one layer. Try it! Using the 2” line that is marked on the center of the ruler, cut 4 goose triangles from a 2” strip.

If you are not using the Companion Angle Ruler, you can do this by cutting a 4-1/4” square, and then slicing it on both diagonals with an X to give you the 4 triangles required. I don’t keep 4-1/4” squares readily at hand, and I’d have to cut them from charms or fat quarters – not so convenient! But I “DO” keep 2” strips on hand…it was so easy to pull the strips I needed to cut the pieces for this block!

Cutting Wing Triangles:

princesscrown 004 princesscrown 005

Sometimes when using this ruler I go out of my way to AVOID cutting pieces in mirror image. But when making flying geese units, I WANT my pieces in mirror image so that every cut gives me one right hand wing triangle and one left hand wing triangle. Do the thinking BEFORE cutting – and everything will fit together swimmingly!

To create mirror image, simply fold your strip in half with right sides together. Use the 2” line on the ruler to cut 4 pairs of wing triangles, giving you 4 right hand ones and 4 left! If I were doing this the “Normal” rotary cutting way, I’d have to cut 2-3/8 squares. Not such a common size! I don’t save those. But I do save 2” strips! ALL the pieces for this block came right out of my Scrap User’s System in ready to use sizes.

princesscrown 008

Place your large goose triangles and arrange your right hand and left hand wing triangles as shown. See those notches on top? Those are placement guides! Invaluable for getting a flying goose unit that is flat across the top! If your notch is at the bottom end instead of the top, never fear, you can just use your easy angle ruler to nip off the OTHER corner as well.

princesscrown 009

Take a right hand wing triangle and place it against a goose triangle with right sides together. See how the notches match at the top? I align the bottom and bias edges –the top should already be even. If there is a problem, I take my piece, and my ruler and double check to be sure I cut right ---if I am off anywhere at all, it is usually operator error in the cutting department.

princesscrown 010

Feed all of the pieces through attaching the right hand wing triangles. If you look closely you’ll see my Cheddar Bow-Tie leader/ender at the back end!

princesscrown 012 princesscrown 013

Press the seam out toward the wing triangle just added and snip OFF that dog ear! That is the one thing I am really picky about – dog ears don’t need to be in your patchwork, and can make it hard to know how/where to line things up, and make your seam junctions REALLY bulky and a bear to quilt through. Get them out of there! Now take the left hand wing triangles and put them right sides together with the goose unit, matching the bottom edge and the bias edge. The blunted top of the triangle should be even with the top of the goose unit.

princesscrown 015

Sew all the left hand goose wing triangles into place --- and follow it up with more parts from another cheddar bow-tie! Two projects at once—I love it!

princesscrown 017

Here is what we are looking for! The crucial point!

You need to be sure your seam allowance will give you a 1/4” distance between the top edge of the goose unit and the top of that goose triangle. If it is wider than that, your seam allowance is TOO WIDE and your unit won’t measure 2” X 3.5” before sewing it into the block. If you have LESS than 1/4” here at the top of the goose triangle – your seam may be too skimpy and you will lose the nose of your goose when you sew the blocks into the quilt. Your unit may also measure LARGER than the 2” X 3.5” we are shooting for. Be careful with your cutting, careful with your seaming, and all will turn out right! I took this pic BEFORE snipping the dog ears off…gotta get them off of there!

Block Assembly!

princesscrown 018

I’m a little haphazardly messy and way thready, but this is how we roll around here!

Lay out your units the way they will appear in the block. We are going to chain this together 9-patch fashion. If you can imagine this block has 3 rows across and 3 columns from side to side…

princesscrown 019

Sew the second column to the first column with right sides together. You will notice there are chaining threads left between the rows! Leave those there. Now flip the units in column 3 over onto column 2 ---

princesscrown 020

Chain from row 1 to row 2 and directly onto row 3. Now there is no way that you can get things turned around in the wrong way!

princesscrown 021

Your block now looks like this….3 rows held together by chaining stitches between the rows. Now all you have to do is quickly press your rows to get the seams going the way you want --- I press toward the outer 4 corners and toward the center unpieced square ---and sew the rows together! One block done!
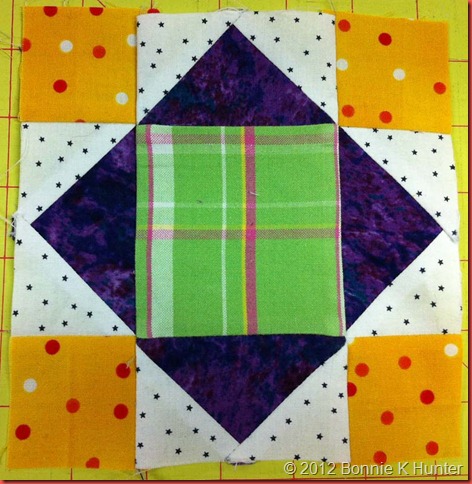
princesscrown 023

1 block completed! Make 25!

Here is a selection of blocks that went into my Princess Crown quilt! Blacks, Whites, Brights, and African fabrics!

babymichelle 010

I had a lot of fun pulling scraps for this quilt. Many of the African fabrics came from my friend Karol-Ann in the UK!

Setting the quilt:
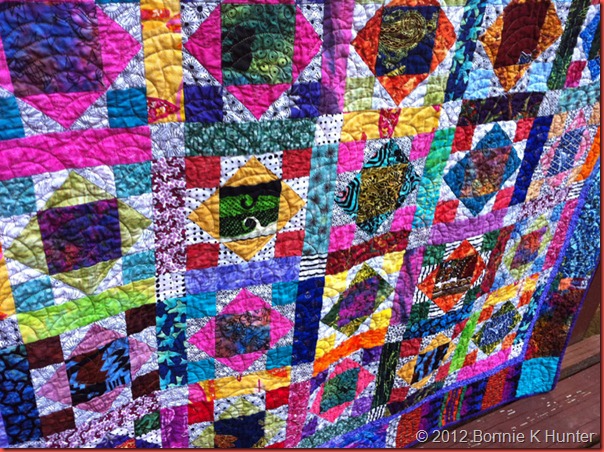
babymichelle 016

I cut 60 2” X 6.5” Rectangles from assorted brights for the sashing pieces. Between them are 36 black-on-white cornerstones cut 2” square. Lay the quilt out as you want the colors to fall, cornerstones, sashing and all.

Join the quilt into rows ((I assemble the whole quilt with the whole top webbed together just as I showed in the block assembly above….think columns and rows and chain, baby, chain!)) Join the rows to complete the quilt center. Press seams toward the sashings.

Inner border: I used a 1.5” strip of several purple fabrics joined on the diagonal for the inner border.

The outer border is a collection of left over fabrics from the block assembly ----what was left of the African fabrics that Karol-Ann had gifted me and some others. I included this special fabric that was also gifted to me by another quilter:

babymichelle 012

It was PERFECT! Michael is from Kenya, and his wife, Harriet, is from Uganda. Michelle is 100% AMERICAN. :c) The Swahili words of love, unity and family brought tears to my friends’ eyes when they received the gifted quilt!

Stitch random 5” wide scraps together end to end until the border is large enough to fit the circumference of the quilt. Cut 4 borders to fit the quilt sides, and four 5" cornerstones for the border corners.

For more info on adding borders to a quilt click HERE.

I quilted the quilt with an edge to edge design called Moon Flower by Keryn Emmerson. I bound the quilt in purple ---washed the quilt to give it that home loved softness, and gifted it to our friends.

101_1382

Is there anything as precious as a sleeping pink bundle on top of her very own quilt?