

Remember this sweet little lady?
And that was put on hold due to a missing spring that attached to the feed dogs below.
A part was located sometime in June, and then July hit and things went crazy with my schedule. Until New Year’s Day. I wrote about this last week, so this is the continuing saga of the oddly named C.G. HDW machine (Made by the White Sewing Machine Company.) and how she FINALLY got to sew!
And THEN – when I was eager to hook her up to a belt and get her running, I found that the one leather belt I had was too SHORT. The black rubber tubing belt that I get from Lehman’s was too thick to pass through the belt guard of the balance wheel underneath the machine. GAH!!

Do I have many treadling friends out there?
I hope this info is interesting/helpful to you!
The 3/16’’ tubing belt and connectors that I also like to use arrived from McMaster Carr. You can also use aquarium tubing, but I am so happy with how quickly these folks ship.
Simply cut the tubing to length. Things to love about tubing vs leather – NO HEINOUS STAPLE to contend with. It's not going to stretch over time and need to be shortened like leather belts have a tendency to do. The tubing doesn’t slip when sewing. If you’ve got the belt a bit too big at first, it is easy to trim off 1/4’’ or so and reconnect the ends.
The hardest part? Getting that first end into the tube -

It’s just such a little deal!
But it can hurt your fingers while trying to work the first end in there.
I find that if I hold one end of the connector securely in a pair of pliers, I have much more control and strength.

Working the second side into the other end of the tube.
Because the tubing is stretchy, it is easy to get over the hand wheel of the machine and into the groove – and best of all, it passed the narrow belt guard test – YES!
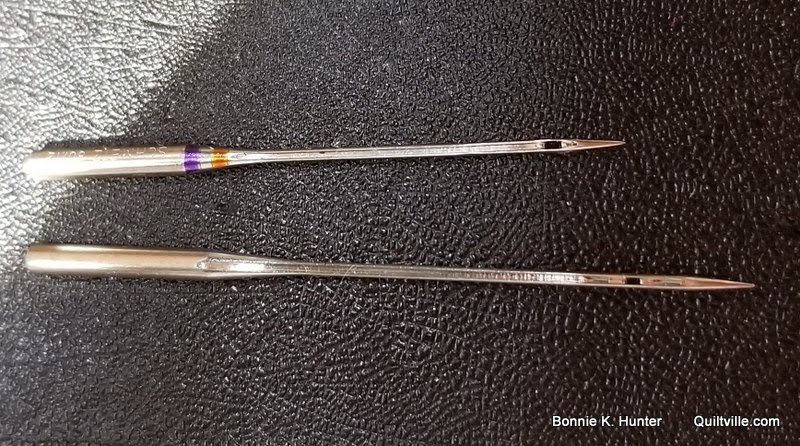
And this is where size matters.
Know your machine, and the kind of needle it takes.
The top needle is a 15 X 1, standard size needle that we use in many machines, including our modern ones today. This is the needle that was in the machine when I received it.
IT WOULD NOT STITCH. I got birds nests with every try, thread breakage, you name it.
That sent me on an internet search for any information on White treadles as I didn’t have a manual and I had no idea what the problem could be.
This machine doesn’t take a 15 x 1. It takes a Boye 20! Look at how LONG that baby is!
And once we figured this out – Click to Play:

A new needle in the correct size – MATTERS!
A new belt in the correct width – MATTERS!
And now the sweet C.G. HDW is stitching a beautiful seam. She’s had quite the journey. I’m thinking she needs to go live in the bay window in bedroom #2 at Quiltville inn!
Don’t you just love the SHAPE of this machine? That round end is just too cool.
Which brings me to our next adventure!
I heard back from Jessica & the Shippenstitchers, and they are so excited! They’ve chosen the first weekend of October as their dates.
Which means it is time to draw for the NEXT group!
Drum Roll Please!!!

Entry 32
THE STITCH MOB!!!
Jessica, I have sent an email to the address you provided with the available dates for your group. Many of the dates also include the possibility of adding extra days and a workshop should your group desire.
Please choose your dates, reply to my email and we’ll work on it together from there to make things perfect for your group!
After the Stitch Mob has chosen their dates – those dates will be removed from the available list of dates and we will choose our next group.
This whole process is so exciting. I woke up extra early this morning just because I knew I was going draw another group. It’s like Christmas!
And there is more excitement to come – because you know what tomorrow is?

(And evidently we are to Frolic down the center of the road!)
I’ll be spending much of today at my desk getting ready for tomorrow – and then there is that cutting sashing thing to get the Jack’s Delight quilt a bit further along in the asembly queue. How about you?

Quiltville Quote of the Day -
Vintage spiderweb quilt top, machine quilted by my friend Allison.
Oh, that purple background!
I love life on the scrappy side!


I love that the Quiltville Inn is beginning to fill. So exciting for you and the hubs..you've worked hard to get to this point. And you are definitely the machine master! Always amazed at how you fix and work on those golden oldies.
ReplyDeleteI wrestled On Ringo Lake onto my floor stand frame last night (after dealing with backing that was too small, batting that was too wrinkly) and today I'll set setting the first stitches in it as I hand quilt a Baptist fan pattern on her! That tubing looks a lot easier to use than the leather belt I replaced on my treadle...will keep it in mind for future replacements.
ReplyDeleteGood morning, Bonnie. Even though I am not part of any of the groups in the retreat lottery right now, it is sooooo exciting to watch it finally happening. Your excitement in seeing your dream coming true is infectious. And yay! for figuring out that size DOES matter. LOL!
ReplyDeleteI don’t even know what number was assigned to our group.... hoping our number is drawn soon. Waiting for tomorrow— have a great day, Bonnie!!!
ReplyDeleteSo excited! Love the frolicking lamby-pie!
ReplyDeleteI, too, use different color threads in my needle and bobbin when I piece. It makes checking stitch tension so much easier.
ReplyDeleteI LOVE that tubing and have used it on several machines! I have ordered from that company a couple of times and they are always quick to get your order to you!
ReplyDeleteThat sheep picture nearly made me spit tea all over my keyboard. :)
ReplyDeleteNifty little machine! Glad she's happy and working again.
Thank you for all of your tips. I have a one I will be working on once I bring her home from my Mom's. All of her parts move freely but just need a good cleaning. I don't treadle yet. All in time and part of my journey. Thank you.
ReplyDeleteI really admire your mechanical ability and the skill to get old machines humming again.
ReplyDeleteLove your posts on vintage machines. Lots of good information and tips. Thanks, Bonnie.
ReplyDeleteI always wondered how the O2 (oxygen) tubing could be re-purposed. I have bags of used tubing from my late-hubby's concentrator.
ReplyDeleteC.B., I was wondering as well. If so, I could save the 50' tubes from my dad's concentrator!! I hope Bonnie lets us know! I hate having to throw them away.
DeleteI wondered how you get the tubing connected. Thanks for sharing. I love the vintage machine information but have never tried to sew on the two treadle machines I own. Have tried my feather weight but love my 30 year old Pfaff best! Is 30 years vintage? It's been exciting to see your Inn dream develop and come to fruition.
ReplyDeleteI have a treadle a friend gave me years ago and I haven't tried it yet either. My 20-year old Pfaff died last year and nobody could fix it. The repair place I use even called in a Pfaff expert. It seems I just wore it out. I really miss that machine. I have a couple other much more expensive machines with all the bells and whistles, but this was my favorite. I also miss it's convenience since it was much lighter than my newer machines.I just bought a Bernette this afternoon to take to sew ins since I needed something lighter to lug around. Keep enjoying your Pfaff.
DeleteI love to see you bring an old machine back to life.
ReplyDeleteFor more than 10 years, I've used plastic tubing on my treadle machines. I even use the plastic tubing on my 1870s treadles. The tubing is slightly sticky, stretches slightly and works very well.
ReplyDeletePlastic tubing can be shortened or lengthened. Just add the needed length of tubing with the inserts.
I purchased 25 yards at a time.
My earliest sewing machine is a Folsom hand crank from the 1860s.
How wonderful you figured out the problem and got that sweet treadle working again, so awesome that the internet can furnish us with the answers to these little problems.
ReplyDeleteI’m so pleased for you your bookings are starting to happen, I can fully understand your excitement.
So looking forward to the next frolic clue, I’m loving these colours .
Thank you Bonnie for sharing your fun and excitement with us.
Love and quilty hugs
Anne xxx
I love how you lovingly restore these machines and pass that knowledge on. 💕💕
ReplyDeleteI love McMaster-Carr, too. To make the tubing easier to put on, put a tiny drop of soapy water inside the tubing. Just a drop, if the connector is not rust-proof.
ReplyDeletePlastic tubing instead of a belt? Who knew? Bonnie, are you sure you want to run a retreat center and not a vintage machine sales, repair and supply shop? Ok maybe a vintage machine display wall @ the QPO. That would be worth a visit to the Quiltville Inn even if I wasn't on a retreat!
ReplyDeleteBonnie, I love your quote. I really do think happiness is a choice.
ReplyDeleteThank you so much for the information on the treadle tubing that you use. I have a leather belt that I ordered and it just seems so stiff. Which tubing do you order? - soft, firm, hard????
ReplyDeleteYour motivating me to work on my tredle.....Thanks JoAnna
ReplyDeleteI need a source for treadle needles. A 96 year old friend has a treadle and I need to find needles for her.
ReplyDeleteRjoehnk5@aol.com
Bonnie and all, dip the ends of your tubing into hot water to soften it before pushing the connectors in...makes all the difference! And as soon as it cools, it takes a set and locks the tubing in place.
ReplyDelete