

I had some free time yesterday afternoon!
Why bind alone, when you can by with thousands of your closest internet friends? LOL!
I know binding is not a mystery to many, but there are a lot of new quilters that have joined us during our Frolic mystery and at some point they are going to need to tackle that binding thing as well, so hopefully this will give some clues.
And maybe there are some who also have a fairly shredded but still too good to toss out quilt that may serve you better as cushions to be enjoyed, than something folded and kept in a pillowcase in the closet.

This is the quilt I started with.
It looks okay from far away -

But not so great on closer inspection.
Several of the tulips were rotting away. It looked like this quilt had seen plenty of years of good use and loving. (Which is what we hope for ANY quilt, right?!) I salvaged it for $40.00 determined to make the “good blocks” into cushions for Quiltville Inn.

Determine your size!
My 16 1/2’’ ruler came in really handy here.

I was able to save 7 good sized blocks.
The two smaller pieces came from between the blocks – the nine patch center is the cornerstone. Those came from areas where the tulips were too far gone to save. I’ll bind them as use them as mug rugs. Or maybe put them with toy sewing machines as “mini quilts” or something.

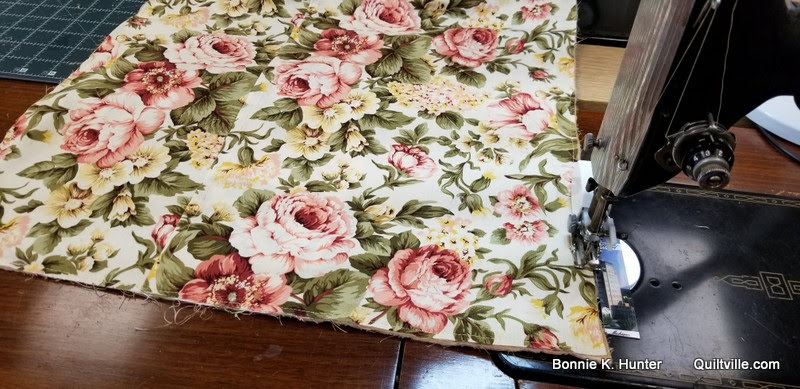
Making the backing pieces.
I find it harder to use big prints like this because my piecing tends to be fairly small. But they are PERFECT for projects like this.
THE FORMULA:
This cushion cover front is cut 16 1/2’’ square. The pillow will finish at 16’’ once it is sewn and bound.
There needs to be enough overlap between the two rectangle backing pieces that they wont gap and gape once a pillow form is added. Through trial and error I found my BEST overlap is at 3’’. 2’’ is not enough. 4’’ makes the pillow form harder to insert.
Since the pillow size is 16’’, I divided that in half to 8’’ – and then added 3’’ of overlap, bringing me to 11’’. Now add 1/2’’ seam allowance to that. I cut 2 backing rectangles at 16 1/2’’ x 11 1/2’’.
On one long side of each backing rectangle, run a double fold hem. Fold the edge over a bit less than 1/4’’. And then roll it over again about 1/4’’ and top-stitch close to the inside fold of the hem to catch all layers securely. Press.
Place the cushion front face down, noting which end is the bottom.
Place the first backing rectangle at the bottom half of the cushion front, WRONG SIDES together with hem toward the cushion cover center . Pin.
Place the second backing rectangle in place at the top half of the cushion cover, aligning raw edges, having the hemmed edge overlap the hemmed edge of the bottom half. Pin.
This is a job for a walking foot!
Due to the many layers in this project, I do the whole process by walking foot. Set your stitch length a bit larger than normal, and sew around the circumference of the cushion cover with your seam being just a bit less than 1/4’’ so it won’t show after adding the binding.

Click to Play:
View more of my binding tips under the Tips & Techniques tab at the top of the blog!

One finished earlier.
Binding is one of my favorite things to do in the evening. I always feel at a bit of a loss if there isn’t SOMETHING to bind at hand when I sit down to relax with a bit of TV.
This cushion, and the other one I started during the recording of the above Quilt-Cam will be finished this week and placed right on the beds at Quiltville Inn!
And I am super excited about drawing for our Retreat Rally winners starting WEDNESDAY! Will the random number generator draw YOUR GROUP!? Only if you have entered your group into the running. Click the Quiltville Inn Rally tab at the top of the blog and enter.
Any group not drawn will remain on the waiting list for future availability should any group cancel for any reason. It’s the only way I know how to be fair about this whole thing.

Last night’s binding finish!
Only the label is left.

The biggest one of all being NO TRIANGLES!! LOL!
Sew SO Scrappy, Sew Much Fun! You’ll find the pattern in the Digital Pattern category of the Quiltville Store. You can begin sewing it today!
This Irish Chain variation starts with a simple 9 patch and grows from there! Easy strip piecing and full color photos. Fat Quarter Friendly as well! Quilt size: 93’’ X 93’’.
You’ll love making this quilt block-by-block easily from strips. It’s fast, it’s satisfying, and destined to chase away those winter blahs that tend to follow when the holidays are behind us but spring is still far off into the future.
As for my Monday? MONA IS COMING! And she is staying the night. We plan to stitch today away, and then tomorrow head out with Martha for a round of antiquing fun. It’s been too long since we have done that. It’s time.
How about your Monday?

Quiltville Quote of the Day -
Something to ponder today as you work through your fabric!
If we have to jump into a Monday, we may as well do it with a laugh and a giggle!
Have a great day, everyone!


So true! I never thought about that before... why is that?!?! LOL
ReplyDeleteHave a wonderful time with your friends!
Ugly fabric multiplies, because it is on sale & we always want to save money. Then we can't decide what to do with it. It keeps getting put back. So I say start cutting it up smaller & smaller.
ReplyDeleteLove what you did with the old quilt. I've seen your beautiful quilts on display before. Do you make a temporary sleeve when you need one? And handstitch it on or use safety pins. I get that you may not one on every quilt, especially ones destined for your bed.
ReplyDeleteThanks for the pillow cover tutorial! Something I want to try but now I need a 16 1/2" ruler :) Yours turned out so pretty. I am glad Mona is coming over and y'all will have a great time. Do you have any plans on publishing the "winter blues" quilt from last January ? It's one of my favorites of yours :)
ReplyDeleteSo funny, I was just thinking about Mona and wondering where she was! So strange this “Bloglife”..if ever I share one of your stories, I say, my friend, Bonnie Hunter, haha, we have met only once but how well we all know you! SO kind of you to share your life with all us ”Quiltvillians” . Thank you!
ReplyDeleteI love the big floral fabric that you are using for the back of your pillows. I tried to find some of that print a while back but no one had it.....I love big florals.
ReplyDeleteSounds like a great way to spend a Monday. After our errands, including purchasing a new mattress, I will be working on organizing my scraps and hopefully putting together a few challenge blocks.
ReplyDeleteI am just becoming familiar with you, Bonnie. I just love your blog and the scrap quilting you do. Jo's Country Junction has gotten me following your blog. I have not done a dive into scrap quilting yet. On my list for 2020.
ReplyDeleteOh Bonnie, You are so charming. I have recently discovered your blog, and am delighted. Would you believe, I have been putting together a machine applique design for two pillows we keep on a little bench on our porch. I thought a winter design would be good, and since we just moved to rainy Portland OR from snowy Idaho, i thought I would put an umbrella/rain touch to them. I automatically thought of snowflakes. :) I love the pillows you created from the tulip quilt, and your instructions will be very helpful. What a lovely discovery you are.
ReplyDeleteYou're so funny, Bonnie! Make this your 2020 mantra (if anyone gives you a hassle for not primping for camera): "What do you expect -- a raving beauty 7-days-a-week??!!!" :-D
ReplyDeleteThanks for your detailed description of the binding, especially the join at the finish. I'm so glad you said "it's a crap shoot" whether or not a binding join hits a corner... my very first quilt, of course that exact thing happened to me, on a quilt I was gifting to my niece for her University graduation. I decided to just leave it, since my mitering worked out well. And since she's not a sewist, she was just thrilled I made her a quilt!
~Diana K from Hamilton (Ontario, Canada)
My favorite backing for a pillow or cushion is the front of a man's shirt with a button-down placket. This way you just unbutton the shirt, put the pillow form inside and button it back up. Easy peasy!
ReplyDeleteI shared this tutorial with a recycling group I am in on FB. Some people don't think any old quilt should be cut up, but when the history is unknown and part can be saved, I say why not. I haven't done it, but I did use some quilting practice pieces to make pillow covers.
ReplyDeleteI shared this tutorial with a recycling group I am in on FB. Some people don't think any old quilt should be cut up, but when the history is unknown and part can be saved, I say why not. I haven't done it, but I did use some quilting practice pieces to make pillow covers.
ReplyDeletebaby gifts boys 0 to 6 months
gifts for her under 20 dollars
gifts for him husband unique
gifts for mom under 10 dollars
Thanks for sharing nice information about cushion cover with us. i glad to read this post.
ReplyDeleteSuch a nice blog!!!
ReplyDeletemust have a look at Night time tips to put you to fall asleep immediately