 Click HERE for printer-friendly .pdf version!
As a Vagabond Traveling Itinerant Quilter….I have come to learn that there are “two camps” to the idea of “Bonus Triangles!” Either people hate them, can’t be bothered to spend the time to find a way to use them….or they LOVE THEM so much they just can’t let them go!
I know I am in the latter camp….but it took many years of dealing with odd sizes to develop a way that would WORK for putting these little gems to good use.
Let’s face it --
The method of drawing 2 lines 1/2” apart from each other on the back of the square being added to the snow-ball block, the flying geese rectangle, or whatever else you were doing….just made that “Bonus” be more of a Bother and a Blunder….The math didn’t work out!
Let’s talk about a 2.5” square as the corner piece, for example --If you sew those so each piece gets that exact 1/4”….you end up with a bonus triangle you have to square DOWN to 1 3/4”. I don’t know about you, but things that finish at 1 1/4” are just NOT user friendly with the sizes of scraps that I keep on hand. this would mean I would have to trim things down FURTHER to 1 1/2”….finishing at 1”…if I wanted to pair it with the other sizes of units I keep on hand---OR….cut all new fabric in weird sizes to go with them, giving me blocks that don’t fit nicely with the other things I like to do. I prefer blocks and units that finish on the even inch or half inch. Things that finish on the quarter-inch are just a Bummer!
So here is a little trick I use to ensure that I get the 2” unfinished size that I can readily use, finishing at 1.5” in the block!
We’ll start with a 2” X 4” finished flying goose unit for example!
I pulled a 2.5” X 4.5” brick from the brick drawer for the base of the goose, and a pair of blue 2.5” squares for the “Wing” triangles.
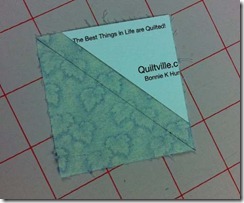
But before we sew…we need to make a “triangle buddy” ![]()
Determine what size you would like your unfinished Bonus Square to be. With the 2.5” square, I just subtract 1/2” to give me 2”. 2” unfinished is great!
In my workshops I pass out some “old” business cards ((You know how it is, the email address has changed, what am I going to do with a whole box of 1000 cards?))
Business cards are already 2” tall, if they are standard! Cut a 2” square from the business card…discard the odd end. Now cut that 2” square on the diagonal corner to corner. You’ve now got TWO Triangle Buddies!
I use these a lot at home, so I’ve also cut them from template plastic and mark the size on them. They are not as high contrast for pics for this tutorial, so you’ll see me using the business card ones!
I am one of those who DOES like to sew on a line if I am doing this type of method. I’ve tried the line drawn on the machine bed…I’ve tried the piece of tape, I’ve tried that angler, I’ve tried folding—but I know me, and I prefer to use a pencil or a pigma to DRAW an actual sewing line if the square is 2.5” or larger. If it is smaller, I’m pretty well able to “aim and shoot”….But with 2.5” or bigger, I get the best results when I have a line to follow.
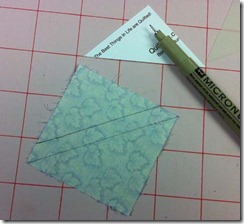
First: Draw your center line from corner to corner across the square.
Next: Lay your Triangle Buddy in the corner, using it for the placement to draw your second seam line.
I know drawing the lines is boring. I usually save this for when I am sitting somewhere away from the machine, maybe while watching TV…I have a sand paper board that is great for this. With dark fabrics, I use a white ceramic pencil, with light ones, a mechanical pencil or this very fine pigma work just great.
Experiment with what you like to mark with, you want your lines clearly visible.
I’ve marked both of my squares for the wing triangles, and I am ready to sew!
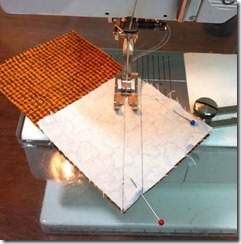
When sewing, I like the left side of my needle to just “KISS” the inside of that center line. My stitching is JUST in the channel between the two lines but touching the lines. This gives me a bit extra for the triangle to fold up and over the stitching. Even though we are not sewing on a CUT bias, we ARE still sewing on a bias, and fabric can crawl, so I do pin just to hold things square. I also piece with very SMALL pins…Save those big yellow headed quilters pins for other tasks..I like these tiny glass head ones!
This is crucial! So many patterns say “Stitch, Cut, Press, Discard” in that order! I find it really important to flip that triangle back first, make sure it is going to meet the edges of that base rectangle nice and square FIRST! I give it a good finger-press and crease with my fingernail.
If it meets and is square, then and only then…do I flip it back and sew the second seam. Reason? If it isn’t sewn right, who wants to un-pick TWO seams to fix it?
If it doesn’t meet? Do double check the size of your square..if it is 2.5” X 2 3/8”…you aren’t going to get a good result!
I do chain piece these….stitch all the center lines first, cut apart, then flip them to check placement, and then sew the second lines. Since I am snipping the units apart anyway, it’s really easy just to use my scissors to cut between the two seam lines. Look at the two units you get! And because you used a “triangle buddy” to mark your line for the bonus triangle, it is ALREADY 2” square! All you should need to do is trim off the dog ears. Get those out of there…I never understood why some quilters keep them in? They get in the way, they make seams bulky, you can’t see where you are going….snip snip and they are gone!
Now listen to me---each seam allowance WILL be a bit smaller than the traditional 1/4” seam. About 1/16” less. I can live with this. When I’ve sewn miniatures, I’ve been told to sew my 1/4” seam and then grade it down by half to eliminate bulk. Your quilt will not fall apart! But I wouldn’t go with any less seam than this…what is more important to me is the finished size of the bonus unit, NOT that each and every piece have an exact 1/4” seam. if the seam is in the proper place, the size of the seam allowance is neither here nor there. Remember, there are countries that use metric measurements, and their seams are not an exact 1/4” and their quilts are holding up just fine!
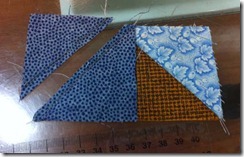
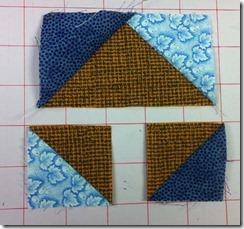
Here I’ve added the second square, checked for placement, sewn the second line for the bonus triangle unit, and cut them apart!
I’ve got one goose, and two spare goslings!
It’s a simple concept. It’s about leaving your extra bits in useable sizes that will work with other things. It’s about finding purposes for squares and bricks you already keep on hand. It’s about using that stash to its full potential and getting wonderful quilts out of it and minimizing the work and brain cramps at the same time! The possibilities are endless….
Go get creative!





Bonnie - thank you so much for this post! I love the concept of the bonus HSTs but I just grit my teeth at having to trim every one down to 1 3/4" -- You are a life saver. Thanks for explaining your technique. I'd much rather draw another line than trim four sides!
ReplyDeleteI must be a real neatnik freak because I just can't "stuff" my scraps into bags or drawers. Do you then press everything as you pull it out of a bag to sew and don't the edges get all hairy?
ReplyDeleteJoQuilter: I just put my bonus triangle/squares into zipper baggies and label them by square size for when I am ready for them. I've not had any problems with the edges getting hairy. They are not rubbing anything that could cause that. instead, they are safely tucked away and ready for future use!
DeleteThank you - such a simple little trick I never knew about. This makes the bonus triangle concept worthwhile to me!
ReplyDeleteDuh........now I get it! sometimes things just have to be laid out simply for me ....just as you did here. thanks Bonnie for another excellent scrap lesson.
ReplyDeleteHappy sewing
Loved your tutorial - explains a lot and good information for all quilters. Judy C
ReplyDeleteThis is wonderful!! Just wish I had not just finished making 144 flying geese and marking my 1/2" second line which yielded 288 1 1/4" HST. :) However, I WILL remember this trick from now on. Thanks for your tutorial and very detailed demo. You are soooo good!! Judy S
ReplyDeleteBonnie, this is just another "great tip" that you have given us. I just love you and have never met you ! pattyeth@bellsouth.net
ReplyDeleteThanks Patricia! I used to measure between the two lines with a ruler, and then a lightbulb went off to make a corner template, and I've never looked back! It just WORKS to have them in a size I can use everywhere, every time!
ReplyDeleteJoQuilter...loosen up! 2 seconds with a hot iron will solve any wrinkles...and sometimes threads happen. It's fabric. It's about getting the most out of the leftover bits :c)
Bonnie
Gotta love free quilts from scraps! I will make me a triangle template too. Just got done sewing a ton of HST together last night. I am sewing all mine into pinwheels this time around.
ReplyDeleteI have jars of hst's in my sewing room from various projects...need to pull them out and use them now! Like the card trick...
ReplyDeleteI sew the bonus triangle and found the bonus was always an akward size to use too. I usually keep them the size they are and use them to sew a decorative strip on a pillowcase or throw pillow to match the quilt they spawned from.
ReplyDeleteI like this method and will be sure to try it. Thanks for sharing your creative genius Bonnie! Keep it coming!!
Jacqueline, NL, Canada
Here is are three examples of using my (or someone else's) leftover triangles.
ReplyDeleteThe finished size of the triangles in the ranges from about 1/2" to 3". Anymore I try to keep up with my triangles and sew them up into broken dishes blocks so they are less overwhelming and when I have enough I will make them into another top. A friend just gave me the book Friendship Triangles by Edyta Sitar that I hope to use with some of my triangles also.
http://www.flickr.com/photos/lucysquilts/4637088633/in/set-72157594301574034/
The small triangles in this were the 'leftovers from two quilts I made from the same pattern and since I had so many of the same type I decided to do Lady of the Lake blocks. I think each LotL block finished at about 5.5".
http://www.flickr.com/photos/lucysquilts/4521125910/in/set-72157594301574034/
This little quilt is about 26" square and the little triangles were the leftovers from a bunch of flying geese blocks that a friend used in a quilt she made.
http://www.flickr.com/photos/lucysquilts/253867351/in/set-72157601729798110/
Thanks, this is good information. Now that I've done one the hard way, I'll surely remember this the next time! I recently made a mini from bonus triangles left from a Christmas Pinwheels quilt. I didn't think about sewing that extra seam before I trimmed them. They finished at 1.25 by the time I had squared up, so it was an odd size. Since I only used those units, it wasn't a problem with this one. 200 red, green and beige triangles with a 1.25 border made a 15.5 finished mini. It won a blue ribbon at our guild show, so I suppose it was worth the effort!
ReplyDeleteThank you for sharing this, Bonnie. It's MUCH better than endlessly sewing those tiny triangles, just to wind up with an odd size. Wonderful!
ReplyDeleteThank you so much for this. I just finished piecing and cutting several units for a new quilt, and ended up with 150 1.75" bonus triangles. That won't happen again with your method. Quilt and learn, I always say.
ReplyDeleteThank you, Bonnie! I started sewing that extra line recently but was not coming up with consistent sizes. Your idea will be a big help.
ReplyDeleteGreat blog today Bonnie. Very useful!!!! Thanks.
ReplyDeletedefinitely makes sense . . like always - you have enlightened me.
ReplyDeleteThis is just a wonderful post, Bonnie.
ReplyDeleteI have been sewing a double seam, HOWEVER, I wasn't marking THUS was not consistent with the end result.
Guess, what ! ! ! from now on I WILL BE MARKING and ending up with very usable hst's.
Thanks for this time-saving, efficient tip.
Hugs,
Gerry
Excellent - wish I'd known this before!!
ReplyDeleteLove the new look of your blog...or has it been awhile? :0) Where does the time go anyway?!!
ReplyDeleteThanks for such a great post Bonnie. I'm sure this will be great help. I am NOT a math person at all so if things fall at 7/8 or strange numbers like that my brain sprials out of control. LOL This is going to help I'm sure.
ReplyDeleteI have been looking at buying the software by Bear Paw Productions called Triangulations. Have you seen that yet? It looks like a good idea and a huge time saver in creating half square triangles. I like how it says you can customize the printouts to whatever size you need to have. You can find it here if you haven't seen it yet. http://www.bearpawproductions.com/store-detail.php?cat=1&ID=2 I don't know why all the question marks show up on that page or if even that is only my computer showing them too possibly. Another blog I follow just loves this software though and it looks really good. Because I'm so new though, I would love to hear what your opinion is.
Great Post! I'll put this to use right away. Would you please make it "Printer Friendly" so I can put it in my files for future reference and to share with others? One of your best tutorials! Thanks a MILLION!
ReplyDeletePauline
Thanks for the great tutorial. Since Double Delight I have fallen in love with the bonus triangles(which I used to throw away)but they have not been consistent and I find I spend a lot of time trimming and measuring. I will make a triangle buddy for next time, it will be great.
ReplyDeleteThanks again.
Arley (Sooke BC)
thank you Bonnie for this clear written instructions. I was lucky to get the exercise in real from you in Bad Cannstadt (Star Struck) but now I have it printed to remind me on your experience. Hugs Brigitte
ReplyDeleteYou are THE BEST with your tricks and techniques to make the most of ALL our fabric!! Thank you :)
ReplyDeleteTerrific tip, thanks so much!! But I'm terrible with templates, so instead I pulled out my Easy Angle Ruler (that I learned about from you), saw they didn't have a line where I wanted one, so I just added my own line. Now I have a nice ruler to use to draw the line -- I draw the corner-to-corner line with it, then move it to my hand drawn line to mark the second stitching line. Easy peasy!
ReplyDeleteI used to just throw these away, but as fabric gets more expensive, I've started saving them - and lately I've been wondering what I'm going to do with them. Thanks for the great tip!
ReplyDeleteThis is an awesome tip! I am really trying to perfect my quarter inch seams and get better at piecing and you are making it so much easier for me!
ReplyDelete" and their seams are not an exact 1/4” and their quilts are holding up just fine! "
ReplyDeleteThis is the BEST Statement in this post!
I love this idea. Will definately be making myself some triangle buddies.
ReplyDeleteBonnie may I come and live with please, I'll pay rent ;c) I love your tips and tutorials, your down to earth attitude. The reason I'm asking is I keep saving your tips on my homepage of my ipad and I'm running out of space. It would be cheaper to pay rent than keep buying new iPads lol.
ReplyDeleteThank you for all the great tips.
Peg xx
Ps. I'm good at tidying and I don't throw scraps away, just incase that helps my application ;0)
You are such a great source of handy info! Thanks for sharing your great time saving and fabric saving tips!
ReplyDeleteAh, now I get it! thanks for your always timely info!
ReplyDeleteI love your tutorial. For this new bee its really easy for me to understand.
ReplyDeleteI just learned this technique in a class I was taking and it is a wonderful way to save fabric and so easy to have extra little pieces of a block already started. This lady I took the class from used them as cornerstones in her quilts.
ReplyDeleteI just learned this trick in a class and the instructor used the HSTs as cornerstones in her quilts. Great way to save fabric and utilize the extras!
ReplyDeleteSo very clever!! I have a box of weird size blocks, think I will use pillowcase trick O read above but this technique in the future. Thank you!
ReplyDeleteWonderful! Thanks for the info.
ReplyDeleteI love my mechanical pencils for marking a fine line. You mentioned a white ceramic pencil --does it have a fine tip like mechanical ones? Do you know if and where I can find a white mechanical pencil?
ReplyDeleteBrilliant! Thank you.
ReplyDelete