

Morning, Quiltvillians!
I have had many questions over how I was going to finish the edge of this project - even while I was piecing, and in to the quilting (which took years) folks were asking "How are you going to finish that?"
This has been my plan all along.
I used the same technique on my first hexie quilt finished in the 1990s. (Take it from me - you do not want to hand quilt through Warm & Natural with a scrim in it. Just trust me!) My hexies were much larger, and I wanted to keep the picot edge intact rather than lose some of the border effect by trimming edges even, or even appliqueing to a plain border.
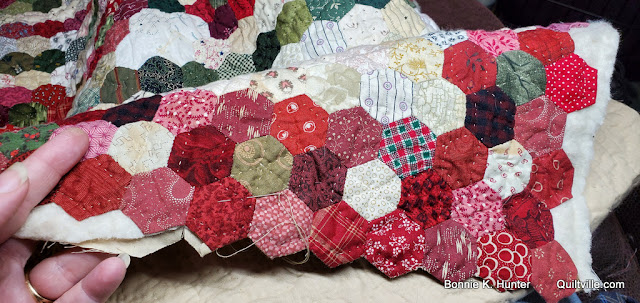
My hexies are only 3/4'' per side.
Can you imagine trying to add a separate binding strip around all of these points and valleys?
Likewise - making a facing out of *only* approximately 400 more hexagons to finish the edge with the facing hexies stitched to the backside more than triples the job needed to finish this edge.
Example HERE.
While cute for a small project - making MORE hexies simply to make a facing is not where I want to go.

A simple knife edge finish has the same look from the front, but has none of the heavy bulk that a hexie-facing does.
Basics:
The outer edge of the quilt top is already turned under due to English Paper Piecing basting. My basting stitches were only on the under side of the hexies and stay after removing papers. The basting stitches are now hidden inside the quilt never to be seen (or need to be removed!)
*NOTE* If you are glue basting your hexies you will have an unfinished raw edge around the outside of your quilt top when you remove the papers.
I quilted 1/4" from the outside edge leaving space to trim and turn the backing inward to meet the edge of the quilt top.
I am trimming just a bit ahead of where I am stitching.
I am undercutting the batting just a bit shy of the edge of the hexies due to the loft.
I then trim the backing fabric 1/4" away from the edge of the hexies giving me seam allowance to turn under.
I am also clipping into the V areas as needed.
My thread matches the backing fabric.
I am finding the point of my seam ripper extremely useful in helping me turn in corners and achieve sharp points.
Slow process, but its looking good so far.

The under side.
I have been using that pin to hold down points I am stitching toward.
I know this is going to take a long time. What I am showing at the top of this page is about 3 hours worth of work. But it will be worth it.
This quilt is going to Jason in due time. I have an unquilted top for Jeff - but I think I'll finish up another hand quilting UFO before I dig in to quilting that one.

Does this look like mid-December to you?!
It doesn't feel like it to me!
The temp was 56 yesterday afternoon. Jeff has removed the sod layer for the bed of our walkway.
What a difference this will make!
Now that the sod layer is gone, we've got to dig the dirt down a couple of more inches, and fill the trench with sand before laying the pavers.
Jeff is working his regular job today and tomorrow, but will be back up on Saturday to work on this some more.
Crazy to be hoping that the "weather holds" when it really shouldn't be - but we want to get as much of this done before bad weather comes if we can.

Planning on my Christmas to New Year's fun project!
I keep this bin next to my cutting table and anything i don't save in my Scrap User's System goes into it. It's usually stuff just less than 1.5" but more than 3/4".
It's overflowing!
I am planning on a whole week of schmaltzy heartfelt holiday movies and much string block sewing in my stretchy pants!
I am more excited about this designated time than I am about Christmas!
Shhhhhhh - don't tell anyone!
Do you get giddy over personal holiday sewing time as well?

Quiltville Quote of the Day -
Take a good look at these pinwheels.
What do you see?
Beauty in imperfection!
Happy Accidents.
REAL.
Like this quilt, life is never perfect, but there is beauty to be found if we just look.
I hope you are able to find some beauty in whatever situation you find yourself today.
Part Four of Rhododendron Trail goes live TOMORROW!!
Are you ready?


The knife edge finish is exactly right for this quilt! It looks so nice. My grandmother used this finish on most of her quilts and comforters.
ReplyDeletethanks Bonnie for the info on binding this quilt. at our last quilt get together we were discussing how to finish a hexi quilt a member is making. I am printing this for her I think this is the way to go. thanks again
ReplyDeleteThank you for the pics and explanation of your quilt finish. I couldn’t quite get my head around it yesterday!
ReplyDeleteThe edge finish of your quilt will be awesome. On a smaller hexie quilt I have seen a straight facing added to the front, trimmed and folded back. But the hexie shape still had to be dealt with so your method is very clever.
ReplyDeleteBeautiful hexie quilt! I have hexies in waiting for a project one day too. Yours is gorgeous! and NOO...I'm not ready for Clue 4 HA! But then again...it's not a race, right? Have a great day Bonnie!
ReplyDeleteHi Bonnie! I've never seen this edge treatment before but it looks great!
ReplyDeleteA perfect finish! And my first thought when I saw that basket full of scraps was "Where's Lola?" Anybody else?
ReplyDeleteQuick question - do you use a ladder stitch or a whip stitch to sew the edges together? Thanks
ReplyDeleteThe sides of the hexie are only 3/4'' so a ladder stitch doesn't put enough stitches across that space. I'm using a whip stitch, barely catching a couple of threads right at the fold of both sides.
DeleteHaving your hexie quilt at the finish line is like coming to the end of a really, really long book and not wanting it to end.
ReplyDeleteThat hexie quilt is beautiful and a true labor of love. What a fortunate son to receive such a gift. The red/green combo is amazing. I have been watching the progress on the brown/turquoise quilt and waiting to see how it would finish, I love the color combo, it sparkles and shines. I am making my own red and green quilt based loosely on the Blue Heaven pattern, cutting, cutting, cutting with anticipation of sewing during our Winter Break from school. Thank you Bonnie for sharing so much of your quilting journey. Happy Holidays to all!
ReplyDeletegreat minds think alike! i too am planning the week between christmas and new year's...even tho i sew almost every day set aside something special for this week...
ReplyDeleteThat finish would have never entered my mind. It is perfect and I am filing it away in case I every do a hexie!! Not likely since I'm getting fairly close to 80!
ReplyDeleteThat knife edge is super clever, and it looks beautiful. Hand stitching that lovely red/green/cream quilt through the holidays will feel really festive!
ReplyDeleteSaving a link to this post for future reference. I appreciate that you also linked to the faced version. Saving that one, too. Never know when one might work better than the other on some future project.
That new path is going to be super handy! Fingers crossed that your weather holds out a bit longer.
The new path will be so awesome. Loving following along as you enjoy being home.
ReplyDeleteAll I can say is WOW!! Quilt is stunning.
ReplyDeleteThanks for explaining the knife-edge finish. I have an ages old hexie project I need to get back to work on and that will be the perfect finish for it.
ReplyDeleteThank you for sharing, I am piecing a hexagon quilt now and wanted to know another way to finish it. I like your idea and will consider using your technique!
ReplyDeleteYour finishing technique looks great. I wonder if facing the quilt would be an option, or just a lot of hassle to turn all the points?
ReplyDeleteI don't think I'll ever do a hexi quilt because I am too chicken. I hope to finish clue 3 this weekend.Thank you, Bonnie,for doing the MQ. So far I have thoroughly enjoyed it and also learned to use 2 new rulers. Looking forward to seeing what clue #4 will be.
ReplyDeleteWith 11 grandkids, 2 sons and 2 daughters in love here between Christmas and New Years, I don't think I'll get any sewing time in. 😊 Hoping for some quiet January time to sew.
ReplyDeleteI never thought of saving scraps that don't fit into the scrap saver's system so I am intrigued to see what you do with them.
ReplyDeleteI love your hexi quilt. It is a lot of work for sure, but thhe end result is fabulous. Love the pattern you used.
ReplyDelete"Personal sewing time" cracked me up. It made me think too. I have made 5 doll quilts (appx 19 x 24) for our great granddaughters out of state for Christmas. I have the 6th (our local one) on the design wall. I way, way underestimated the time they would take! So, I have been push, push, pushing. String blocks for fun really sounds good. Every year I tell myself to start in January for Christmas, haha. The older I get this plan makes more sense. It will make for a more harmonious outcome. Merry Christmas Bonnie. Happy personal sewing time!
ReplyDeleteI love your hexie quilt. I think I might even start making hexies. But I want to ask you a question about buying an old Singer machine. I would like to buy a 40's machine not in a cabinet. I want something portable. But I don't have any idea which one I should buy. Just looking right now. I want something for a backup when my machine needs repair. Any ideas would be helpful. I hope this isn't too long! Merry Christmas Bonnie!
ReplyDeleteThanks so much Bonnie! I was left my great grandmothers (grandmothers flower) hand sewn quilt face. She had started to turn the outside edges and basted them down for a a couple feet. The women at the store told me to appliqué it onto a larger piece (I refused the suggestion even if I wouldnt be keeping with tradition!) They also were snobby about my ability and said I should send it off to be machined… (I didnt share with them I am an FIT fashion design grad and make custom gowns…) fair to say I didnt agree with any of their suggestions and figured I could do this technique; even if I did make it up. Its a family heirloom and its now my “responsibility/opportunity” to make it come from “me” as well as MeeMee McRae. Thanks for the explanation and visuals!
ReplyDelete-Courtney