

The most common of hexagon patterns is the "Grandmother's Flower Garden" But did you know that mosaic patchwork goes way back before that popular hexagon revival of the 1930s?
There is a great article found on WomenFolk.com about the history of this kind of work, with the earliest known American mosaic quilt dating to about 1807, and English quilts are even earlier. I read about a template for this kind of piecing that is dated to around 1770!
The Illinois State Museum has a nice collection of mosaic or honeycomb quilts in their collection.
Several years ago while living in South Carolina, I was down in Charleston for the Cobblestone Quilter's 2003 Quilt show...and there was a book on mosaic quilts in the museum gift shop, as well as many mosaic quilts on display in the museum itself. You can bet that book came home with me! One of my favorite quilts was just a top in progress...fussy cut little hexagons, papers still in place, and you could read the writing on them! FABULOUS!
Though you can buy pre-cut English paper piecing hexagons, I've been having a lot of fun with this:

It's from Creative Memories, and has 2 sizes of hexagon punches. The one I am using on the right is a 3/4" per side, or a 1 1/2" finished size hexagon. The one on the left is smaller. Each side measures 1/2", for a 1" finished hexagon.
**Note** I've since been told that the hex punch has been discontinued, so if you can find one on ebay or craigslist, snag it!
I'm having a great time repurposing greeting cards, business cards, advertisements that come in the mail, anything that has that "card stock" feel to it. All those political flyers? Oh yeah..they are all getting chopped up! Those subscription cards that are blown into magazines? Perfect! (I've even been guilty of picking them up off the floor in the grocery store and putting them in my purse!) I have enough junk paper coming my way that I don't feel the need to have to buy pre-cut paper shapes. I'd rather spend that money on fabric!
If you don't have a punch, or access to pre-cut paper shapes, you can cut your own. You just have to be very careful that they are all exact so that they fit each other when you join them together.
I pre-cut my fabric shapes a scant OVER 1/4" seam allowance all the way around. I feel like the hex papers stay in better when my seam allowance is a bit more generous. This is just something I've figured out for myself while working on this 10 year old Phd! ((Phd=Project Half Done!)) Yes, that's right..I started this quilt THAT long ago and it has moved with me from Idaho to two places in Texas, to a place in South Carolina, and on to North Carolina. It's come out of the cupboard now and again, ((Not as often as it should!)) for 2 trips to the Netherlands...it is so very portable! But I've got the push to really keep working on it now and see it DONE. It could be that 10 year anniversary GUILT!?....who knows....*LOL*
SO! Here we GO!

Center a paper hex on the wrong side of the fabric. Take a small pin and pin the fabric in place on the BACK (fabric) side. This keeps your thread from getting tangled up in the pin when you are basting your corners.
I use a size 10 applique sharp when working my hexagons, and yes, I do use a thimble!
My favorite thread for basting/stitching hexagons is aurifil. I love how I can use a good length and it doesn't shred back up against itself the way that some other cottons do. Some like silk, some like bottom line. Thread is a personal preference. I'm using a shade of grey/green because it blends through all the fabric colors I am using without standing out too much against any of them.

This is the paper side of the pinned hexagon. The pin might buckle the paper a bit, but not too much. Some like to use a hole punch to punch a hole in the card, and pin through the hole, but I don't have time to be bothered with that. ;c) Just pin it!

Start at one side, and fold the seam allowance over the edge of the paper hex. Keep that pinched with your finger, and fold over an adjacent side, creating a little miter at the corner. Run your needle through the fabric, under the fold, but not through the paper. We are just going to be back-tacking the corners. The stitches will NOT go through the paper.
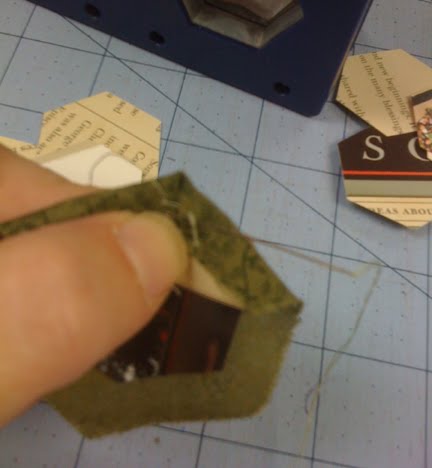
Working the same corner, do another little back stitch so your thread anchors that corner. Pull snug but not tight.

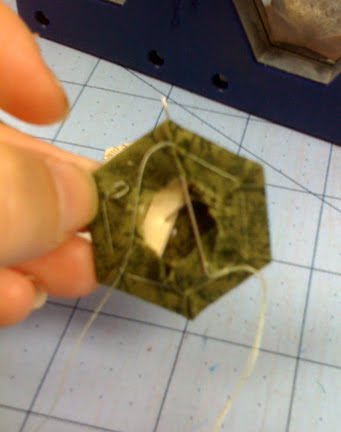
Fold over the next adjacent seam allowance, and tack stitch at the next corner in the same manner. The basting thread will travel from corner to corner on the back of the hexes.
**Note** If you are doing hexes that finish more than 2"...you might need to stitch through the card at the center of each side, as a really long stitch on the back might not be sufficient to hold your seam allowance in place. That *Will* mean you have to remove your basting stitches at a later point. You won't be able to continuously baste AND attach your hexagon to the next one, you'll have to baste the hexes individually and start a new length of thread to join the basted hexes.
I've only used this continuous method for SMALL hexes. The quilt I did with large hexes I just hand pieced the "regular" hand piecing way with no papers needed.
Continue all the way around the hex until you have tacked each corner. Just tack that 6th corner, there is no need to carry your thread all the way back to the first point...the basting threads will be on 5 sides only on the back of your hexagon.
If this were a center of a flower, I would knot my thread and end it here. But I am using this green hexagon in the border segment I am working on. No matter what pattern you are doing with these, the steps are the same.
I like my stitching to be as continuous as possible, and because I am adding this to another unit, I'm not going to end my thread here. Instead, I'm bringing my needle out through the corner of the hex, and I'm going to join it with the same thread to the unit already in progress. If you were making flowers, you would add them in the same manner. This helps keep things more secure. Since these sides are only 3/4"...I don't want a new piece of thread and a new knot every 3/4". And this gives me a way to see instant progress, instead of just building up a baggie of miscellaneous basted pieces that have to be sewn into something later.

Place the hex where you want it to go to check placement, and then fold it right sides together with the one you are sewing it to. It's a *Y* seam process, but it is very easy to do by hand.

The secret about whip stitching these together is to have your needle catch only a few threads of each hexagon at the fold. If your stitches take too big of a bite your stitches will show. Stitch only through the fold, not through the paper.
I take two stitches at every corner to anchor the corners and to keep them snug so they won't gap. Each side takes me 8-10 stitches to get to the next corner on these 3/4" per side hexagons. Work carefully, work slowly. When you reach the next corner, take two stitches to anchor the corner securely.

After reaching the corner, flip out the little hex you just added, adjust to the next side you will be sewing, fold it back with right sides together to align those two sides, and start stitching again. I find it helps me to pinch the adjoining hexagon to give it a crease which allows me to really stitch into the corner. Two stitches in the corner to anchor it good to prevent gaps...little tight stitches just along the fold, not too big of a bite to keep stitches nearly invisible, working toward the next corner.

When you reach the corner, two more stitches to anchor...
And if this is far as you can go, there are no more sides of that hexagon to stitch down, work a few stitches back toward the center of that hexagon, away from the corner. This allows you to keep corner stitches tight, and makes it so there is never a knot in the corner of any hexagon that might work loose. Knot and end thread.

Here is my hexagon all sewn into place on this border unit!

If you are working flower units, the system is the same. Baste your center hex. End the thread. Baste your first petal, bring the needle up through one corner, and attach it to the center hex without breaking the thread. End thread and baste next petal. Continue to add petals around the center until you get to the last hex! Sometimes you get to connect only one side, sometimes two, but that last one will have you basting your hex, and sewing three sides to set it into place with one length of thread -- no stopping. When you get used to the process, you can find yourself piecing whole sections and joining them together with long seams, just working point to point to point. It's addictive! And FUN! And a great way to make use of found time!
These flowers are waiting to be sewn into the next border section in my quilt.
And just to show you when you can remove the papers:

When the hexagons are completely surrounded by another row on all sides, you can easily lift the papers out and reuse them! This is the backside of the 3 flowers, and I've already snagged the center hex from the green middles. You WILL want to remove them as your project grows because it keeps the center supple and easier to work with it in your hands. Only the outer-most row needs to have the paper pieces in place to keep them in shape!

Ahhhh! Progress!! I can hardly wait to go to my bee meeting tonight so I can stitch on it some more! :c)

PS...if you want to print some hexagon graph paper so you can design your own layout with markers or colored pencils, click HERE! It's a lot of fun to design your own the way I did.
And for those asking --- My quilt will finish at approx 79" X 90". My hexagons are 3/4" per side, or 1.5" across the center from point to point. I have not even begun to count the pieces in this quilt, nor will I until the piecing is done!


Wow beautiful tutorial as always! This will definately clarify things for those beginner EPP's out there.. and it explains things in a way only you can! THANKS BUNCHES!
ReplyDeleteI do the things the exact same way! YIP PEE
There are quilts -- including hexagon quilts -- at the Illinois State Museum?!?!?! I'm only an hour and a half away ... and I'm planning a road trip to Springfield NOW! Thanks for the heads up on that ... and all the tutorials you provide!!
ReplyDeleteAhh, such familiar instructions. And, so like mine, except that I haven't pulled any of my papers and I was basting tons of hexes and then forming them into sections. Had not thought of basting and joining in a single step. Thanks! Lane
ReplyDeleteI've never seen a mosiac quilt or even heard of them..LOL. Thanks for sharing. It's now on my list of "eventually".
ReplyDeleteYours will turn out to be fabulous.
Thanks for posting the info on mosaic quilts and for the graph paper to play with.
ReplyDeleteThank you for this wonderful tutorial. Your design and colors are beautiful ! This makes me really appreciate some of the historical examples, and the painstaking work that goes into this kind of quilt. Readers may all be familiar with the amazing Brayley hexagon quilt at the Victoria & Albert Museum in the UK, but if not, check it out: http://www.vam.ac.uk/images/image/46122-popup.html
ReplyDeleteSo nice of you to cave in to us... Now can we twist you enough to start the Mystery early? Just kidding, but I'd be more than happy to get a jump on it!
ReplyDeleteThanks for posting this tutorial Bonnie, having made a few hexie flowers before I thought I knew what I was doing but I've learned I was doing it wrong and I've also picked up a few techniques I didn't know about.
ReplyDeleteGail
As with the plastic kind. I punch a round hole in the center of the cardboard hex. This allows you to put a pin thru the hole and pin the cardboard to the fabric,, but not make a pin hole thru the cardboard each time. Then when it is time to take them out, just insert a long thin object (Knitting needle or crochet hook, or pencil etc) insert thru the hole and pop out the hex..
ReplyDeleteI love your hexie quilt. I also did a search for the book you mentioned and found a great website that others might find interesting. It's paperpieces.com. They have the book listed as available for $22.50, plus they have free patterns available. A great inspiration site.
ReplyDeleteThanks for that, interesting to see different ways to do something, with the same end result, that's what is great about quilting, you just need to try different methods to see what 'feels' right for you.
ReplyDeleteI really like the 'SEWLINE" glue pen for basting fabric onto the papers and I too love Aurifil threads.I know some people use a peg or hairclip (the clipping kind) to hold the fabric in place while you baste, rather than a pin. I have never made a Hexie quilt, just smaller projects using them.I have made lots of blocks of Dresden Plates and want to make a quilt in blues and yellows.Sue Daley of Australia designed perspex templates for plates, dresdens and much more shapes that has a seam allowance included and you just use your rotary cutter to cut several layers of fabric at once, this is a great time saver!I have a link on my blog if you are interested?
Sometimes you just have to do something in self defense don't you? The tutorial was wonderful, as usual, and sure did explain some questions I was going to ask you. Thanks for being you, Bonnie. JudyC
ReplyDeleteI am adding you to my big Hexagon quilting post from last week. Since I am most known for my listings of free things and how I keep them updated, the hexie craze had to be included and many have mentioned your beautiful quilt or cutter in comments to me. My post was: Quilting With Hexagons
ReplyDeleteThat was a great tutorial, lots of information, but there's so much prep work. I found some software called Inklingo that allows you to print hexagons right on the fabric, complete with cutting and stitching lines. Then you just cut them out and start stitching. Eliminates all that prep work.
ReplyDeleteI hate cutting fabric into pieces to feed it through my printer which jams..and uses ink! So it's a "to each their own." Kind of preference. I find that to be even more labor intensive...
ReplyDeleteThis method also enables me to use SMALL scraps, instead of yardage :c) I can't feed those small pieces through the printer. Something has to be available to use up the little precious bits!
Bonnie
Your hexie quilt is beautiful Bonnie and also a great tute thanks.
ReplyDeleteRobyn
I made one...ONE grandmothers flower garden quilt...and am still working on it! I found that Christmas cards were lovely stock for hexies...your quilt is wonderful, Bonnie.
ReplyDeleteI really like this quilt. I am considering one just to have some hand work to do. Any suggestions on patterns?
ReplyDeleteThanks Bonnie. I have been wanting to try this and continue to find snags in the directions or there are little tid bits left out. Very informative and wonderfully done.
ReplyDeleteyour hexies & quilt looks great. i'm making hexies too for a quilt. i'll be following your progress :)
ReplyDeleteWell, you are a really bad influence. After reading your tutorial I fired up EQ and drafted a hexie quilt. I was looking for a hand project for the two trips we will be taking in Dec and Jan and this seems like just the right thing. Thanks.
ReplyDeletePerfect timing! I just asked for help with hexies, and was given this link. I finally 'get' it. Thanks so much for sharing this info.
ReplyDeleteBonnie, thank you so much! I've looked at these quilts for year but been too afraid to try. Now I have the perfect project for my fall roadtrip. I have a box of 470 fabs left over from my Scrappy Gretchen and just found a hex cutter on Ebay! Lynne
ReplyDeleteThanks for the step by step instructions :) I got a punch and even got a die for my cutting machine to do the fabrics. I'm just not sure what I want to use for a design. I printed out some paper,but I also googled "hexagon quilt designs" and got a few different ideas. Actually mostly from wall and floor tiles!
ReplyDeleteI do my hex's with Inklingo....by machine! Linda Franz came up with a wonderful quilting tool so we can print the cutting and stitching lines on the back of fabric with a regular home printer! I love creating POTC (Patchwork of the Cross) blocks using elongated hex's with Inklingo!
ReplyDeleteBonnie, I've had a lot of trouble with my thread choices and hand sewing. Seems I spend more time untangling the thread than stitching! Can you tell us where is the best deal on that thread? I'll proly have to order online since I live in the middle of nowhere! Thanks :)
ReplyDeleteI would also suggest that you run your thread through some thread conditioner.
DeleteI'm so excited...one of my FB friends posted several items from Creative memories for sale and guess what she was selling...both of the hexagon die cutters....guess who is buying them for a bargain price. Thanks for the suggestion.
ReplyDeleteNo bargains now for the hex punch but got one anyway...can buy a lot of paper hexes for what the die goes for now on EBAY. Connecting threads has a sale on the paper hexes right now. I do love the idea of using my old card mail though. I really want to do a "mosaic" by me design. Thanks Bonnie!
ReplyDeleteThanks for the tutorial! I was just bit by the bug when a friend destashed her entire fabric stash to me. I decided it would be nice to have a take along project, and have always love hexagon quilts. I have the Accuquilt Go!, and the hexagon die set. While cutting out hexies, it seemed like a waste not to use the small scraps. (I was cutting out the larger 3 inch x 2 5/8 hexie) I discovered the smaller 2 inch x 1 1/2 inch wide hexie fit inside the larger perfect, as in english paper peicing. Color me happy! I cut a bunch of freezer paper, and pressed them centered in the larger hexie. Now I'm rolling!
ReplyDeletePS- Want a bunch of 2" hexies? They should fit around your 1" card stock perfectly.
ReplyDeleteThank you so much for this one! I am to try my first "hexie" and of course I hit your site first, and as always you have the perfect tutorial. Thank you so much Bonnie!!!
ReplyDeleteI actually found a "new" used paper punch on E-Bay last year after one of your posts.
ReplyDeleteI also am cutting up those heavier weight papers...the covers on phone books yield lots of papers!!!
XOXOXO Subee
I cut some hexies with m friend's Cricut cutter. There is a hexie pattern on one of the software cards and you just have to size it to the size you want.
ReplyDeleteBonnie, can you tell us about the organizer you carry you hexie supplies in?
ReplyDeleteJust a quick noteI wound up going with a dark black/brown counter. I will post photos in a later update.
ReplyDeleteHexagonal floor Tile
I am currently working on hexagon table toppers and they are very addictive. My question to you is how do you finish them off? I don't like the looks of half hexagons so I am confused as to how to add a backing. You started me on this with your beautiful hexagon quilt and now I am totally addicted. You need to start a hexagon quilt blog in your spare time because it is all your fault that you got so many started doing this. I love taking them with me when I am basting so I don't have to think or concentrate on what I am doing. Thank you for all you do, I don't know how you do it but you are one SUPER WOMAN & many of us quilters appreciate all you do.
ReplyDeleteWhat about adding some white (or other background color) hexies to the edge, trimming those in half, and then adding a straight border of the same background color around the edge of the quilt? This will give the illusion of the hexie center floating on a background.
DeleteI'm sorry if this has been asked and answered already, but I didn't see it in the earlier comments. So, you use the punch to make the hexie papers, but if you're not using a die cutter system for the fabric, how do you cut that? Do you trace around the paper onto your fabric and then hand cut with scissors? Rotary cutter? I'd like to give this a try. Thanks!
ReplyDeleteTHANK YOU for making a reference to my friend and guild Member Judy Ann B---I love her webpage! thank you also for the tute on basting without going into paper--I am still one who goes into paper :-) Mickey has a great way for assembling the hexies and she showed me when she was here....hexie on!! *~*CAROLE*~*
ReplyDeleteHi Bonnie,
ReplyDeleteI am a complete newbie to this type of handwork and piecing. Do you use a pattern to cut the original hexies? What do you make it out of? Perhaps tagboard? This is such a great idea to do when waiting for kids at their activities. I'm excited to get started. Found the punch of ebay. Just need a pattern for the fabric cut. Thanks.
Great tutorial. I'm working on a Grandmothers Flower Garden, lot to do yet. But wondering
ReplyDeletehow one quilts this when the top is finished. Would love some ideas for the future.
Thanks!
Twinkjf
I have really become interested in hexies since reading your references to the hexie quilt you are making, so I am going to try it! I was really lucky to find the Creative Memories hexi paper cutter on eBay in the size you mentioned, so am all set up that way, and I have been collecting the inserts from magazines for some time to use for the papers. Thank you so much for this tutorial and even the link to the free hexagonal graph paper! This will be such a great thing to do when watching TV, etc.
ReplyDeleteI just found hexigon tutorial. Thanks for the great info. Question: since you baste then continue to piece your hexies, does that mean you leave in the basting?
ReplyDeleteI've been plugging away at my hexi project for a few years now, and keep coming up with new ways to use the panels I've created. Part of me wants to use them as patchwork fabric in a dressing gown I'm planning. The fabric is so pretty, the project is so slow, I might as well wind up with something I would want to use all the time. Daydreams like that keep me stitching. There's really no telling what I'll wind up with in the end. Lately I just make fairly large almost rectangular sections, then start piecing together another. Mostly I just love the simplicity and calm of the hand stitching.
ReplyDeleteOne thing I did that I find helpful is to holepunch each hexi. I have a fairly large single punch one. Having a hole in the middle helps me get the pieces out more easily. Not sure if there's some part of the removal process I missed that would make the holes an unnecessary complication, but this seems to work well for me.
Bonnie I sure do wish I'd discovered you 15 years ago in 2010 when you wrote this, but life does have its reasons and NOW is a great surprise! What new horizons you've opened up for my 32 finished hexies (a 20 year long term project) that I didn't know how to complete. I need to decide on and find a neutral and start designing! You are a godsend!!!
ReplyDelete