>>>>
Showing posts sorted by relevance for query maverick stars. Sort by date Show all posts

Wednesday, June 18, 2014

Maverick Stars from Debbie!

Debbie2
I love seeing the projects that you take off with!

And seeing these photos in my inbox made me smile, and I love sharing them with you too – so if you have made quilts from my designs or inspired by something you have seen here, please share your photos with me!

Debbie sent these along, with the following:


Hi, Bonnie. 
I just wanted to share two pics of our Maverick Stars quilts that our group, the Preble County Stitchers in Preble County, Ohio, made as a donation quilt for the Potter          orphanage in Indiana. 
I showed the ladies how to make your Maverick Stars and they just took off.  For each block they donated for the quilt, I gave them a chance on prizes.  We had so much fun and used so many small pieces. 

They always kidded me because I wanted their tiny scraps; now, they're keeping them for themselves.  LOL. 

To make the quilt more interesting, I added a few large (12") Maverick Stars; I just used 4 1/2 inch squares instead of 2 1/2 inch squares.  Our group now understand how much you inspire all of us. 

Thanks for offering the pattern for free.
Debbie
Aren’t these great?

Check out this one:

Debbie1

That uses up a LOT of scraps!!

Thanks Debbie for sending along the photos, what fun quilts!

You can find the basic tutorial for Maverick Stars under the Free Patterns tab at the top of the blog.

I am a nervous auntie.

My sister Joy went in to deliver baby Emery last night around 9pm EST.  I hardly slept.  I tossed, I turned, I kept checking my phone for messages --

I have heard nothing!

I know that babies take their own sweet time to get here.  I know that with today’s technology we are used to INSTANT information.  I know that this precious sweet family may want some bonding time together before they blast it all over facebook that Emery is here, but I’m still a nervous auntie!

More info will come as I know more – maybe by Quilt-Cam tonight we’ll have word!  9pm Eastern.  Be here!

I’m headed out to lunch with my friend Lisa today ---new place in Winston that I’ve never been to before called the Porch.  There my be food pictures to follow!

See you tonight ---


Click Here to like our Quiltville Friends Page on Facebook for more fun!

Click Here to join our sister group, Quiltville's Open Studio on Facebook, a place to Sew, Share & Grow!!

Wednesday, June 01, 2005

Maverick Stars!

Maverick Stars!!
(
Click here for printer friendly version)


Use your meagerest of crumbs to make one-of-a-kind template free star blocks!


I've been a fan of Gwen Marston and her methods of liberated quiltmaking for years and years! This love of "all things wonky" inspired the way I do these little stars.

These fun and scrappy stars start out as a basic 9-patch formation! I have here 8 neutral 2.5" squares, and one red center square, all pulled from my scrap 2.5" squares bins. Laying your fabrics in this way will help you remember what goes where! The 4 corner neutral squares are the block corners. The 4 side squares are the foundations for adding your star points!

What I love about making these is that I don't have to pre-cut anything. Just grab the crumbs and sew! These stars are perfect for using all those triangles you snip off from joining lengths of binding or borders on the diagonal. You can do all matching star points if you want or do them in two alternating colors, or all scrappy and random as above!


Because I like to chain piece, I sew on all four foundation squares at once! Grab your first square and lay a crumb across one corner at an angle. It can be tall and skinny star point, short and fat or anywhere in between! The one thing you need to watch for is being sure you have enough fabric to cover the foundation when you flip the star point outwards. THINK BIG...it's easy to trim off, but frustrating to not have enough. The second pic shows a leftover triangle from binding joints! I just randomly place them on the foundation squares and sew..a pefect 1/4" seam isn't even necessary. Sew all four as shown...and if you are using leaders/enders to begin and end your piecing, now is where you will sew two of them through, leaving them under the presser foot. Snip the threads between the leader/ender squares, freeing the star point squares.

Pardon my slightly blurry pics!

One hint or help for you! I use a June Taylor pressing/cutting mat next to my machine when working on blocks like this. I have replaced them in the past finding that the canvas cover doesn't hold up well to lots of ironing. After a time it gets stained and dirty, and eventually disintegrates. I took an old cotton towel, and wrapped it around my June Tayor board! Now I can remove the towel and wash it when it gets yucky, and the towel really gives a nice pressing surface.


Take your scissors and trim the excess star point fabric even with the foundation square. Then carefully trim away the excess layer of foundation square. You really don't want the extra thickness behind the star points when working with units this size.


Follow the same proceedure for adding the star points to the other side of the square. I do these "BLIND" meaning, I don't pay attention to the height or the width, I just lay the scrap on there and check to see that the placement gives me enough of the star point to fold back after sewing and cover the foundation square. Continuously sew all 4 star points to their squares. Press Open. Trim the exess star point along the edge of the squares. Trim excess foundation square fabric away from the star points.


This is where you can play! Try different center squares to find one you really like! Or try leftover parts of other projects! I have a bin of 4 patches that I had intended to make a WHOLE QUILT out of. Well, the quilt never got made, but I have used these 4 patches as cornerstones in lots of quilts. They finish at 2" so they are perfect for crumby star centers!


Play with the corner fabrics too for different looks! Try them ALL scrappy, ALL one fabric, or all one stand-out color! For this sample I stayed with the neutrals. Simply sew the units together as if you were sewing a simple 9 patch. Sew the units into rows, and sew the rows together to make the block. These are funky stars! You don't even have to worry about matching seams or being sure that the points aren't chopped off.
If you leave the block as is...it will finish at 6". There is lots of room to play if you want to make it more wonky! Above I took my Dear Jane 5" square ruler and angled it on top of the star. I trimed the star to this size! FUN!! There are no rules to these crumby stars, you are only as limited as your imagination!


Monday, February 25, 2008

Maverick Stars!!


I am on my way to the Atlanta Georgia area to teach workshops and give lectures and trunk shows to 3 Atlanta area guilds! As I was writing instructions for a crumb block workshop, I decided to upload these instructions for all! Maverick Stars are made from the meagerest of scraps, but pop with personality! Make yourself some Maverick Stars today!

Friday, June 27, 2014

Trish & Sheila’s Show & Share from Fredericksburg!

20140620_134845
This is Sheila and Trish sharing Trish's  Roll Roll Cotton Boll from String Fling!

I wanted to post these lovelies before I get too buried in the weekend…it was a busy hectic time in Fredericksburg, arriving for my evening lecture, a class the next morning and then right out of town and heading for Woodbridge right after the class was over, and I realized that I didn’t post these…and they are SO great!

We’ve already wiggled room for another Fredericksburg visit in early 2018, so I’ll be seeing these ladies again….that gives them what ----4 years to work on their UFO’s we started just a week ago? ((Has it been a week already? Yes, it has!))

Thanks for  bringing the quilt, Trish, it's GORGEOUS!


20140620_135014

Sheila’s Holy Toledo From Scraps & Shirttails II!


Sheila is a fabulous quilter, and a very fun gal to be around.  She was on our Germany trip last December, and it was extra special…though she had told her hubby, Brady that they were going to be traveling somewhere together, he had no idea WHERE they were going until they arrived at the airport.  Sheila planned it all herself and kept it on the sly to keep him guessing.

How romantic is that?

20140620_135023

Close up!

Sheila used recycled shirts in shades of grey and pink for her version of Holy Toledo and I just love this color combo – isn’t it fun?  And the fun doesn’t stop here:

20140620_135051

Racing stripes down the back!

20140620_135154

This is Sheila’s Bargain Basement from Scraps & Shirttails --

20140620_135241

More racing stripes on the back!

She used oodles of leftover orphan units in the front..anywhere you see a flying goose unit, broken dishes, basket or 9 patch – that is a 3” finished “OPEN” space where ANYTHING can go ---what a fun quilt!

20140620_135314

Maverick Stars in a Random Ohio Stars Setting!

Under the free patterns tab is a free pattern for Random Ohio Stars – Sheila played with this same setting idea, substituting Maverick Stars instead…isn’t it great?

20140620_135548

Jared Takes a Wife from the Free Patterns tab ---
Just waiting for borders!

20140620_135626

Rectangle Wrangle From Scraps & Shirttails II!

Also just needing borders!

20140620_135633

Close up of great recycled fabrics!

Thanks for sharing your quilts with us all, Sheila – they are WONDERFUL!

I’m just kicking back at Mary’s after a run around morning getting things ready for tonight’s lecture…there is some of this in progress:

hexies1

Hexies on Mary’s coffee table!

I’m downloading some audio books from my library while typing this..I’ve got a long drive home on Monday, and I’m excited.  I’ll be stopping by Hollis Chatelain’s who lives a mere 45 minutes from my home in North Carolina –on my way home from Pennsylvania!  It will be a good location for a leg stretch, a visit and a chat with a friend, and I’ll need some audio books to keep me busy on that long drive.

Heading out shortly to meet up with Mary and get ready for the lecture – let the Bedford Quilters Whirlwind begin!


Click Here to like our Quiltville Friends Page on Facebook for more fun!

Click Here to join our sister group, Quiltville's Open Studio on Facebook, a place to Sew, Share & Grow!!

Sunday, March 27, 2011

Show & Tell Sunday!


We haven’t done this in a while….and there have been some beautiful quilts showing up in my inbox over the past couple of weeks! Wouldn’t you like to see them?

But first, the TELL!

Sherrie wrote me about a news article I was quoted in!

Hey Bonnie,

I just wanted to share with you a link to an article in The Commercial Appeal about our guild going to your trunk show. I am the one that told you about telling my husband going to see you would be like him getting to go see Jeff Gordon....lol!!!

I hated that I didn't get to stay and be in the picture with everyone else, but the ladies I was carpooling with were anxious to get to the quilt shops!!  We all had a wonderful time, and your quilts are even more beautiful in person!!  You have motivated alot of us, several are trying to decide which quilt to start on first.

Here is the  Link!

Thanks for the article Sherrie! I got a kick out of being compared to Jeff Gordon!Flirt male

And on to the quilts!

This first quilt is from Fran M!

P1160383

I’m not sure if this is the actual color or not, I think the pic was taken at a guild meeting in indoor lighting! But you know how nuts I am over orange, and this is just so fun to look at! Look at the striped sashings! WHOO!

Fran writes:

Bonnie,

When I line up for Show and Tell at our guild, Shenandoah Valley Quilters Guild, they expect another quilt made from bonus triangles from your patterns and I try not to disappoint.  In fact, I try to motivate them to make something from theirs.

My latest one was made into pinwheels with a small striped fabric as sashing.  It really worked!!  When my daughter saw it she said "Wow!"  and could she have it.  She already has lots of mine (including Double Delight!) so I asked her how she felt about depriving some poor, cold refugee in a foreign country of a warm quilt and she quickly said, "I'll give you one back".  Needless to say, I'm making more for the refugees!! My dear SIL with Alzheimer's is no longer able to press my triangle seams open but she fondles quilts and smiles alot!!

I just love the stories that come with the quilts as much as I love the quilts! Thanks for sharing Fran! I am always trying to purpose my bonus triangles as well ((As you witnessed with the 600 hsts in Roll Roll Cotton Boll!!)) I’m thinking this is a good topic for a blog post this week…a little technique I’ve been teaching that gives me very accurate USEABLE sizes for my bonus units without having to square each one down individually to the next increment on the ruler so things work with the math I like. I’m making a note to myself to do that!

Our next Quilter is Karen R and her “Stars Of Hope”!

Stars of Hope 2nd place

Isn’t she a beautiful lady? And look at her beautiful red ribbon!

She writes:

Hi Bonnie!   I think I sent a photo of my finished Random Ohio Stars that I named "Stars of Hope," but not sure if I mentioned that it earned a second place ribbon in our Peace River Guild's recent Southwest Florida Quilt Show.  The quilt is now being raffled to raise funds for our Relay For Life team.  Thank you again for your wonderful designs....you are indeed an inspiration!!

Blessings, Karen

Karen, you are the inspiration…such a beautiful quilt for a wonderful cause! I know this will be a great benefit for Relay For Life..Quilt on, girl, Quilt On!

Jana M has also been very busy! And I love her use of YELLOW! ((Yes, I’m still in a bright forsythia-makes-me-smile mood!))

Strings

She writes:

Dear Bonnie,
since I received your books I have been quilting just the patterns form your website or your books. There is one of them which pleased my mum very much.
Jana (from the Czech republic)

Isn’t it fun to see the different ideas and the fabrics that are found in different countries? The colors of this quilt remind me so much of hand painted pottery. Thank you Jana, for sharing your pic with me!

Mariella L has sent a couple pics of her “Scrappy Trips Around The World!” and they are BOTH so different in the feelings they give, just by switching the use of color and placement! I love them both! She has a very fun blog called Cancun Quilter full of delicious pictures. Give her a visit, say Buenos Dias and tell her Bonnie sent you!

Many Scrappy Trips Quilt Top 30 April 2010

Isn’t this pretty!  The sashing just really draws the eye….and there is so much color play going on here!
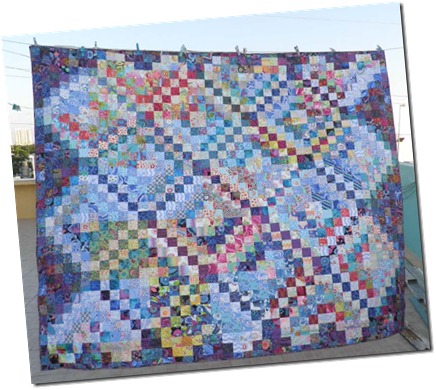
OLYMPUS DIGITAL CAMERA

And This one? It’s the same quilt..but look at the use of the darker blues at the edges which seem to float the quilt center a bit! Still love the random placement of colors here there and everywhere..there are lots of little surprises.

It just goes to prove that “Truly Random Does Not Necessarily Mean Equidistant!” Sometimes I think we spend so much time to make SURE that bits of color are “evenly spread” and that this fabric can not touch that one, or avoiding “too much red in one corner” that we somehow kill the spontaneity of design. We miss the opportunity to have a design element of surprise become a focal point of interest. At least that’s how it is playing in my mind with the things that I see out there. Let it play!

Mariella writes:

Hi Bonnie,
I've been coming to your website for inspiration for a while now.  I've love scrap quilts.....hey I buy fabric to make scrap quilts!!!  Anyway I've made some Scrappy Trips and would like to show them to you.  Hope you enjoy!!!
Mariella L

Thank you SO much for sharing the quilts from what looks like your roof top Mariella!

Angela has BEEN BUSY!!! You can check out her story about this quilt on her blog, Angie Quilts!

A Trip Down Memory Lane

I hope she has sent this pic to Tonya too, cuz I know Ton would go nuts over this! It’s called “A Trip Down Memory Lane”

She writes:

I'm sending a photo of my quilt top to you as I used your Maverick Stars for my borders along with Tonya's letters, I had been struggling with what to do in the borders when I saw Tonya's book was soon to be released, I pre-ordered and waited for it.

As soon as it came I had a flash of inspiration and made up the words... what to do with all the open border spaces... hmmm to Quiltville to see what could help... Maverick Stars... perfect.

Thank you so much for posting the free tutorials Bonnie.. I don't know what I would do without you!!

If you EVER have a trip planned to the UK would you PLEASE let me know ... I would sell my children (they're 22 & 21 so they might be in agreement)  to have you come up to Staffordshire for a few days, he he he

Thank you again for all your inspiration

Good Wishes

Angie

Angie!! I’d sell mine for a chance to come visit you too! UK is definitely on my list of places I need to visit…

And if you’ve enjoyed what you’ve seen today….you need to come over to our Quiltville Friend Page! We are having a show and share of projects-in-progress! You can find the link the side bar to the right…or click directly by clicking HERE!

As for me..it’s 11:11am. 11:11 is always a time for making wishes. I wish for you a blessed Sunday and a bit of time to Sew!