
If You've reached this stage, you are ready to put this quilt together!
Click HERE for printer-friendly .pdf version!
*note* You must have adobe reader installed to view and print this file. You may need to right click to save, and then click to open it to print it!

Cutting The Setting Triangles!

I believe in specialty rulers! I also love on-point quilts, so this ruler really comes in handy. I remember exactly where and when I bought it -- it was 1999 and we had just moved to Sulphur Springs, TX. This is "The Setting Triangle" by Omnigrid, and you know what? I just did a web search for it, and couldn't find it, so I don't know if it is even made any more! Bummer if not....but I'm sure there are other rulers by other manufacturers out there that do the same thing.
Basically, it is a HUGE "Companion Angle" type ruler, and allows you to cut big triangles with the straight of grain on the longest side of the triangle from STRIPS, not squares. I find it really easy to use. You find the unfinished block size (9 1/2") on the left side of the ruler, and it tells you what width of strip to cut for your triangles (7 1/4") and you use the ruler to cut them down the length of your strip. I've learned to give myself a bit of extra allowance with the first cut at the end of the strip, and those cut off corners are big enough to trim for the 4 corners of the top.
But if you don't HAVE access to a ruler like this, we are going to be cutting squares!

From your gold fabric, cut:
(4) 14" Squares, cut diagonally twice from corner to corner with an X to yield 16 setting triangles.
(2) 7 1/4" Squares, cut diagonally once from corner to corner to yield 4 corner triangles.
Lay out the quilt as shown in the picture above, paying attention to the direction the blocks are turned. That said, feel free to play with them! Rotate them! Find an arrangement that is pleasing to you.

On-point quilts are sewn in diagonal rows starting in one corner. Each row gets longer as you get toward the center of the quilt, and then the rows diminish again.
Stitch the blocks into rows, with setting triangles on the end of each row. Join the rows.
I like to sew the quilt in 2 "approximate" halves, and then join the halves together to complete the top, this makes things a bit less unwieldy when putting so much through the machine.
Trim the quilt center, leaving 1/4” seam allowance beyond the block corners around the outside edge of the top. There might not be much to trim, but this helps get rid of dog ears as well, cleaning up the top before adding borders.
Adding The Borders!
Black 1st border: Cut (7) 2" strips across the width of yardage.
Red 2nd border: Cut (7) 2 1/2" strips across the width of yardage.
Paisley 3rd border: Cut (8) 5" strips across the width of yardage.
I could do this the easy way, and just tell you the length to cut your borders according to the "math-perfect" dimensions, but you know? I find more people have greater success if they work with their own measurements. I want your quilt to be successful, so you need to cut borders that fit YOUR quilt, not the prototype :c)
Follow this procedure for EACH of the three borders shown, adding each border individually to the quilt and repeating the measuring steps with each border added:

Join the strips for each border end to end with diagonal seams. Press seams open and trim dog ears.
Lay quilt out on the floor, smoothing it gently. Do not tug or pull. Measure the quilt through the center from top to bottom. Cut two inner side borders this length. Sew inner side borders to the quilt sides with right sides together, pinning to match centers and ends. Ease where necessary to fit. Press seams to the borders.
Repeat for top and bottom inner borders, measuring across the quilt center, including the borders just added in the measurement. Stitch top and bottom inner borders to quilt center, pinning to match centers and ends, easing where necessary. Press seams to the borders.

If you are really ambitious, you could sew all three border widths together first, and MITER your corners! If you want to do that, you can find directions for that HERE!

Here is a close-up of the fabrics in my top! Writing this tutorial has really urged me to get this quilt out ofcold storage the closet and get my holiday decorating under way!
Of course, you are going to layer and quilt "as desired". Christmas Lights is edge to edge quilted in free-hand garlands of light bulbs and cords that wind and meander over the quilt surface. I used a variegated gold thread.
Binding:
Cut 8 strips of paisley fabric (Or go contrasting if you want! I would have if the magazine hadn't already chosen this for me...I'm such a rebel and my binding is usually contrasting with the outer border!) 2 1/2" wide by width of fabric. (I know some of you are 2 1/4" binding girls, but I like mine a bit fuller and wider at 2 1/2, using the edge of my walking foot as a guide for my seam. It makes a nice 3/8" Binding instead of 1/4", which I like!)
For more on quilt binding...go HERE!
*Part 1!
*Part 2!

Click HERE for printer-friendly .pdf version!
*note* You must have adobe reader installed to view and print this file. You may need to right click to save, and then click to open it to print it!


I believe in specialty rulers! I also love on-point quilts, so this ruler really comes in handy. I remember exactly where and when I bought it -- it was 1999 and we had just moved to Sulphur Springs, TX. This is "The Setting Triangle" by Omnigrid, and you know what? I just did a web search for it, and couldn't find it, so I don't know if it is even made any more! Bummer if not....but I'm sure there are other rulers by other manufacturers out there that do the same thing.
Basically, it is a HUGE "Companion Angle" type ruler, and allows you to cut big triangles with the straight of grain on the longest side of the triangle from STRIPS, not squares. I find it really easy to use. You find the unfinished block size (9 1/2") on the left side of the ruler, and it tells you what width of strip to cut for your triangles (7 1/4") and you use the ruler to cut them down the length of your strip. I've learned to give myself a bit of extra allowance with the first cut at the end of the strip, and those cut off corners are big enough to trim for the 4 corners of the top.
But if you don't HAVE access to a ruler like this, we are going to be cutting squares!

From your gold fabric, cut:
(4) 14" Squares, cut diagonally twice from corner to corner with an X to yield 16 setting triangles.
(2) 7 1/4" Squares, cut diagonally once from corner to corner to yield 4 corner triangles.
Lay out the quilt as shown in the picture above, paying attention to the direction the blocks are turned. That said, feel free to play with them! Rotate them! Find an arrangement that is pleasing to you.

On-point quilts are sewn in diagonal rows starting in one corner. Each row gets longer as you get toward the center of the quilt, and then the rows diminish again.
Stitch the blocks into rows, with setting triangles on the end of each row. Join the rows.
I like to sew the quilt in 2 "approximate" halves, and then join the halves together to complete the top, this makes things a bit less unwieldy when putting so much through the machine.
Trim the quilt center, leaving 1/4” seam allowance beyond the block corners around the outside edge of the top. There might not be much to trim, but this helps get rid of dog ears as well, cleaning up the top before adding borders.
Black 1st border: Cut (7) 2" strips across the width of yardage.
Red 2nd border: Cut (7) 2 1/2" strips across the width of yardage.
Paisley 3rd border: Cut (8) 5" strips across the width of yardage.
*Note* If you want your borders continuous with no piecing in them, cut them lengthwise from 2 1/4 yard lengths of fabric. You will need 4 Strips of each border fabric.
I prefer to cut mine across the width of the fabric unless there is a pattern that I want to preserve in a certain orientation in the border. I also like any remaining yardage to be "full width" in my stash so I know exactly how much I have and what I can get out of it. It's easier for me to plan a quilt with 44" wide yardage than 30" yardage that has had borders for a previous quilt removed from it, get it?
I could do this the easy way, and just tell you the length to cut your borders according to the "math-perfect" dimensions, but you know? I find more people have greater success if they work with their own measurements. I want your quilt to be successful, so you need to cut borders that fit YOUR quilt, not the prototype :c)
Follow this procedure for EACH of the three borders shown, adding each border individually to the quilt and repeating the measuring steps with each border added:
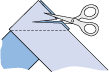
Join the strips for each border end to end with diagonal seams. Press seams open and trim dog ears.
Lay quilt out on the floor, smoothing it gently. Do not tug or pull. Measure the quilt through the center from top to bottom. Cut two inner side borders this length. Sew inner side borders to the quilt sides with right sides together, pinning to match centers and ends. Ease where necessary to fit. Press seams to the borders.
Repeat for top and bottom inner borders, measuring across the quilt center, including the borders just added in the measurement. Stitch top and bottom inner borders to quilt center, pinning to match centers and ends, easing where necessary. Press seams to the borders.

If you are really ambitious, you could sew all three border widths together first, and MITER your corners! If you want to do that, you can find directions for that HERE!

Here is a close-up of the fabrics in my top! Writing this tutorial has really urged me to get this quilt out of
Of course, you are going to layer and quilt "as desired". Christmas Lights is edge to edge quilted in free-hand garlands of light bulbs and cords that wind and meander over the quilt surface. I used a variegated gold thread.
Binding:
Cut 8 strips of paisley fabric (Or go contrasting if you want! I would have if the magazine hadn't already chosen this for me...I'm such a rebel and my binding is usually contrasting with the outer border!) 2 1/2" wide by width of fabric. (I know some of you are 2 1/4" binding girls, but I like mine a bit fuller and wider at 2 1/2, using the edge of my walking foot as a guide for my seam. It makes a nice 3/8" Binding instead of 1/4", which I like!)
For more on quilt binding...go HERE!
*Part 1!
*Part 2!


