


My color inspiration for this year's challenge came from photos of blooming trees I took this spring.
Nature NEVER disappoints!
Nature also doesn't care if some colors are "in" or "out."
The trees just do their thing and bloom right on time.
Take a good look at this photo...notice the different shades of pink. And then look at the leaves. They are not green (Though there is some green grass in the background.)
They are at this point a deep gold.

This photo I took is also an inspiration on color play.
Beautiful pink dogwoods are my absolute springtime favorite - and look at those beautiful gold stamen in the centers.

My first two completed blocks inspired by these colors.
Of course - you can choose which colors you wish to work with - even scrappy everything will turn out wonderfully.

Instructions are for one block.
Cutting:
Pair a 2'' neutral strip with a 2'' colored strip (at least 16'' in length) with right sides together. They will be cut with right sides together, ready to sew, no matching required!

Square off one end of the strip set and cut:
2 pairs of rectangles 2'' X 3 1/2'' (2 colored, 2 neutral rectangles total)
4 pairs of squares 2'' (4 colored, 4 neutral squares total)

You can pin, clip or stack them so you have easy access by your machine.

Here's 10 ready to stack. It's easy to keep count by 10s!

Did I get carried away? Maybe!
Half of them are pink/neutral and the other half mustard/neutral - and you'll even see one in the front row where I ran short of a neutral and pieced it to get that one last square to make it work.

All the needed units, built as Leaders & Enders.

Building Blocks!
The two pairs of rectangles are sewn on the short side. At the end of your line of chain piecing on your main project, run a pair of rectangles under the presser foot and stop in this position. Trim your work off from behind the presser foot, go press and trim or whatever you need to do.
This pair of rectangles will hold your place until you return to sew on your main project again.
Stitch both pairs of rectangles and press the seams toward the colored fabric.
Units will measure 2'' X 6 1/2'' unfinished at this point.
If they are too small or too big, this is where you take the opportunity to adjust your seam allowance so that things come out correctly. Your main project will thank you as well!

Same thing with the four pairs of squares. Each pair is a half-four-patch.
Press these seams toward the colored fabrics.
Half-four-patches will measure 2'' X 3 1/2'' unfinished at this point.

My main project is behind the presser foot. I'm getting ready to go press those pieces, so I'm sewing two half-four-patches into a completed four-patch as an ender at this point.
Notice that the colored square is going under the presser foot first, and the top seam allowance is pointing up toward the needle. Be consistent here! This orientation will help snug seams closer together, and keep all four-patch seams spinning in the same direction which is important for nested seams.
I trimmed my work off from behind the presser foot, pressed, came back and began to sew again. At this point, remove the four patch and spin-press the seams.

Here's another with the dark square going under the needle first, and the seam allowance pointing up. This also means that the seam allowance on the under side is going WITH the feed dogs so the feed dogs will not flip your seam.

To spin press, hold the four-patch like this.
Notice the long center seam is going across - not up and down.

Gently hold down the right side of the center seam allowance with your thumb. Grab both layers of the left hand seam allowance and lift. This will cause a couple of stitches in the short seam allowances to release so that you can spin-press your seams. You'll see a tiny four-patch in the center of the block. This helps eliminate bulk where pieces come together and enables this four-patch to nest to the second four-patch no matter now you turn the pieces.
Can you see how these seams are rotating clockwise? Look at the seams like a clock: 12, 3, 6, 9. It's only 9 o'clock that needs to reverse to follow suit. Press with the iron at this point.

Keep using these pairs as Leaders and Enders and soon you'll have 2 four-patches. They will measure 3 1/2'' unfinished at this point.
Place blocks in this orientation before sewing them together, with the light squares at the bottom left of both four-patches.

Stitch the center seam as your next leader & ender!

This center seam has to spin too -but it is going to go in the opposite direction, counter clockwise instead of clockwise.

The seams in the four-patches are the boss of which way that center seam is going to spin. In this case, hold the left hand side of that seam down with your thumb, and lift the two layers of the right hand of the seam to get those stitches to release creating another tiny four patch spin in the center. Press.

Adding Side Rectangles:
If you have pressed as directed and spun your four-patches as shown, your side rectangles will nest with your center unit.

I know it's exciting to see this block coming together, but use these sections as Leaders & Enders while continuing to sew on your main project. Add one side section, pressing outward toward the side rectangles.
KEEP SEWING ON YOUR MAIN PROJECT!

Finally!
When you have reached the point where your main project needs a trip to the iron or trimming station - attach that last rectangle section to the block.
And this is the hardest part for me - leaving this under the presser foot until I sew some more on my main project because I want to get this block out of there and give it a final press so I can admire it and add it to the completed pile.
But it stays under the presser foot until I come back with pieces of my main project and start feeding them through.
At that point I can snip the completed block off of my chain from behind the presser foot.

Press that last seam out toward the rectangles.

Here's a pink one in progress with some of my current project behind the presser foot. I'm nearly there - and these blocks are building themselves while I work on my main project.

One more seam!!
Blocks will measure 6 1/2'' unfinished and finish at 6'' in the quilt.
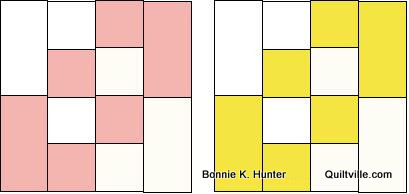
How many saw this block being made in quarters instead of 3 columns? Once you see it you can't unsee it!

Here's a sample layout of 6 X 6 -
And there are so many things you can do with this simple block.

Similar to what I've done with my blocks above.

You can add sashings and cornerstones.

You can also set them in diagonal rows.

On point with pink setting triangles.
There are so many options. I know I am going to enjoy working on this over the next several months.
I also know I'll have a hard time not pushing this one forward to be my main project!
In that case...just pull another project into Leader & Ender position.
As long as "something" is being left under the presser foot to hold your place while you go press, trim and come back to sew...it's all good!
I will be adding Four-Patch Fun to the other tutorials and patterns found under the Free Patterns tab at the top of the blog.
And there you have it! I can't wait to see what you do with this year's Leader & Ender Challenge.

Quiltville Quote of the Day -
It's a great day to attack the scraps! Who's with me?
Time to get sewing!
Have a wonderful Wednesday, everyone!


37 comments:
Another lovely project! Thank you, Bonnie. My County Clare is waiting for its backing. Time to get that sorted and on to the longarm.
This is an adorable quilt pattern. Thanks again, Bonnie!!!
Thank you so much for this! My husband died in January after several years of dementia. I needed just this leader ender project to get fired up to sew with them again. I'll be grabbing my mid sized 2" strips from my almost overflowing drawer!
Thank you for being so generous with your talents and time.
Thank you Bonnie! I love these freebees you give to us! This year's leader and ender challenge is definitely going to be a work in progress soon! I think it will get my mojo back to machine piecing again. I've been slow stitching hexies since the beginning of December and I'm only about 1/2 way done. Maybe in about 12 months I'll have the top done. The first few months were much more productive since I was recouping from surgery. I'm itching to do some machine piecing again. Thanks for the inspiration to get back to it! I'm absolutely in love with this year's leader and ender challenge. My favorite layout has the sashing and cornerstones! I'm not sure what colors I'll be using, perhaps blue and gold, or if I have enough purples, I'll do that with greens or golds.
Thank you dear Bonnie. It's a Lovely
L/E project.
Your generosity goes above and beyond.
Have a wonderful day
What a great pattern! You thought of everything from needed strip size to pressing direction. I cant wait to play with my scraps. Bonnie, you are the best!
Oh, Bonnie, you are such a wonderful resource! I haven't done a Leader/Ender Challenge in quite a while, but I'm committing to starting this one. I had seen a pattern that looks like this, but the construction was different. I like your method so much better! And of course it's perfectly suited to being a Leader/Ender.
Thank you for another fun challenge. I love your color inspirations.
Ooh... I really like this! Thank you for your generosity and encouragement! Sara
Thanks for a fun L/E project!
Thank you, Bonnie, for the new/free Leaders & Enders project. It's really cute, and I'm in! Have a super day, Jenny
Love it! Your modeling the behavior of "cleaning up" between projects has inspired me, and I am working bag by bag, pile by pile, to process the odd scraps and units that litter my world. At retreats I immediately cut the odd strip ends, etc into Scrap User System sizes, but I don't do that at home. I'm going to start doing it at home too.
I've never done a leader / ender challenge before. This looks like fun. I don't have enough of one color in scraps so I may just do it scrappy. thank you for your encouragement and generous giving. Brenda J.
YAY!! Shout out to the 4 patch!! This will give me something to do while I am "cleaning." HA!! We will be going through the scraps and organizing. I am still working on County Claire. Happy scrap hunting!!
Thanks for dreaming up a very fun Leader/Ender project for us this year!
I love spinning those 4-patches. Ya, I saw a 4 patch assembly. Three works better. Thanks for making it easy. I have Scraps from all my Nysteries that need to be mowed down to usable sizes. Getting out my Go Cutter.
Wow-I may have made some similar blocks almost a year ago and they are hiding somewhere. I'll see if I can use them; if not I'll continue on with your techniques and use the rest of those scraps for L/E. What a great inspiration to get a WIP finished!
I love this years L and E's. I have to admit it took me a while to realize that the pretty flowered "fabric" was just a piece of tape.
Love this! It will be perfect for the small quilts I’m making two practice my FMQ skills on. And, it will be out of my scraps, which is also what I’m working on! Yay!
i made a top from these blocks..they ARE indeed fun and fast and do bust stash...win/win/win!
I love, love, love your attention to detail with spinning/pressing seams! You are the best!! And I have a lot of 2" and 2.5" strips that can be used in 2 different layouts which will look totally different. A big WIN-WIN!!
Leader enders have caused me confusion in the past, trying to keep everything straight, which project I was working on etc....but THIS TIME, it all makes sense!!! I am unpacking from a move, and the sewing room is next! so excited to try this and use up baby fabric, so mine will likely be more scrappy than 2 color......
Just in time! I don't do a lot of leader/ender projects because I chain piece as much as possible. However the charity quilt I'm just starting is going to require me to piece individual blocks in order to keep the scrappy colors coordinating the way I want them. This will be perfect for all those stops and starts. I've wanted a project to use my leftover binding pieces---so I'll be doing the cuts at 2 1/4 inches.
I'm already excited about this! I can't wait to get started on this one!
So, I don't do leaders and enders for a couple reasons. My machine plays nice with the start of my sewing (I know, lucky me!), and I sorta lose track and wonder how the piece fits into the project I am working on...because I can be pretty caught up in the sewing. BUT I can make the entire blocks a few at a time between my projects when I need my brain to decompress. Pick up the next project and go along to finish before I do more L/H blocks. There is NO WAY I will be done in two weeks! lol!! I will take my time because it will be a quilt for me and not anyone else :) It gives me joy to have something to just work on when I want to.
I am still working on my Triple Treat! Sometimes my leader/ender projects take longer because I have several paper piecing projects that I can't use the leader/ender! but I do REALLY love this one! Maybe I will wrap up Triple Treat in the next few months and can start on this one.
Thank you! No triangles! And will fit in with my Nine in thr Middle project from Your
Adventures with LeAaders and Enders book.
Thank you so much for your generosity and providing another great L/E project. I just love it and all the different ways you provided to set the blocks!
Thanks Bonnie! I enjoyed last years project, the quilt is finished, its a baby sized quilt. I will take a look through my scraps, I like your colourway. Best wishes from New Zealand.
Great block for new L&E project, Bonnie. And timing is perfect - been reorganizing my studio and finding all these miscellaneous jelly rolls and assorted other precuts mostly in blues squirreled away in various odd corners. Must have been cheering meself up at random times these last few years buying whatever size of precut the budget could stand, then stashing new arrivals in convenient atm spots. Result = a bit of guilt that all these wonderful blues in a whole range from very light to dark indigo have been just sitting in odd spots and sorta forgotten. I've spent the last week kitting up enough bits for two throw sized quilts and still have what my southern neighbor would laughingly call "a genteel sufficiency" of my overabundance of blues and creamy lights, so will be basing this L&E on 2 1/2"
Dear Bonnie!
What a wonderful block, I´ll have to try it in any case! Thank you so much for sharing! I read your blog frequently, you and your quilt Ladies are so inspiring to me,
I´ll send you a big hug from Austria, have a great day, Sophia
This might be my favorite!
This is just what my 2" strips have been waiting for!!! Thank you for another fantastic idea!
I always make a test block. Boy am I glad I did! Pay close attention to the direction of those 4 patches! This is going to be SO cute! Mine is Christmas!
Thank you Bonnie. I am excited to start this.
I think I might do blues and greens, with an occasional purple tossed in. I lean toward a cooler color range sometimes.
I made 5 test blocks. Yup. Going to go *all in* for this one. I have 3 jellyrolls that I bought for stash, knowing they would come in handy.
Thank you for all your hard work to make these projects possible.
Post a Comment
If you are commenting as "anonymous" please leave your name at the end of your comment.
Did you know that ad space on this blog provides for all of the free patterns and free mysteries and challenges at no cost to you? Without ads, this blog would not be possible.
Thank you for understanding the many hours that go into this blog 6 days a week, 52 weeks a year. :)