>>>>

Friday, July 29, 2005

Whew, what a week!!


Where has the quilting time gone this week? It's been a few days since I've posted. Wednesday and Thursday are the days that I'm at school, and here we are friday.

It has been SO hot and humid the past week or so. This is my 3rd summer in South Carolina, and the hottest by far! The rain did come last night,thunder and lighting in the middle of the night. I remember vaguely waking up to acknowledge it, and then falling right back to sleep. For some reason, I can sleep really well through a storm, I love the sound of the rain and the thunder, and even the flashes of light.

I spent the day finishing a customer's batik bear paw quilt that I thought turned out JUST beautiful. I am really happy with the way it turned out, and I hope she thinks so too.

I have added a page to my website called

Customer Quilts

I plan on adding more note worthy quilts to it in the future.Take a peek at the batik bear paw there! I also found a free program that makes thumb-nails in any size you need them, so this was my first experience with thumb-nails linking to bigger images. I keep learning!

I also monkeyed with the template for my blog page a bit...I found that I could make better use of the page if I didn't have so stinking much margin. So I changed the page width! And then I changed the page COLOR, and then I found I could link all sorts of little graphics. FUN!

Now I am toying with typing this whole entry in netscape composer, and then just pasting the html into the 'add entry' thing for blog spot. I'm hoping it will work and that way I can get more than one pic per post in.

I've got 8 whole mitre boxes blocks done, so that means I've only done 4 sets since you get two blocks from a set. See my new laminate floor! Pretty pretty..I shouldn't have cropped the pic so close so you could see more of it. I like these blocks and the method, just need more time to sew, which I haven't had this week.

We are headed to Charleston for the weekend, hoping to spend some nice relaxing time on the beach, maybe a bit of window and touristy shopping. There are a couple quilt shops down that way, but I really don't NEED more fabric, and i haven't been inspired by any patterns out there. I am more inspired to search ebay.com for pics of antique maverick quilts...I've got a whole folder full of pics I've saved for inspiration. Oh, another good thing...School starts in about 2 1/2 weeks, so my 15 year old will be out of summer-teenage-retirement! YES! I can't tell you how happy that makes me!

Bonnie
;

Tuesday, July 26, 2005

If my house burned down...


I was trimming some "quilt leftovers" this morning, and thinking to myself...If there was a fire, what would I save? I think the scraps and the fat quarters are more valuable to me than the yardage on the shelves.....The scraps have memories of other things I have made with them, there are alot of years in collecting this odd blend of scraps I have in my drawers..I couldn't duplicate it if I tried! I could go to a quilt shop and start a new stash, but I could never duplicate the mix of scraps I've accumulated over 20+ years... Old, ugly, out of print, outdated...they are mine and pieces of my life are attached to them. I came across a scrap of pink calico as I was digging and it was like visiting an old friend... "echos of an old rendition of 'I remember you' playing through her head".

Now I don't know if that is exactly philosophical thinking or not, or how do I apply those thoughts to the rest of my life. Maybe it's the same kind of thinking that people have when they lose everything..it's the pictures and momentos they miss most, not the furniture or clothing or anything that can be easily replaced.

I was looking in someone's webshots (I almost typed webshits...terrible what typos can make you giggle, pardon me!) album the other day, her quilts were beautiful...except each one was a carbon copy of some other quilt somewhere. "This quilt made with all Thimbleberries" "this quilt made with all authentic civil war reproductions" "this quilt made with all Aunt Gracies" and I thought to myself "Where are the memories?" Am I the only one that feels this way? I mean, these quilters who quilt "kit" quilts eventually have to build up a REAL scrap stash from the leftovers, don't they? Is there hope that in the future their next project might be to make something that just says SCRAP HAPPY and doesn't have to "name-drop" a fabric manufacturer in the process like Hoffman, Moda, Benartex?

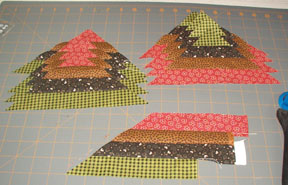
I think I'll go play with some of my lowly leftovers and all their memories :c) I've got an idea for a quilt in the works....Sew 4 strips together, cut them into triangles with the long side of the triangle along the edge of the strip...you can get two blocks from each set of strips...4 triangles of one kind, 4 of the opposite. Lay them out all together with the tips pointing in and sew them into a square with an X. It looks like a log cabin with 3 rounds around it, but instead of 12 seams around one center square, this makes two blocks with 9 seams total! Weehaa..I love stuff like this. I'm calling them "mitre boxes" unless I can come up with something more interesting.
;

This is the cool idea I was thinking of yesterday. Usually my scrap quilts use shorter cuts, but this one needs a full width of fabric cut, so strips are 1.5" X 44" (or close) I sewed the 4 strips together and pressed them in one direction, then used the wondercut ruler to cut triangles from the set. You get two opposite blocks from one strip set, so cut 8 triangles (there will be a bit left over, but not much!) Posted by Picasa
;

Two sets of 4 and a bit left over! Posted by Picasa
;

Two opposite blocks from one strip set! This could be a cool quilt, and so much easier than building log cabins with strips round and round... Posted by Picasa
;

Saturday, July 23, 2005


Can you find the invisible dog? If it weren't for the black nose and the long pink tongue, I think he blends into the forest floor pretty well! This is Buddy, and he is 5. Best dog ever! We love to go hiking in the state forest that is near us. I'm waiting for fall when the weather isn't so dang hot, humid, and oppressive! Posted by Picasa
;

Friday, July 22, 2005


I am a junkie for trying new techniques and styles with my quilting. I needed a practice piece to try this all over freehand swirling feathers design, so I chose the green 9 patch quilt top I finished a few weeks ago. The jist of the design is that you start somewhere not too close to an edge, quilt a question mark, feather around it....letting the feathers fill the area, then take off, quilt another question mark, feather back, etc....supposed to be called "A flurry of angels". This thing stumped me so much and I found myself quilting myself into dead ends! So..I am calling this one Broken Wings instead of "flurry of angels!" I do like how it turned out, thank heavens the piecing is busy enough not to show any speed bumps that I hit along the way! It's trimmed, I just need to put the binding on, probably start on that tonight. Posted by Picasa
;

Cose up and side-lit view of the "broken wings" quilting! My main problem was trying to not make the machine stitches too big when doing the bigger plumes....I tend to get smoother results wtih wide sweeping movements, and I was outrunning the stitch regulator on the machine :c/ Posted by Picasa
;

Thursday, July 21, 2005

Does anyone realise that this drives me crazy that my posts are in reverse order? Are you scrolling down the page and reading UP? The red calico in the borders is deteriorating, the brown for the cornerstones I think was a home dyed fabric. Whatever the dye was, it was caustic and the brown fabrics are shattering worse than any...but the greens, other reds, and blues are just as bright and vibrant as they were 100 years ago. I wish I knew who this maverick quilter was, and what others thought about her one blue maverick block in this very intricately pieced red and green quilt! Maybe someone will wonder about my funky quilts some day....who knows..... :c)
;

Green framing the star. Isn't this an interesting block? I have never seen another one like it. I've called it Little Mountain Star because I found the quilt in Little Mountain SC Posted by Picasa
;

Why was only one block blue and red? Did she run out of green? Some of the blocks have green framing the star, some of them have red framing the star...but there was only the ONE corner block that had BLUE. And why was that one placed distinctly in that corner? :c) The world may never know! Posted by Picasa
;

The poor quilt was falling apart in places....but it was the traditional reds and greens and chrome yellows of the mid 1800's. My heart was pounding! My nose was also scrunched up because of the old old smell! I don't know where this was stored, but it was bad..*LOL* Unfolding the quilt brought a bigger smile to my face...amongst all the red and green blocks (and the piecing is quite good, and the quilting stitches small and precise) was ONE lone blue and red MAVERICK BLOCK! Oh quilter-long-gone...I don't know who you are, but I like you already! Posted by Picasa
;

Thunder is rumbling outside, it's 7:30 pm on a thursday evening. I've had an 'airing of the quilt' here for the past couple days, and before I brought the quilt in, I thought I'd take some pics, and write about it's story.

Up the road from me about 20 miles is the tiny little town of Little Mountain, SC. I don't know why they even call it Little Mountain, because there IS no mountain there. However, there is a great antique mall and I love to wander the aisles and touch history. Not alot comes home with me, but one day I did happen up on this quilt....folded under a stack, all I saw was a bit of red and green calico and I had to dig further. Posted by Picasa
;

Tuesday, July 19, 2005

No Picture, just words...

I've been cranking on customer quilts which has left me.....cranky! Big exam in school tomorrow, should be studying. I have been binding on a couple things, and I did get the baby quilt sent off to my sister Mary, who's baby is due any day now. Sometimes I have so many things going on at once I feel like I'm just bailing out a leaky boat...not making much progress as it keeps filling back up again!

I did take some time to do a search for other quilt blogs. I seem to have missed the blog-trend by about 2 years according to the inactivity on most of them. And.....there weren't many that caught my eye. There seems to be a TON of knitting blogs, and quite a few art quilt blogs....but they just aren't me. So who am I? As a quilter?

Oh here we go, let's get deep! I feel a great connection to antique quilts and the women's hands who created them in the past. I look at the fabrics, trace the hand stitches....and wonder what their lives were like 150 years or so ago. I bet they never thought their quilt would travel this far this long into my hands.

I love making traditional quilts, but they have to have a ZINGER to get me to stay with them. I think that is why I like scrap quilts so much, lots of options to keep me from getting bored. I quilted a quilt for a customer that was 110X110 and contained only 3 fabrics. It was beautiful, but it looked preprinted it was so organized, know what I mean? Repeat, repeat, repeat...It was so HARD to force myself to keep quilting on it. It's GORGEOUS....but lifeless.

I like things a bit wonky, a bit crazy, a bit primitive, a bit outside the lines, and a bit maverick! But still recognizable as a QUILT and that is why I don't fall into the art quilt category. So out here in the midlands between traditional quilt making and art quilts....can be a lonely place to be...not quite a square peg, and not quite a round hole.

Are you this kind of quilter..if so, let me know I'm not alone out here! If you have a blog, invite me to come over. I'd love to see what else is out there!

Bonnie
;

Monday, July 18, 2005


The laminate flooring is DONE! All that is left is the trim and then we can put the furniture back Yehaww! While the boys were working, I retreated to a distant corner and finished the quilting and binding on Whirlygig Logs. I like it! I think it will have an 'older' feel after I wash it, but for now it is DONE DONE DONE! Posted by Picasa
;

Saturday, July 16, 2005


The flooring project downstairs has expanded into the familyroom! It's looking great, but there is no place to sit, all the furniture is crammed into the other living room, and the construction noise is pretty horrific so I am retreating to my quilting room! A Few weeks earlier I posted a pic of 1/2 log cabin quilt top that I had finished. I decided it would be a good candidate for quilting with an all over feathered frenzy. I've quilted whirly-gig feathers in the dark pinwheel areas, and butterfly shaped feathers in the lights. So far so good..lots of texture! I still am not happy with this quilt and how all the logs don't line up with eachother. I need to let that go and be more liberated, but that said...when it comes to log cabins, I think I'll stick with the purposely wonky ones, or regular ones where the logs go all the way around the center. 1/2 log cabins may be easy to construct, but they are not easy when it comes putting them together right! Posted by Picasa
;

Errata

~ Errata~
er⋅ra⋅ta
[i-rah-tuh, ] –noun
1. pl. of erratum.
2.a list of errors and their corrections inserted, usually on a separate page or slip of paper, in a book or other publication; corrigenda.
Origin: 1625–35clip_image002

Here you will find little corrections to the patterns found in my book patterns. Sometimes it happens and mistakes are made, even with several people going over every detail, working on the book and patterns together.

We hope you forgive us and understand that things happen! We admit we are not perfect and hope you will continue to enjoy our patterns - even though we overlooked a typo or misread the final draft before printing.

Please note that errors are corrected in subsequent printings and not all books contain these errors.

Scraps & Shirttails
Shirttails Pattern, page77:
  • The center square for the Union Square block should be cut 4-1/2", not 4". 4" is the finished size.
Perkiomen Daydreams Pattern, page 93:
  • 400 blocks are required for the diagram as shown on page 96. It only says 100! (oops!) You can tell by the pic that the quilt is set 20X20, not 10X10.

Adventures With Leaders & Enders
Scrap User's System, page 11:
  • The page says to cut bricks 2.5" X 3.5" and it should read cut bricks 2" X 3.5". The second size 2.5" X 4.5" is correct.
Hopscotch, Butterscotch, Page 67:
  • The strip set strips for the rectangle rail units should be cut at 14.5" instead of 13". The extra 1/2 inch is to give you enough to square up your strip set before cutting your rail units.
  • The 74 short border rectangles should be cut 2"X 5". The pattern says 2" X 4.5". The 2" squares are added to these short rectangles to make them equal to the size of the large rectangle which is cut 2" X 6.5".
  • The blocks finish at 7.5" so cut the sashings 8".
Happily Scrappily Irish, Page 85:

The cutting instructions for the background are as follows:

1. (6) 8" strips cut into (66) 5" x 8"rectangles
2. (4) 5" strips cut into (132) 2" x 5" rectangles
3. (14) 2" strips cut into (132) 2" squares

this needs to read as follows:

1. (9) 8" strips cut into (66) 5" x 8"rectangles (9 X 8=72)
2. (7) 5" strips cut into (132) 2" x 5" rectangles (7 X 21=147)
3. (7) 2" strips cut into (132) 2" squares (7 X 21=147)

Bow-Dacious, Page 43:
he caption under the top illustration should be:
Bow tie unit
Make 196

Scraps & shirttails II:

Goose In the Puddle, Page 12-13:
  • The Panel 1 and Panel 2 diagrams on the "Directions At A Glance" on page 13 are correct! But the paragraphs describing them on page 12 should read as follows:
  • A should read Dark/Light/Dark
  • B Should read Light/Dark Light
  • The 9 patches should look like those in Diagram C with the darks in the corners!
Smith Mountain Morning, Page 16-17:
  • On page 17 directions say to cut quantity 14 – 4 ¼” squares for both blue and brown. That should be 28 – 4 ¼” squares. These should be cut on the diagonal twice to yield 112  matched quarter square triangle pairs.
  • On page 19 – the directions at a glance for unit “G” it should say make 28 (not 14).
Fair & Square, page 23:
  • There is no 1/2 yard of light blue required in the fabric requirements.
  • I made my border with 2" strips for a border that finished 4.5". If you make them with 2.5" strips, your border will finish at 6". Either works great!
Oregon Or Bust, Page 74:
  • The 6 cornerstone (small) triangles for the outside edge of the quilt should be cut as 3 1/2"squares instead of 2 3/4" squares. Cut the 6-3 1/2" squares twice on the diagonal with an X to yield 24 sashing triangles.

String Fling:

Pineapple Crazy, Page 50:
  • Not sure how this happened, but the numbers on the pineapple foundation block are scrambled. I started in the center and worked out in rounds. Center/Corners/Sides/Corners/Sides, etc.
Talkin' Turkey Page 69:
  • The flying geese method shown will make FOUR geese units, not 2, so less cutting is needed.
  • The large square should measure 4 1/4'', not 4 1/2''. The smaller squares should measure 2 3/8''. 
  • Please note that the border diagram on page 73 and the photo on page 68 show the units colored the opposite of the geese units in the block, so you will need 216 units with RED large triangles and NEUTRAL corners to complete the border as shown.
  • If you have already pieced your geese with larger neutral triangles and small red wing triangles, never fear --sew them end to end --and it will just be your reds that have the seams in them instead of the neutral ones. It will not alter the quilt greatly at all.
String Frenzy:

Emerald City: Unit E, page 68.

The dyslexia fairy stepped in and rearranged the numbers.  You actually need 1080 green/neutral half-square triangle units instead of 1008.

You may also correct this number at Unit E, page 66.

Pine Tree Point PDF pattern:

For the tree base row 5 - cut the background rectangles 3'' x 4 1/4''.  I had originally planned on a tree trunk from a 2 1/2'' wide rectangle, but it was too fat.  When I skinned the trunk down, I needed to add a bit more to the background rectangles.  I didn't catch that in my pattern notes when typing up the instructions for row 5.  If you do them as written before pattern correction, you will be 1/2'' short in the length of your row 5.  Mistakes happen.  I thank you for your patience and understanding.  Pencil in the correct size of 3'' x 4 1/4'' on your pattern.

This has been corrected for future downloads. If you downloaded after 11/17/2020 your pattern should have the correct info.
clip_image004
;

Thursday, July 14, 2005


Liberated Shooflies! Digging through that drawer of snipped off triangles and small pieces, I made a handful of free-form shooflies and let them be as unsquare as unsquare could be, chopped off points and all! I wanted the shooflies to be 'child like' in construction. Sometimes I think things are so purposely wonky, that it looses it's effect...so these aren't WAY off, just enough to make you go, hmmmm.... :c) I framed them with 2 rows of 1.5" cut scrap strips log cabin style....when it came time to add the borders it just didn't have it! I've had so much fun quilting on the "best things" quilt with the letters in the border, and being inspired by my friend Tonya who is the word-queen of quilts....I decided to do words in the border. At first I was going to just do "shoo fly, shoo"...but it looked so unbalanced that I had to add the "flies in the buttermilk" to the upper corner. Posted by Picasa
;

Wednesday, July 13, 2005


Just a little peek at the quilting on the "best things" quilt. This is the first quilt where I have hand drawn feathers to fit an area, just freeform without templates, and then quilted what I drew. I like it! There is no way that this quilt shouts out "stencil!" at you. The diagonals in the border are only 1/2" apart. They are a bit wonky, but that's okay, the whole quilt is wonky. The two narrow borders, red and black, have zig zag lines, and the center has baptist fans. Everything is with purple thread and I'm loving how it is turning out. I need to spend more time on this project. I started quilting on the outside edge because of the way that the fans need to be quilted around and around. Thank heavens for machine basting! I can start at an edge and work either way without having to worry about puckers or fullness in the middle when I get there. I have two borders and their corresponding inner border areas and one row of the fans around two sides of the quilt center done so far! Posted by Picasa
;

Tuesday, July 12, 2005


Just a little quilt (27"X32") that I've called Lil'bit Crazy. There may be a whole series of these the way I'm feeling about my life lately! I have a drawer for little snips and pieces that are too big to toss, too small to categorize (smaller than 2.5" square, short strips and odd pieces) and I like to pull from these pieces and make crazy free form blocks. The triangles are snippings from joining bindings and borders on the diagonal...not trimmed to any specific size, just sewn 'wonky'. I made this in an afternoon after an excruciatingly mind numbing day at school. Brainlessly piecing is very liberating! I squared my little blocks up using a 5" ruler, so they finish at 4.5" square, 4 rows across, 5 rows down, slap on some borders and voila! I want to hand quilt this, but it will have to wait, I'm still hand quilting on "the best things" quilt. Posted by Picasa
;

Monday, July 11, 2005

What makes an art quilt an art quilt?

There is something in the quilt world in the works that has bothered me for some time. It seems wherever I go, be it a guild meeting, a quilt show, a quilt shop, a quilt list.....There is a rift, a division. There are definate cliques. There is this attitude that says "While we enjoy and admire more traditional quilts, this list, group, webring is not intended for quilters that focus on traditional quilting."

Frankly, I feel some quilt racism going on! Traditional quilt discrimination. Is there such a thing?

Maybe I should come up with a list guideline that says "While we enjoy and admire artsy fartsy quilts, this list, group, webring is not intended for quilters that focus on your so called artsy fartsy quilting if you can even call them quilts."

The quilt world is a strange section of society. There are groups for gay quilters, lesbian quilters, man quilters, wiccan quilters but one group that was the MOST discriminatory was a group of "conservative christian" quilters who would not let me join their group because my denomination was not christian enough, nor conservative enough for their likings. I was spammed with bible verses to supposedly set me straight, get me to repent, give up wearing pants and find the true way of conservative christian quilters. Good grief!

You know, I love quilting down to it's roots. Down to when people would share patterns, have quilting bees with potluck food, share fabric, life's stories, joys and sorrows...when things were not so divided. When quilts were made to cover people and beds, no matter how traditional or maverick they were (Just look at Ghee's Bend quilts and some of the other african american influences in quilts and tell me if they are not ART!) and copyrights were not to be feared nor claimed.

When did quilters start having to fit in to this category or that one? And what about those of us who are caught between more than one definition by the quilts that inspire us? What is the quilt world coming to anyway?

Bonnie
;

Friday, July 08, 2005


Sometimes ideas for big quilts end up as small ones when you lose the energy to keep going on them! A friend sent me a pic of a 9 patch quilt made in the 1870's and it had this poison green background and lots of madder browns in it. I loved it! I really wanted to make a bed sized quilt, but these 9 patches are only 3" and I got either bored with them, or intrigued by something else. They sat in a box for a year....I pulled them out yesterday after coming across that 1870's pic again and decided to just make them into whatever I could make them into and call it done. I think the small inner black border really frames it and the outter madder colored border warms the whole thing and tones down that green! Posted by Picasa
;

Tuesday, July 05, 2005


Close up of border fabrics for house quilt. I think I'll use more of the blackcheck for the binding....And for what it's worth, I've never put black, blue and yellow together before, but I kinda like it! :c) Posted by Picasa
;

Borders are on! This is what I decided to do. I liked the blocks laid without sashings, but I didn't leave enough floating space from squaring up the blocks to put them next to eachother. Next time I will twist and turn them with deeper triangles so that when I square them up there will be more than 1/4" from the edge of the center block. I found the black-on-black checked sashing fabric at Joann's yesterday and it was 30% off and worked perfect. The blue cornerstones came from my stash, as did the yellow inner border. The outter border is a black/blue check with stars on it..daisy kingdom! I thought it was pretty horrid when I bought it, but walmart was closing it out at $1.00 a yard. I was using it on the back of neonatal intensive care quilts...They wanted dark backs to make the incubators darker when they covered them with the baby quilts. Long story short...I never thought this fabric would be perfect to show on the FRONT of anything! *LOL* Who knows when this will get quilted, but I'm thinking of what kind of quilting to do on it... Posted by Picasa
;

Monday, July 04, 2005

Fourth Of July!

Let your patriotism shine with this scrappy red, white, and blue lap quilt. The use of simple 4-patch blocks and those with stitch-and-trim corners make it an easy quilt, but one that will dazzle the eye and warm the heart. Get ready to snuggle under the fireworks!

4thfull1

Quilt Size: 60” x 72”

Block Size: 6''.

©2005 Bonnie K Hunter. All Rights Reserved.


The large lap quilt shown here is made using 80 blocks set 8 blocks across by 10 blocks down.

Two bold color families, medium to dark reds and blues, and a common white or light fabric will make this a spectacular quilt. Because it uses scrappy fabrics, it’s the perfect project for a collection of red and blue fat quarters.

Click HERE for Printer-Friendly PDF.

4thcuttingchart1

4thsewingchart1

4thblocka

BLOCK A (make 40) Make four-patch blocks using (2) different red and (2) different blue 3 ½” squares. For easy matching, press seams in alternating directions. Completed 4-patch blocks should each measure 6 ½” square.

4thblockb14thblockb2

Block B Block B & Block C

BLOCK B (make 38, 1 red & 1 blue triangle) and BLOCK C (make 2, both triangles are red) You will use the stitch-and-trim technique to make triangle in two corners of the B and C blocks.

On the back of the 3 ½” squares, draw a diagonal pencil line from one corner to the other. This will be your stitching line.

With right sides together, place a red 3 ½” square in the corner of the large 6 ½” square, lining up the edges and outside corner. Sew on the pencil line from corner to corner as illustrated. Trim off the corner, leaving a ¼” seam allowance. Press toward the triangle.

Repeat in the opposite corner using a blue 3 ½” square. Trim and press toward triangle. Blocks should each measure 6 ½” square. For Block C, use 3 ½” red fabric squares in both corners.

4thcenterblocks

Assembling the Quilt : Finish your quilt by arranging the A, B, and C blocks 8 blocks across by 10 blocks down (arranging blocks as illustrated at the top of this page—watch position of red and blue fabrics—the two C blocks are positioned in the center as shown here).


Ramona with her finished top at Quiltville Inn!

Borders and Finishing:

Border #1 is made by cutting (6) 2 ½” x width of fabric strips Border #2 is made by cutting (6) 4 ½” x width of fabric strips

Click here for more border attaching hints!

Quilt as desired and bind using (8) 2 ½” x width of fabric strips to make French-fold binding.

Click here for a tutorial on applying binding!


;