I know we have many NEW bloggers this time around, and it makes it so exciting to discover who you are and where you live and what you do –
I want to welcome you for joining in and for including the badge for the Easy Street Mystery in your blog side bars.
The reason WHY you want to use the provided code that is found in the box below the side bar photo is that it will automatically link back here where others can find the directions for the mystery too.
It does more than just say you are participating -- it shows others the way to get here so they can participate as well. They just have to click your side bar badge!
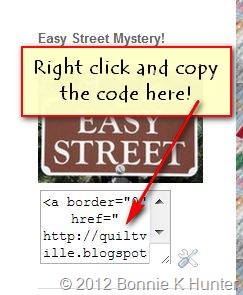
The first thing you need to do is find the badge with the code in box below it in my right side bar. It looks like this:
Right click in the text box and choose the option "SELECT ALL,” The code in the box will be highlighted blue. Right click it again, and select COPY.
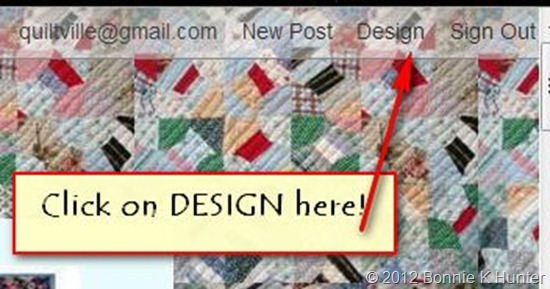
Scroll back up to the top of your browser page, and left click on DESIGN.
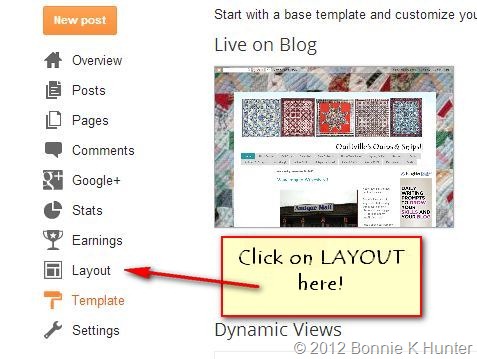
A page with a menu opens up like this….left click to choose LAYOUT!
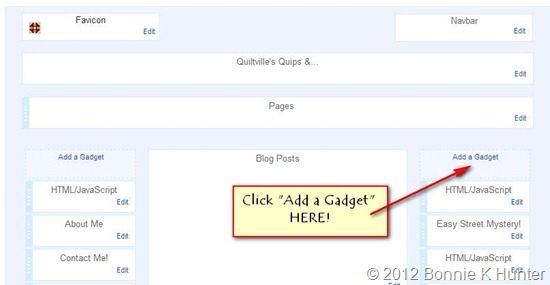
This is the layout for your whole blog!
Click Add a Gadget ---If you have two columns you can choose it on either side.
The gadget menu will open up – scroll down to find HTML/JavaScript and click the +
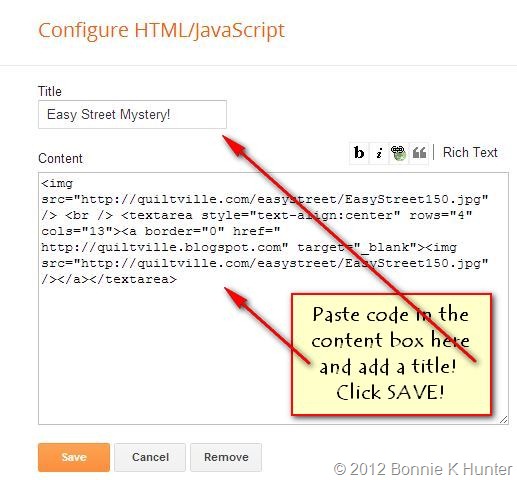
A small box will open up! Put the title or any text you want in the title box – and then right click and choose PASTE to put the saved code into the content box.
Click SAVE and you are good to go!
To change the placement of where your badge appears in your side bar, go back to the layout page. You can click and drag your widgets into the order that you want them to be.
Click PREVIEW and it will open in another browser page to show you what it will look like. If you don’t like it – simply hit CLEAR!
When you like what you’ve got – click SAVE ARRANGEMENT and you are good to go!
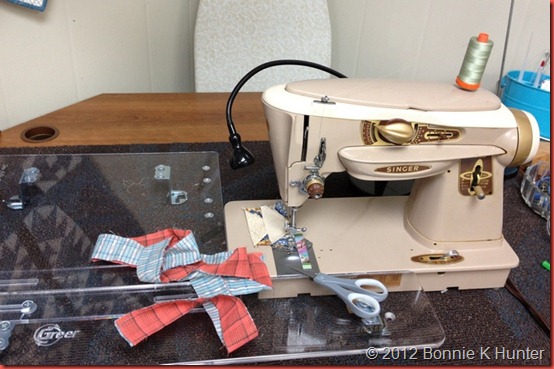
Things around here are moving quickly! I’m off to the post office in a few, and then heading into High Point to take Missy the Magic Bus featherweight to get her timing adjusted. I’ll be back and eager to sew for Quilt-Cam tonight..look who I’ve got up and running:
I checked her serial number out and she’s a 1963! That means the search for the elusive 1962 machine is still ON!
See you at 9pm Eastern--



She's a beauty! Thanks for the tutorial.
ReplyDeleteMy son found a Rocketeer 500A at a yard sale this past summer in a cabinet for $20. Her serial number shows that she was made in Anderson, S.C. in 1961. My birth year is 1960, so I missed mine my one year too. She actually stays in the back of my family room with a lamp and small quilt on her, in case I want to sew while hubby is watching TV. Thanks for all you do Bonnie!
ReplyDeleteThanks for the tute, I found out what I was doing wrong. Love, love the new machine - she looks so space age 60's. I'm off to take my featherweight in for a tune up, she also was skipping stiches. Just hoping I can resist the other machines he has for sale. He's got a 301 and 401A listed on Kijiji.
ReplyDeleteLove your vintage Rocketeer machine! Question, how do you get to your ironing board that is wedged in the corner behind your desk? Just curious---I have 140 of my Easy Street 4 patches finished!
ReplyDeleteCould not have done it without the tutorial!!
ReplyDeleteGee Bonnie.... If being a '63 makes her unworthy, she can come live at my house! ;) Us soon-to-be "golden girls" gotta stick together! I am on the lookout for a workhorse like her to share my sewing room!
ReplyDeleteThanks for the tutorial. I thought you'd want to know that the badge opens to this page, not the 'home' page for Easy Street.
ReplyDeleteCarol, you are right. I fixed mine. If you want to fix yours, go back to your layout page, choose edit next to your gadget, and in the code for the first instance of "http://quiltville.blogspot.com" just type in "/p/easy-street-mystery.html" (not including the quotation marks), save and it will take you to the correct page. HTH.
DeleteThank you for the tutorial. Way cool machine. Reminds me of The Jetsons era.
ReplyDeleteGot my QUILTMAKER mag today!~ Love the "Ceiling Fan" :)
ReplyDeleteThank you, Thank you, Thank you, for the tutorial. I tried the other day and could not get it. One of these days I won't be soooo
ReplyDeletecomputer illiterate LOL.
Mary aka Tosty
I was born in December 1963...you can always pass it my way as you continue your search for a 1962! :) :)
ReplyDeleteI'm sure you'll find the elusive 1962 one day - I found a 1953 Featherweight after all... Well actually I found a Featherweight which then turned out to be a 1953 model - like me!!! Lynne.
ReplyDeleteThat is the machine I learned to sew on! My mom still uses it EVERY DAY - she actually got an extra - for parts "just in case" - but I don't think she has ever needed to have it repaired. Can't beat that all-metal construction!
ReplyDeleteDoes it have to be this particular machine (500A) for 1962 or ANY sewing machine made in 1962? Linda
ReplyDeleteThanks for the tute Bonnie. This new blogger is much easier than when we started our blogs all those moons ago! I'd love to collect some older machines, but then I'd have no room for the family LOL.
ReplyDeleteMMMM, it's like me still looking for the 1951 pink Chevy. Most were black in those days, but then I have a picture of me sitting on the wheelcase... Saving up pennies but I am sure I will ever hit this jackpot =^}
ReplyDeleteSee it this way: when the machine's feet walked, you were running stitches! "63 will do if you look at this "blueberry yoghurt" color machine. So beautifull, reminds me of Doris Day's doggy in the window....
From a dark and cold Amsterdam,
love Irene
I have a machine that looks exactly like that! Sadly the tension is kaput on it and there is no one local who has and can replace the necessary parts for me. They are HEAVY machines!
ReplyDeleteThe tutorial looks great.....but I am just not able to comprehend how to do it.....I've been trying so many times but just cannot get "linky" things to my Blog, hence why I don't write on my Blog, but as I have started Easy Street I really want an easy way to Blog like so many others. Maybe because my computer skills are self taught and 62yo......I need a teenager brain. Well back to crying on Easy Street.
ReplyDeleteThank you! Thank you! Thank you! I've wondered how people did that, and with your directions, I did it in about a hot minute. :) If you think there'd be enough interest and you wanted to do it, I've also wondered how you get the copywrite message to show up on your pics.
ReplyDeleteThanks again for this great tutorial!!!
ReplyDeleteThank you! Thank you! Thank you! I've wondered how people did that, and with your directions, I did it in about a hot minute. :) If you think there'd be enough interest and you wanted to do it, I've also wondered how you get the copywrite message to show up on your pics.
Thanks again for this great tutorial!!!
I coppy hvat Nan say. I read your blog every day and love it!! I have don the last mystery and told my frends about you.
TWO squeals of delight . . . ONE, your EXPERT instructions worked!! I dusted off my blog and decided I wanted to participate in the linky. SECOND, I have a 500A Rocketeer too. I just e-mailed SingerCo to find out the date of mine (NC 106091). IF it is a 1962 and you have a 1963 (MY birth year) would you want to trade while in Plano, TX? I'm signed up for the mystery on the 1st. Just throwin' the offer out there.
ReplyDeleteBonnie, thank you so much. I have been wondering how to do this for ages and you have made it so easy! I also appreciated your tutorial on Linky and will be using that process from now on. Regards, Tracy.
ReplyDeleteThank you for everything you have given us.
ReplyDelete